
Stitch Your Own Stylish Hexagon Coaster
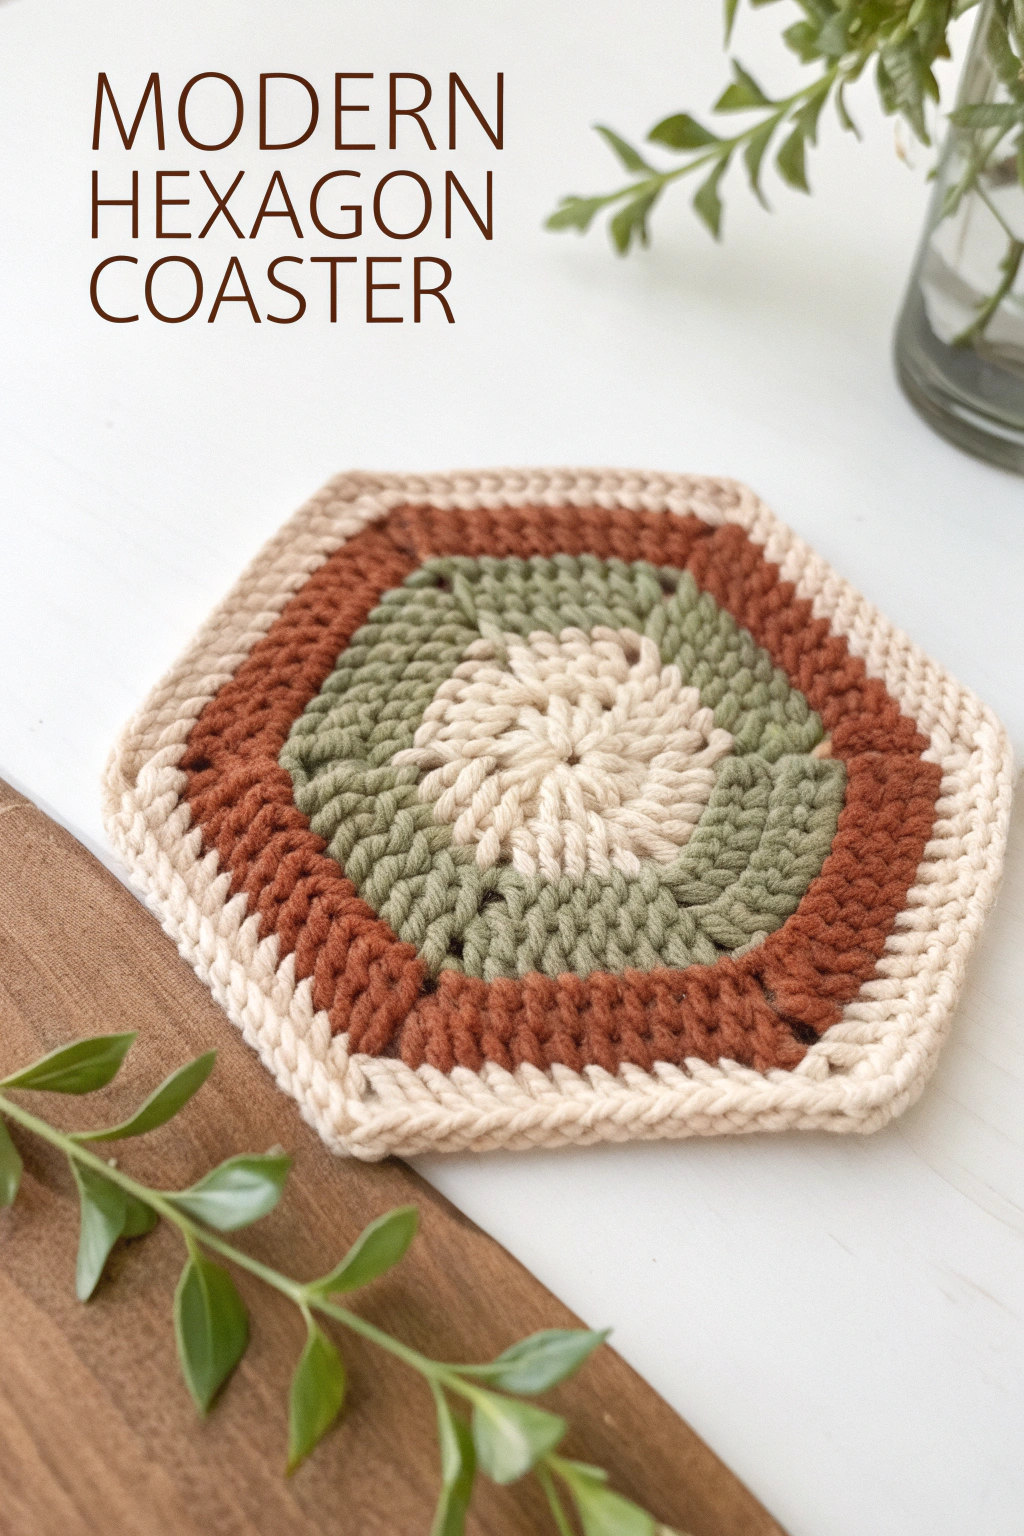
Bringing personally crafted items into your home adds a special touch of warmth and care. Imagine the gentle satisfaction of placing your morning tea or coffee onto this lovely, sturdy coaster, knowing you skillfully made it yourself! The Modern Hexagon Coaster, exactly as shown in the picture, is a wonderful undertaking for anyone beginning their journey with crochet. Its neat geometric form and the appealing, earthy color scheme (featuring cream, light green, and rust) lend it a fresh, contemporary style. Let’s collect our materials and begin this rewarding activity together!
What You’ll Need
Before we start stitching, let’s get everything ready. You don’t need much!
- 🧶 Worsted or Aran weight cotton yarn in three colors: Cream (Color A), Light Green (Color B), Rust (Color C). (The coaster in the image uses these specific weights and colors).
- 🧶 A crochet hook sized appropriately for your yarn – typically a 5.0mm (H-8) or 5.5mm (I-9) hook works well for this yarn weight.
- ✂️ A small pair of scissors for snipping yarn.
- 🪡 A yarn needle (also called a tapestry needle) for weaving in the ends neatly.
Getting Started: Basic Stitches & Terms
This pattern uses US crochet terminology. Here are the fundamental techniques we’ll be using, explained simply:
- Magic Ring (MR): This is a popular way to start projects worked in the round, leaving no hole in the center. If you’re new to this, you can search for video tutorials online, or use the alternative: Chain 4, and join with a slip stitch to the first chain to form a small ring. You’ll work your first round of stitches into this ring.
- Chain Stitch (ch): This is the most basic crochet stitch, forming loops. You simply yarn over your hook and pull the yarn through the loop already on your hook. We use this to start rounds and sometimes to form spaces.
- Slip Stitch (sl st): This stitch is used to join parts of your work, often at the end of a round. Insert your hook into the indicated stitch, yarn over, and pull the yarn through both the stitch and the loop already on your hook in one motion. It’s very flat.
- Double Crochet (dc): This is one of the taller basic stitches and forms the main fabric of our coaster. To make one: Yarn over your hook, insert the hook into the stitch where you want to work, yarn over again and pull up a loop (you should have 3 loops on your hook). Yarn over, pull through the first 2 loops on your hook. Yarn over one last time, and pull through the remaining 2 loops on your hook. That’s one double crochet!
- Single Crochet (sc): A shorter stitch used for the border. Insert your hook into the stitch, yarn over, pull up a loop (2 loops on hook). Yarn over, pull through both loops on the hook.
- Working in the Round: Instead of working back and forth in rows, we’ll be working in circles (well, hexagons!) that grow outwards from the center point.
- Changing Colors: When the instructions say to change color, complete the very last step of the final stitch of the round before the change using the new color. Then proceed with the starting chain or slip stitches of the next round in the new color. Snip the old color, leaving a tail to weave in later.
- Corner Space (ch-1 sp): In this pattern, the corners of the hexagon are formed by working several stitches into a space made by a single chain stitch in the previous round. We’ll call this the “ch-1 sp” or “corner space”.
Let’s Make the Hexagon Coaster!
We will build the coaster round by round, changing colors as specified to match the design in the image.
Round 1 (Center – Color A: Cream)
- Start with a Magic Ring (or ch 4 and sl st to form a ring).
- Ch 3 (this counts as your very first dc stitch of the round – remember this!).
- Work 1 dc into the ring.
- Ch 1.
- [Work 2 dc into the ring, then ch 1]. Repeat this step 5 more times.
- You should now have 6 clusters of 2 dc stitches, each separated by a ch-1 space.
- To finish the round, sl st into the top of the initial ch-3 you made at the beginning. Pull gently on the starting tail if using a Magic Ring to close the center hole tightly. (Result: 6 sets of [2 dc, ch 1], totaling 12 dc and 6 ch-1 spaces)
Round 2 (Color B: Light Green)
- Change to Color B (Light Green) before making the slip stitch into the next space.
- Sl st into the first ch-1 space (the space between the first two dc clusters from Round 1).
- Ch 3 (counts as your first dc).
- In the same ch-1 space, work (1 dc, ch 1, 2 dc). This forms your first corner of the hexagon!
- [Move to the next ch-1 space. In that space, work (2 dc, ch 1, 2 dc)]. Repeat this step 5 more times, working into each ch-1 space around.
- To finish, sl st into the top of the initial ch-3. (Result: 6 corners, each containing [2 dc, ch 1, 2 dc]. Total 24 dc and 6 ch-1 corner spaces)
Round 3 (Color C: Rust)
- Change to Color C (Rust).
- Sl st into the first ch-1 corner space.
- Ch 3 (counts as first dc).
- In the same corner space, work (1 dc, ch 1, 2 dc) – your first corner of this round.
- Now work 1 dc into each of the next 4 dc stitches along the side of the hexagon.
- [In the next ch-1 corner space, work (2 dc, ch 1, 2 dc). Then, work 1 dc into each of the next 4 dc stitches along the side]. Repeat this step 4 more times.
- Work the final corner: (2 dc, ch 1, 2 dc) in the last ch-1 space.
- Work 1 dc into each of the remaining 4 dc stitches on the last side.
- Sl st into the top of the initial ch-3 to join. (Result: 6 sides, each with 8 dc stitches between the corner ch-1 spaces. Total 48 dc and 6 ch-1 corner spaces)
Round 4 (Color A: Cream)
- Change to Color A (Cream).
- Sl st into the first ch-1 corner space.
- Ch 3 (counts as first dc).
- In the same corner space, work (1 dc, ch 1, 2 dc).
- Work 1 dc into each of the next 8 dc stitches along the side.
- [In the next ch-1 corner space, work (2 dc, ch 1, 2 dc). Then, work 1 dc into each of the next 8 dc stitches along the side]. Repeat this step 4 more times.
- Work the final corner: (2 dc, ch 1, 2 dc) in the last ch-1 space.
- Work 1 dc into each of the remaining 8 dc stitches on the last side.
- Sl st into the top of the initial ch-3. (Result: 6 sides, each with 12 dc stitches between corners. Total 72 dc and 6 ch-1 corner spaces)
Round 5 (Color C: Rust)
- Change to Color C (Rust).
- Sl st into the first ch-1 corner space.
- Ch 3 (counts as first dc).
- In the same corner space, work (1 dc, ch 1, 2 dc).
- Work 1 dc into each of the next 12 dc stitches along the side.
- [In the next ch-1 corner space, work (2 dc, ch 1, 2 dc). Then, work 1 dc into each of the next 12 dc stitches along the side]. Repeat this step 4 more times.
- Work the final corner: (2 dc, ch 1, 2 dc) in the last ch-1 space.
- Work 1 dc into each of the remaining 12 dc stitches on the last side.
- Sl st into the top of the initial ch-3. (Result: 6 sides, each with 16 dc stitches between corners. Total 96 dc and 6 ch-1 corner spaces)
Round 6 (Border – Color A: Cream)
- Change to Color A (Cream).
- Ch 1 (this starting chain does not count as a stitch).
- Work 1 sc in the same stitch where you made the slip stitch.
- Work 1 sc into each dc stitch along the first side (that’s 18 sc total across the stitches of the corner + the side).
- When you reach the corner ch-1 space, work (1 sc, ch 1, 1 sc) all into that same corner space. This sharpens the hexagon point.
- [Work 1 sc into each dc stitch along the next side (18 sc). Then, in the next corner ch-1 space, work (1 sc, ch 1, 1 sc)]. Repeat this step 4 more times.
- Work 1 sc into each remaining dc stitch on the last side (18 sc).
- To finish the round perfectly, sl st into the very first sc you made (not the starting ch 1). (Result: A neat sc border defining the hexagon shape, with sharp ch-1 points at each corner)
Finishing Touches
- Fasten off your yarn: Cut the yarn leaving about a 6-inch tail. Yarn over your hook one last time and pull the tail completely through the loop on your hook. Pull it tight to secure the knot.
- Weave in Ends: Thread each yarn tail onto your yarn needle. Weave the needle back and forth through the backs of the stitches of the same color for an inch or two. Try to change direction once or twice to make it extra secure. Snip off any remaining excess yarn close to the fabric. Taking the time to weave in ends neatly makes your finished piece look professional! A little tip: try weaving in the ends as you finish each color round to avoid having lots to do at the very end.
- Your coaster might curl slightly. You can gently flatten it with your hands. If needed, you can ‘block’ it by lightly misting it with water, shaping it flat, and letting it air dry completely.
Admire Your Handiwork!
And there you have it! A gorgeous, modern hexagon coaster, put together by you. Following the rounds carefully results in the distinct color pattern and hexagonal shape you see in the picture. The double crochet stitches give it substance, and the final single crochet round provides a clean finish.
Now, pour yourself a favorite drink and admire the lovely coaster you fashioned! It’s not just a practical item; it’s a little piece of handmade joy. Feel free to experiment with different color combinations for your next one! We’d love to see the coasters you make – share them with pride! Happy stitching!