
Stitch Your Own Sunny Mat
Ever looked at a beautifully handcrafted item and thought, “I wish I could make that”? Well, today is your day! We’re going to journey together, stitch by stitch, to fashion the absolutely charming Mini Mat you see in the picture. This project is a wonderfully satisfying way to dip your toes into the world of knitting, and you’ll end up with a practical and pretty piece, perfect for your morning cuppa or as a sweet handmade gift.
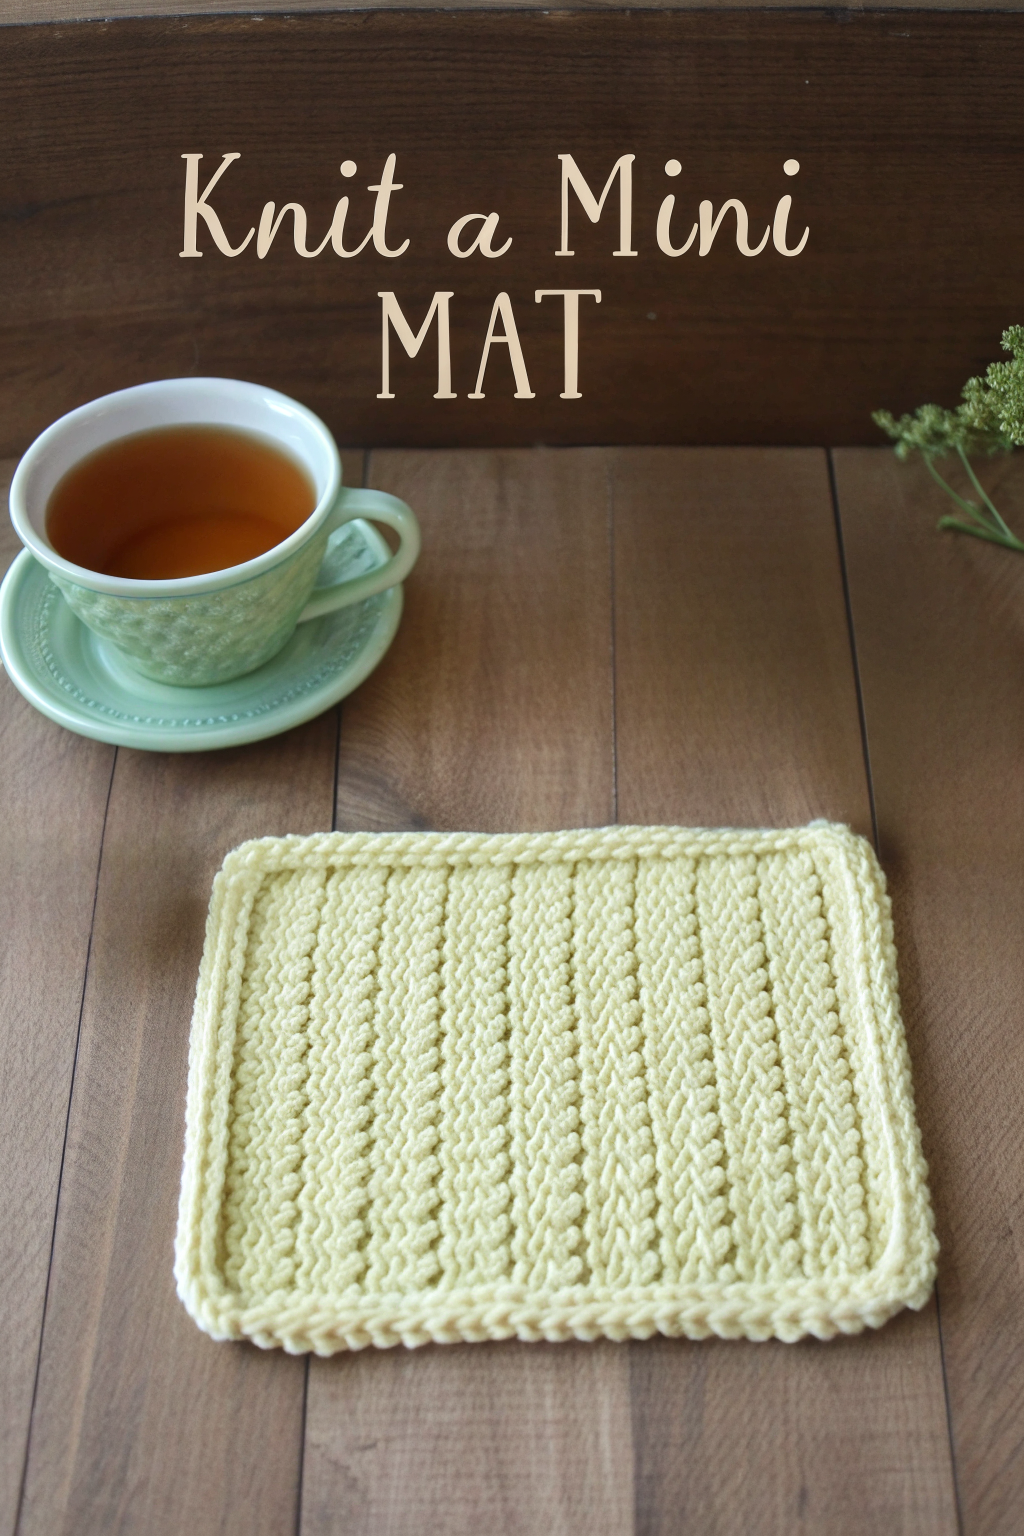
The mat showcases a cheerful light yellow hue, bringing a little bit of sunshine to any surface. Its main body features distinct vertical columns of raised knit stitches alternating with recessed purl stitches, which form a classic 2×2 rib. A sturdy garter stitch border frames the entire piece, giving it a neat and tidy finish. It’s a simple yet elegant design, and I’ll guide you through every step to replicate it!
What You’ll Need to Gather
Before we begin, let’s assemble our tools and materials. For this Mini Mat, you will want:
- 🧶 Yarn: Worsted weight yarn (Category 4). The mat in the image is a lovely light yellow, but feel free to pick your favorite color! A cotton or cotton blend yarn is excellent for mats as it’s durable and absorbent. You won’t need a whole skein.
- 🥢 Knitting Needles: Size US 7 (4.5 mm) or US 8 (5.0 mm) needles are generally a good match for worsted weight yarn. The goal is to get a fabric that’s firm but not stiff.
- ✂️ Scissors: For snipping your yarn.
- 🧵 Tapestry Needle (or Darning Needle): This is essential for weaving in those yarn ends neatly when you’re all done.
Before You Begin: Knitting Know-How
If you’re brand new to knitting, welcome! Let’s quickly go over the basic building blocks you’ll use for this mat. Don’t worry, they’re easier than they sound!
- Casting On: This is how you get your very first loops of yarn onto your knitting needle to start your project. Think of it as laying the foundation stones for your little mat. There are many ways to cast on; a simple “long-tail cast-on” or “thumb method cast-on” is great for beginners (lots of video tutorials online!).
- Knit Stitch (k): This is the star of the show! To make a knit stitch, you insert your right-hand needle into the front of the first loop on your left-hand needle (from left to right). Wrap your working yarn around the tip of the right-hand needle, and then pull that yarn back through the original loop, forming a new loop on your right-hand needle. Let the old loop slip off the left-hand needle. Voila! One knit stitch done. It looks like a little ‘V’.
- Purl Stitch (p): The knit stitch’s best friend! For a purl stitch, bring your yarn to the front of your work. Insert your right-hand needle into the first loop on your left-hand needle from right to left (through the front of the loop). Wrap the yarn around the tip of the right-hand needle, and then push the needle back through the loop, bringing the new yarn loop with it to the back. Let the old loop slip off. Purl stitches look like little horizontal bumps or dashes.
- Garter Stitch: This wonderfully simple and squishy texture is what forms the border of our mat. You achieve garter stitch by knitting every stitch of every row. Easy peasy!
- 2×2 Rib Stitch: This pattern is what fashions the textured main body of the mat. It’s made by alternating two knit stitches with two purl stitches (K2, P2). This sequence is repeated across the row. On the next row, you’ll work the stitches so the columns line up – knitting the V’s and purling the bumps as they face you.
- Right Side (RS) and Wrong Side (WS): The “Right Side” is the front or public-facing side of your work. The “Wrong Side” is the back. For this pattern, your garter stitch border will look the same on both sides, but your ribbed panel will have distinct knit columns on the RS.
- Binding Off (Casting Off): This is how you securely finish your knitting, taking the live loops off your needle so your lovely mat doesn’t unravel.
- A Note on Gauge: Gauge refers to how many stitches and rows fit into a certain measurement (like 4 inches). For this mini mat, exact gauge isn’t super critical, so you can relax and enjoy the process. However, being consistent with your tension will result in a more even fabric.
Let’s Get Knitting: The Sunny Mat Pattern
Alright, yarn and needles at the ready? Let’s begin to bring this sunny mat into being! We’re aiming to make a mat with a 4-stitch garter border on all sides and a central panel of 2×2 ribbing. The mat in the image has 6 columns of the raised (knit) rib.
Finished Size (approximate): About 6 inches x 6.5 inches, depending on your yarn and tension.
Instructions:
- Cast On: Using your chosen cast-on method, cast on 32 stitches.
- Bottom Border (Garter Stitch): This border is plain garter stitch. Rows 1-8: Knit all 32 stitches. (You will have 4 garter ridges on each side of the fabric after these 8 rows).
- Main Body (Garter Border with 2×2 Rib Center): Now we will introduce the rib pattern for the center of the mat, while keeping the garter stitch borders on each side. Remember, the garter stitch border stitches are knitted on every row.
- Row 9 (RS): K4 (this is your side border), then begin the rib pattern: (K2, P2) – repeat this (K2, P2) sequence a total of 6 times across the next 24 stitches. Then, K4 (this is your other side border). (So, it’s: K4, K2, P2, K2, P2, K2, P2, K2, P2, K2, P2, K2, P2, K4)
- Row 10 (WS): K4 (side border), then work the rib pattern for the wrong side: (P2, K2) – repeat this (P2, K2) sequence a total of 6 times across the next 24 stitches. Then, K4 (side border). (So, it’s: K4, P2, K2, P2, K2, P2, K2, P2, K2, P2, K2, P2, K2, K4)
Repeat Rows 9 and 10 another 15 times (for a total of 16 repeats, or 32 rows in this main body section). Or, continue repeating Rows 9 and 10 until the main ribbed section (from the bottom border to your needles) measures approximately 4.5 – 5 inches, ending after a Row 10 (WS row). This will ensure your mat is nicely proportioned.
- Top Border (Garter Stitch): Time to match the bottom border. Next 8 Rows: Knit all 32 stitches. (This will give you another 4 garter ridges).
- Bind Off: Bind off all stitches. Try to bind off not too tightly and not too loosely – aim for the same tension as your knitting. Leave about a 6-inch tail of yarn for weaving in.
Finishing Touches
You’re almost there! The last step is to give your mat a polished look.
- Weave in Ends: Thread the yarn tails (from your cast on and bind off) onto your tapestry needle. Weave them discreetly into the back of your work for a few inches, going in different directions to secure them. Snip any remaining excess yarn close to the fabric.
A Few Friendly Tips
- Count Your Stitches: Especially when starting out, it’s a good habit to count your stitches at the end of every few rows to make sure you still have 32.
- Dropped Stitches: If a stitch slips off your needle, don’t panic! A crochet hook can be your best friend for picking it back up.
- Tension: Try to keep your yarn tension even. If your knitting is too tight, it can be hard to work the stitches and the fabric will be stiff. Too loose, and it might look a bit holey. You’ll find your rhythm!
- Mistakes Happen: Even experienced knitters make mistakes! Learning to spot and fix them is part of the journey. Often, you can “tink” (knit backwards) to undo stitches one by one.
Warm and Fuzzy Feelings
And there you have it! Your very own hand-knitted Mini Mat, ready to add a touch of handmade charm to your space. Take a moment to admire your handiwork. Feel the lovely texture and know that you transformed a simple strand of yarn into this beautiful and useful piece. Isn’t that a wonderful feeling?
We hope you enjoyed this little knitting adventure. Go ahead, put your new mat to use, or perhaps gift it to someone special. We’d love to see your finished mats! Happy knitting!