
Tan & Cream Dream: Crochet Your Striped Tote
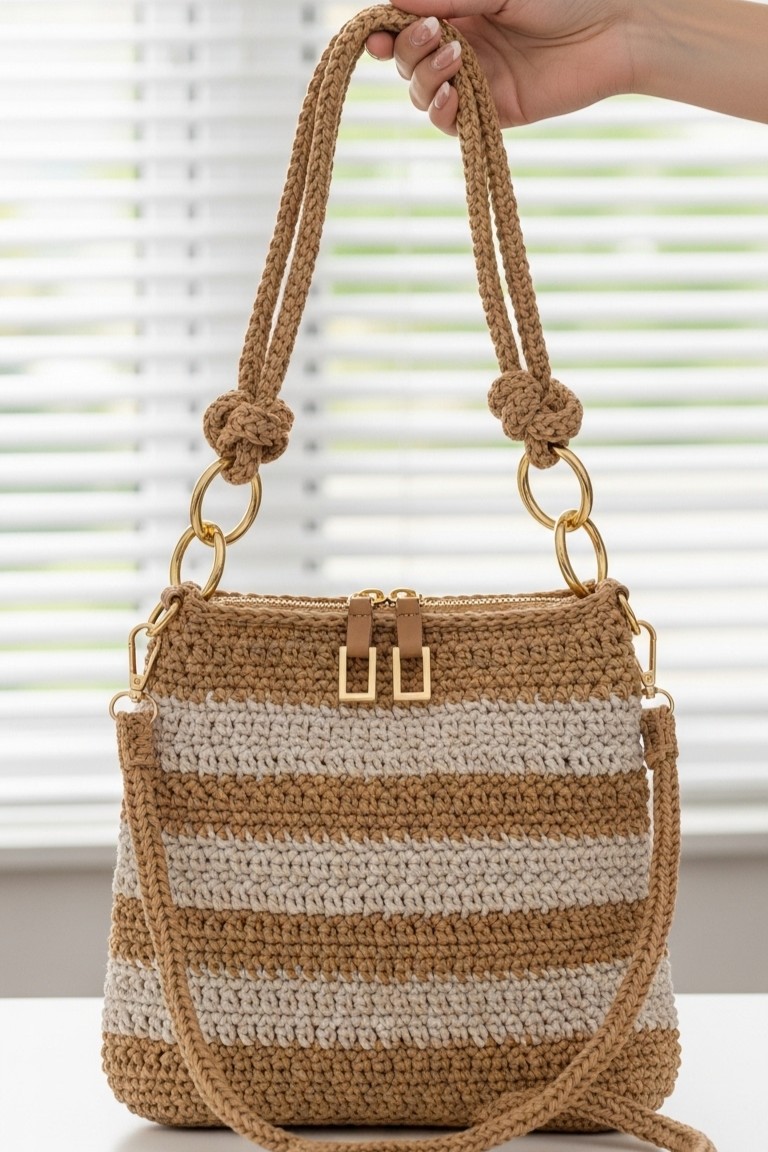
Ever wished you could make a chic, handmade bag like those you admire? Your wish can come true! Join us on an exciting journey to crochet this stunning Striped Tote Bag, just like the one pictured, using only yarn and a hook. This deeply satisfying project will leave you with a stylish accessory you’ll be proud of – get ready for the compliments! Featuring smart tan and off-white stripes, elegant gold-tone hardware, and versatile carrying options, this bag is a true showstopper. Let’s gather our materials and start crocheting some joy!
Gather Your Supplies
Before we dive in, let’s get all our bits and bobs ready. For this specific bag, you will need:
- 🧶 Yarn: Chunky cotton or a sturdy macrame-style cord in two colors: Tan (Color A) and Off-White/Cream (Color B). You’ll need approximately 200-250 yards of each, depending on your tension and final bag size. The yarn in the image is robust, giving the bag excellent structure.
- 🪝 Crochet Hook: A 5.0mm (H-8) or 5.5mm (I-9) hook, or the size recommended for your chosen yarn to achieve a firm fabric.
- ✂️ Scissors
- 🧵 Tapestry Needle: For weaving in ends and assembling.
- 📏 Measuring Tape
- ✨ Zipper: One tan-colored nylon or metal zipper, approximately 12-14 inches long (or to match the width of your bag). The zipper in the image has two gold-tone pulls, and each pull is adorned with a tan leather-like tab and a rectangular gold-tone metal piece.
- ⭕ O-Rings: Four gold-tone O-rings, approximately 1.5 inches in diameter. (Two for the front top corners, two for the back top corners).
- 🔗 D-Rings: Two gold-tone D-rings, approximately 1 inch wide.
- 🦞 Lobster Clasps: Two gold-tone lobster clasps, sized to fit your D-rings.
- 💡 Optional: Stitch markers to keep track of stitches or rows.
- 💡 Optional: Fabric for lining (if desired), plus needle and thread for sewing the lining.
Essential Crochet Know-How (For Absolute Beginners)
Don’t worry if you’re new to crochet! These are the basic building blocks you’ll use. We’ll go through them step-by-step.
- Slip Knot: This is how you get the yarn onto your hook to start. Make a loop with your yarn, lay the tail end over the working yarn (the yarn coming from the ball). Insert your hook through the loop, catch the working yarn, and pull it through the loop. Pull the tail and working yarn to tighten the knot onto your hook.
- Chain Stitch (ch): This forms the foundation of your project or adds height at the beginning of rows. With the slip knot on your hook, use the hook to grab the working yarn (this is called a “yarn over” or yo) and pull it through the loop that’s already on your hook. That’s one chain stitch! Repeat for the number of chains needed.
- Single Crochet (sc): This is the primary stitch for this bag, producing a dense, sturdy fabric.
- Insert your hook into the indicated stitch (for the first row, this will be a chain; for subsequent rows, it will be a stitch from the row below).
- Yarn over (wrap the yarn over your hook from back to front).
- Pull the yarn through the stitch. You will now have two loops on your hook.
- Yarn over again.
- Pull the yarn through both loops on your hook. That’s one single crochet!
- Working in Rows: When you reach the end of a row, you’ll usually chain 1 (this is a turning chain and doesn’t count as a stitch for single crochet) and then turn your work physically around so you can start the next row, working back across the stitches you just made.
- Changing Colors: To get those crisp stripes, you’ll change colors at the end of the last row of the current color. Work the very last single crochet of the row until you have two loops left on your hook. Then, drop the current color, pick up the new color, yarn over with the new color, and pull it through the two loops on your hook to complete the stitch. Now you’re ready to continue with the new color.
- Fastening Off: When you’ve finished a piece, cut the yarn, leaving about a 6-inch tail. Yarn over with the tail and pull it all the way through the loop on your hook to form a knot. Pull tight.
- Weaving in Ends: Use your tapestry needle to thread the yarn tails and weave them back and forth through the backs of your stitches for a few inches to secure them and make your work neat.
Let’s Get Hooking Your Tote Bag!
This bag is constructed from a main panel (which forms the front, base, and back) and two side panels. These pieces are then seamed together.
Understanding Gauge
Gauge isn’t super critical for a bag as it is for a garment, but it’s good to know. It refers to how many stitches and rows fit into a certain measurement (e.g., 4 inches). If your gauge is very different from what you expect, your bag will be a different size. Make a small swatch (e.g., 15 stitches by 15 rows) and measure it. For this bag, a tight, firm fabric is desirable.
Making the Main Panel (Front, Base, and Back)
This panel features alternating stripes of Color A (Tan) and Color B (Off-White), each stripe being three rows thick. Let’s aim for a finished bag width of approximately 12 inches, height of 10 inches, and depth of 4 inches.
- With Color A (Tan), chain 46. (This is an example; adjust for your desired width. If 4 sc = 1 inch, then 12 inches = 48 stitches. Ch 49 to get 48 sc after working into the 2nd ch from hook. I’ll use 46 ch for approx 45 sc for this example, adjust as needed).
- Row 1: Sc in the 2nd chain from the hook and in each chain across. (You’ll have 45 sc). Ch 1, turn.
- Row 2-3 (Tan): Sc in each stitch across. (45 sc). At the end of Row 3, ch 1, turn.
- Change to Color B (Off-White): Work the last sc of Row 3 until 2 loops are on the hook. Drop Color A (don’t cut, carry it up the side if you prefer, or cut and rejoin later), yarn over with Color B, and pull through both loops to complete the stitch.
- Row 4-6 (Off-White): Sc in each stitch across. (45 sc). At the end of Row 6, ch 1, turn.
- Change to Color A (Tan): As before.
- Row 7-9 (Tan): Sc in each stitch across. (45 sc). At the end of Row 9, ch 1, turn.
Continue this pattern of 3 rows Color B, then 3 rows Color A, until the panel measures approximately 24 inches long (this will be 10 inches for the front, 4 inches for the base, and 10 inches for the back). Ensure you end with a full stripe (e.g., 3 rows of Color A).
- For the O-Ring Attachments: You need to create four attachment points for the O-rings: two on the row that will become the top edge of the front panel, and two on the row that will become the top edge of the back panel. The image shows the O-rings passing through the fabric very near the top corners.
- Identify the row that will be the top edge of the front panel (approximately 10 inches from the start of your main panel). On this row: Work 2 sc, ch 2, skip 2 sc, then continue in sc to within 4 sts of the end of the row. Ch 2, skip 2 sc, sc in last 2 sc. Ch 1, turn.
- On the next row (which will be the first row of the base or still part of the front depending on your exact stripe count): Work sc in each sc and 2 sc in each ch-2 space. This forms small, sturdy loops.
- Repeat this process for the row that will become the top edge of the back panel. This will be the row just before you would fasten off the main panel (i.e., after the front, base, and back sections are complete, the very last “top” row of the back section). Create the ch-2 spaces as described above. The subsequent row (if you add one for reinforcement, or the seaming itself) will secure these loops.
Fasten off, leaving a long tail of yarn if you plan to use it for seaming.
Making the Side Panels (Make 2)
The side panels are approximately 4 inches wide and 10 inches tall, matching the height of the front/back and continuing the stripe pattern.
- With Color A (Tan), chain 16. (This should give you about 15 sc, aiming for 4 inches width).
- Row 1: Sc in the 2nd chain from the hook and in each chain across. (15 sc). Ch 1, turn.
- Row 2-3 (Tan): Sc in each stitch across. (15 sc). Ch 1, turn.
- Change to Color B (Off-White).
- Row 4-6 (Off-White): Sc in each stitch across. (15 sc). Ch 1, turn.
- Continue alternating 3 rows of Color A and 3 rows of Color B until the side panel measures approximately 10 inches tall, matching the height of the front/back panels. Ensure your stripe sequence aligns with the main panel for a cohesive look.
- Fasten off, leaving a long tail for sewing. Repeat to make the second side panel.
Assembling the Bag Body
- Lay your main panel flat. Fold it so the front panel (10 inches), base (4 inches), and back panel (10 inches) are formed.
- Take one side panel. Align its edges with the side edges of the front panel and the corresponding side edge of the base. Using a tapestry needle and a strand of yarn (either the tail you left or a new piece), whip stitch or mattress stitch the panels together. Focus on making your seams neat and strong.
- Continue sewing the side panel to the side edge of the back panel.
- Repeat with the second side panel on the other side of the bag.
- Weave in all internal ends securely.
Your bag now has its three-dimensional shape!
Adding the Finishing Touches
These details transform your crocheted piece into a functional and stylish bag.
Installing the Zipper
The top of the bag is finished with a tan-colored zipper, which has two distinctive gold-tone pulls.
- Open the zipper. Pin one side of the zipper tape to the inside top edge of one side of the bag opening (e.g., the front panel’s top edge). Make sure the zipper teeth are just visible above the bag’s edge.
- Using a needle and strong thread (or a ply of your yarn if it’s not too thick), carefully hand-sew the zipper tape to the bag. Use a backstitch or a strong running stitch, catching the crochet stitches securely. Patience is key here for a neat finish.
- Repeat for the other side of the zipper tape, attaching it to the other side of the bag opening (e.g., the back panel’s top edge). Ensure it aligns properly so the zipper closes smoothly.
Fashioning the Braided Cord Handles & Strap
The bag features tan braided cord for both the shorter handles and the crossbody strap.
- Making a Braided Cord: Take three long strands of Color A yarn (or more if you want a thicker cord – for the short handles, you’ll want it quite thick; for the crossbody strap, slightly less thick). Tie them together at one end. Secure this end (e.g., tape it to a table or have someone hold it). Braid the strands together just like braiding hair until you reach your desired length. Tie off the other end securely. Trim ends.
- Short Handles (Make 2):
- You need two shorter handles. Each is a thick, braided tan cord.
- Braid two cords, each approximately 18-20 inches long (this length allows for knotting).
- Pass one O-ring through each of the four crocheted loops at the top corners of your bag (two on the front panel’s top edge, two on the back panel’s top edge).
- For the first short handle: Take one braided cord. Thread one end of the cord through an O-ring on the front panel (e.g., front-left corner). Tie this end in a secure, neat, and decorative knot around the O-ring. The image shows a substantial, decorative knot. Take the other end of the same braided cord and thread it through the corresponding O-ring on the back panel (e.g., back-left corner, on the same side of the bag). Tie this end decoratively around that O-ring.
- For the second short handle: Repeat the process on the other side of the bag, using the remaining braided cord and the O-rings on the front-right and back-right corners.
- Crossbody Strap (Make 1):
- This is a longer, slightly thinner braided tan cord.
- Braid one cord to your desired crossbody length (e.g., 40-45 inches, or measure from your shoulder to your hip and add a bit for the attachments).
- Securely attach a lobster clasp to each end of this braided cord. You can do this by looping the cord end through the clasp’s ring and sewing it firmly or by untying the braid end, passing strands through, and re-knotting/securing.
- Attaching D-Rings for Crossbody Strap:
- The D-rings are attached to the exterior of the side panels, near the top edge, centered.
- You can make small crochet tabs (e.g., ch 5, sc across for 2 rows) in Color A, loop these through the straight edge of the D-rings, and then sew the tabs very securely to the side panels of the bag.
- Alternatively, sew the D-rings directly and firmly to the side panels using several strong stitches with your tapestry needle and yarn.
- Clip your crossbody strap’s lobster clasps to these D-rings.
Tips for a Terrific Tote
- Count Your Stitches: Especially in the beginning, count your stitches at the end of each row to ensure your edges stay straight.
- Even Tension: Try to pull your loops to a consistent size for even-looking stitches. It comes with practice!
- Don’t Fear Frogging: “Frogging” is undoing your work (because you “rip-it, rip-it”). If you make a mistake, it’s often best to undo it and fix it.
- Consider a Lining: While not detailed here, adding a simple fabric lining can give your bag a very professional finish and protect the crochet fabric from stretching with heavy items.
Your Beautiful Bag is Ready!
Step back and admire your handiwork! You’ve just transformed skeins of yarn into a stunning, functional Striped Crochet Tote Bag. This piece isn’t just a bag; it’s a testament to your skill and patience. Think of all the places you’ll go together!
We’d absolutely love to see your finished totes. Feel free to share photos and tell us about your experience making it! Happy hooking on your next project!