
Sunny Slice of Celebration Cake
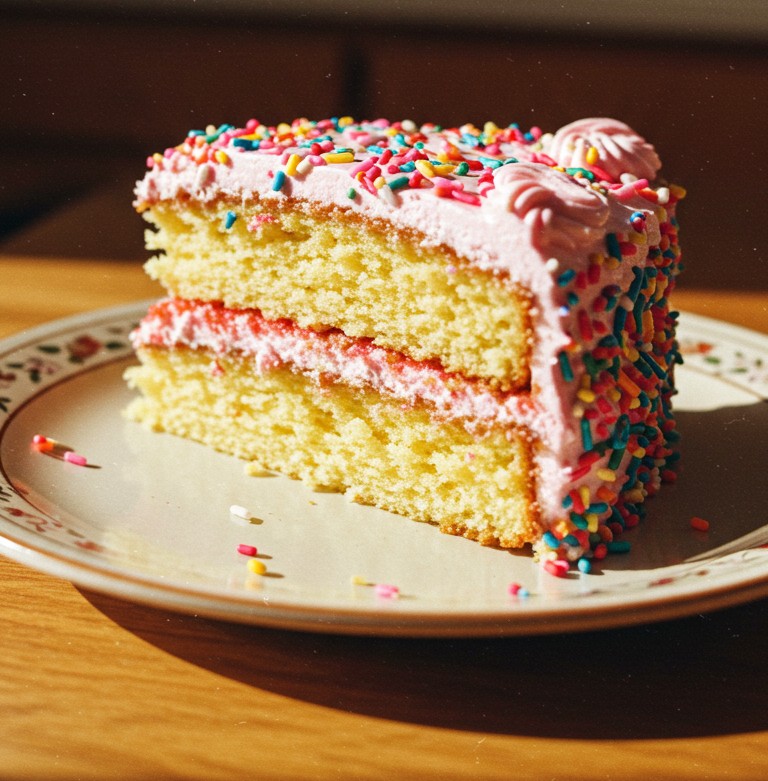
Brighten any day with a delightful slice of homemade cake! This recipe guides beginners through preparing the exact Classic Sprinkle Celebration Cake Slice shown, featuring two layers of golden yellow cake, vibrant pink frosting, and a happy shower of colourful sprinkles. Following these steps helps anyone bring this cheerful dessert to fruition in their own kitchen.
Gathering Your Supplies
Success begins with having everything ready. Here’s what’s needed:
Halal Ingredients:
- 🧈 1 cup (227g) Unsalted Butter (Halal, softened to room temperature)
- 🍚 1 ½ cups (300g) Granulated Sugar
- 🥚 4 Large Eggs (Halal, room temperature)
- 🥛 1 cup (240ml) Whole Milk (Halal, room temperature)
- 🍦 1 tbsp alcohol free Vanilla Extract
- 🌾 2 ½ cups (300g) All-Purpose Flour
- 🥄 1 tbsp Baking Powder
- 🧂 ½ tsp Salt
- 💖 Pink Food Coloring (Gel preferred for vibrant color)
- 🍬 1 cup (approx. 150g) Colourful Sprinkles (rod-shaped, as pictured)
- 🍦 For the Frosting: 2 cups (454g) Unsalted Butter (Halal, softened), 4 cups (480g) Powdered Sugar (sifted), 2-4 tbsp Milk (Halal), 1 tsp Vanilla Extract
Kitchen Equipment:
- 🥣 2 Large Mixing Bowls
- ✨ Electric Mixer (Handheld or Stand)
- 🍳 Rubber Spatula
- 🎂 Two 8-inch Round Cake Pans
- 📜 Parchment Paper
- 🥅 Wire Cooling Rack
- 🔪 Serrated Knife (for leveling, optional)
- 🥄 Offset Spatula or Butter Knife (for frosting)
- 📏 Measuring Cups and Spoons
Preparing the Golden Cake Layers
Making a beautiful cake starts with perfectly baked layers.
Getting Started:
- Preheat the Oven & Prepare Pans: Set the oven to 350°F (175°C). Grease the bottom and sides of the two 8-inch round cake pans thoroughly with butter or cooking spray. Line the bottom of each pan with a circle of parchment paper. This paper guarantees the cake won’t stick after baking. Lightly dust the greased sides with flour, tapping out any excess. This process, known as greasing and flouring, ensures easy cake removal.
- Combine Dry Ingredients: In one of the large mixing bowls, whisk together the flour, baking powder, and salt. Whisking helps distribute the baking powder evenly, which makes the cake rise uniformly. Set this bowl aside.
Mixing the Batter:
- Cream Butter and Sugar: In the second large mixing bowl, using an electric mixer on medium speed, beat the softened butter until it’s smooth and creamy. Add the granulated sugar and continue beating for about 3-5 minutes. The mixture should become light in color and fluffy in texture. This step, called creaming, incorporates air, leading to a tender cake. Ensure the butter and eggs are at room temperature; this helps them combine smoothly without curdling.
- Add Eggs: Add the eggs one at a time, beating well after each addition until fully incorporated. Scrape down the sides of the bowl occasionally with the rubber spatula to make sure everything is mixing evenly.
- Incorporate Vanilla: Beat in the vanilla extract until combined.
- Alternate Wet and Dry: Now, alternate adding the dry flour mixture and the milk to the butter mixture. Start and end with the dry ingredients. Add about one-third of the flour mixture and mix on low speed just until combined. Then, add half of the milk and mix gently. Repeat with another third of the flour, the remaining milk, and finally the last third of the flour. Crucially, mix only until the flour streaks disappear. Overmixing develops the gluten in the flour too much, resulting in a tough cake.
- Divide Batter: Pour the batter evenly between the two prepared cake pans. Use the spatula to smooth the tops slightly.
Baking the Layers:
- Bake: Place the pans in the preheated oven. Bake for 30-35 minutes, or until a wooden skewer or toothpick inserted into the center of the cakes comes out clean (meaning no wet batter sticks to it). The cake tops should also spring back lightly when gently touched.
- Cool: Let the cakes cool in their pans on a wire cooling rack for about 10-15 minutes. Then, carefully run a thin knife around the edges if needed and invert the cakes onto the wire rack. Peel off the parchment paper and let them cool completely. Complete cooling is essential before frosting; warm cake will melt the frosting.
Assembling the Celebration Cake Slice
With the layers ready, it’s time for the fun part – frosting and decorating!
Making the Pink Frosting:
- Beat Butter: In a large clean bowl, use the electric mixer to beat the softened butter on medium-high speed until very pale and creamy, about 5 minutes.
- Add Sugar and Milk: Gradually add the sifted powdered sugar, alternating with 2 tablespoons of the milk, beating on low speed until combined. Add the vanilla extract.
- Whip Until Fluffy: Increase the speed to medium-high and beat for another 3-5 minutes until the frosting is light, airy, and smooth. If it seems too stiff, add more milk, one teaspoon at a time. If too thin, add a bit more powdered sugar.
- Tint it Pink: Add a small amount of pink food coloring (start with a tiny drop if using gel) and mix until the frosting reaches the vibrant pink shade seen in the image. Add more color gradually if needed to achieve the desired hue.
Building the Cake:
- Level Cakes (Optional but Recommended): If the cake tops are rounded, use a long serrated knife to carefully slice off the domes, making them flat. This helps the layers stack neatly.
- First Layer: Place one cooled cake layer, cut-side up (if leveled), onto your serving plate. The plate in the image has a delicate floral pattern near the rim.
- Filling: Scoop about ¾ to 1 cup of the pink frosting onto the center of the first layer. Using an offset spatula or butter knife, spread the frosting evenly out towards the edges. This layer of frosting between the cakes is clearly visible in the final slice.
- Second Layer: Carefully place the second cake layer on top, cut-side down (if leveled), aligning it with the bottom layer.
- Crumb Coat (Optional but helpful): Apply a very thin layer of frosting all over the top and sides of the cake. This is called a crumb coat, and it traps any loose crumbs. Chill the cake in the refrigerator for about 20-30 minutes to firm up this layer.
- Final Frosting: Apply the remaining pink frosting generously over the top and sides of the cake. Use the offset spatula to smooth the sides and top as much as possible. The frosting in the image has some texture, particularly a swirl pattern on the top corner, which can be achieved with gentle spatula movements.
- Add Sprinkles: Immediately, before the frosting sets, press the colourful sprinkles generously onto the sides and scatter them thickly over the top surface. The image shows the sprinkles densely covering the sides and top edge, slightly sparser towards the center of the slice’s top surface. Ensure good coverage for that celebratory look.
- Chill (Optional): Chilling the finished cake for about 30 minutes can help the frosting set, making slicing cleaner.
Serving the Masterpiece
Use a sharp knife, dipped in hot water and wiped clean between cuts, to slice the cake. This yields the clean layers visible in the image. The slice presented shows two distinct golden cake layers separated by the pink frosting layer, all encased in more pink frosting adorned with vibrant sprinkles.
Presenting a slice of this homemade Classic Sprinkle Celebration Cake offers a moment of pure joy. Sharing this delightful bake is a wonderful way to brighten anyone’s day. Give this recipe a whirl and enjoy the satisfying process of bringing this cheerful cake to life. Feel encouraged to share pictures of the finished results!