
Sunshine Crinkle Cookies
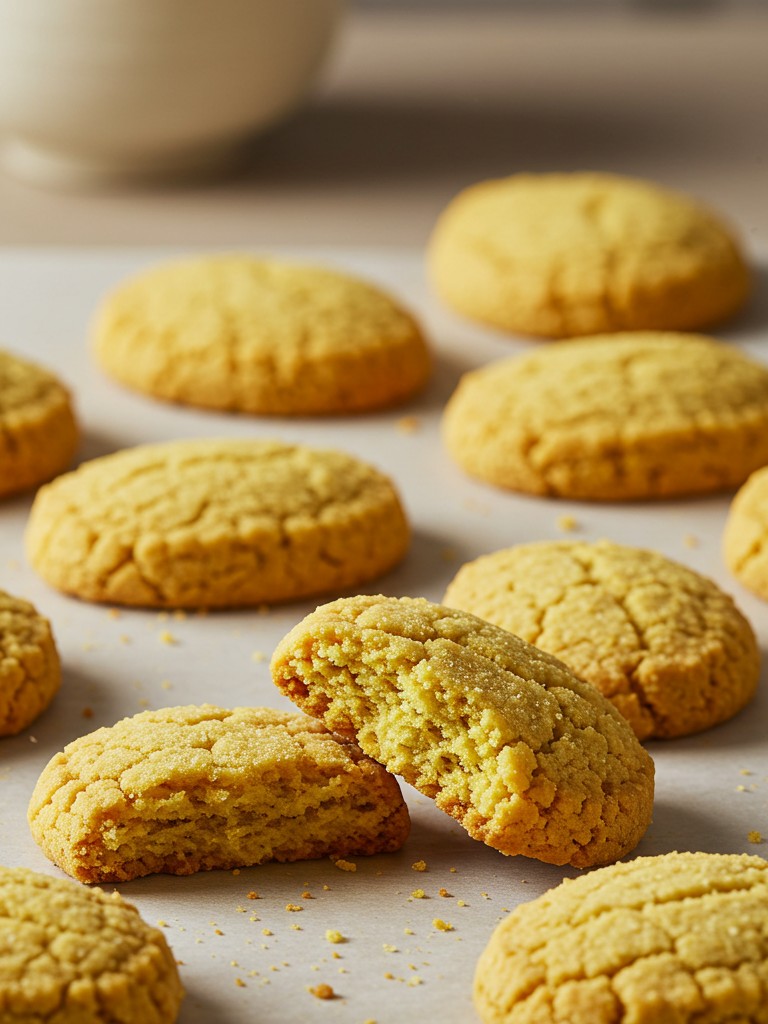
These delightful Sunshine Crinkle Cookies, with their inviting golden hue and characteristic crinkled tops, offer a wonderfully satisfying baking project. The image showcases perfectly baked rounds, one enticingly broken to reveal a soft, tender interior. This guide will walk any budding baker through the process of producing these lovely treats, ideal for enjoying with a warm cup of tea, just like the one suggested in the background.
Getting Ready: What’s Needed
Before embarking on this baking adventure, it’s helpful to gather all the necessary components. Precision and good quality ingredients are key to achieving the beautiful texture and color seen in the cookies.
Essential Halal Ingredients
- 🧈 225g (1 cup) Unsalted Halal Butter, softened to room temperature
- 🍚 300g (1 ½ cups) Granulated Sugar, plus an extra 50g (¼ cup) for rolling
- 🥚 2 Large Halal Eggs, at room temperature
- 💛 1 Large Halal Egg Yolk, at room temperature (this enhances the golden color)
- ✨ 1 ½ tsp Halal Vanilla Extract
- 🌾 390g (3 cups) All-Purpose Flour
- 🥄 1 tsp Baking Soda
- 🧂 ½ tsp Salt
Kitchen Equipment
- 🥣 Large Mixing Bowl
- 🥣 Medium Mixing Bowl
- 🥄 Measuring Spoons
- ⚖️ Kitchen Scale (recommended for accuracy) or Measuring Cups
- ⚡ Electric Mixer (Handheld or Stand Mixer)
- Silicone Spatula
- 🍪 Baking Sheets (at least two)
- 📜 Parchment Paper (as seen beneath the cookies in the image)
- 🍽️ Small Bowl (for the rolling sugar)
- ⏲️ Wire Cooling Rack
Assembling Your Sunshine Crinkle Cookies
Follow these steps meticulously to prepare cookies that mirror the delightful appearance and texture presented in the image—golden, crinkled, and irresistibly soft.
Preparing the Foundations
- Oven Setup: First, preheat the oven to 175°C (350°F). Preheating means turning the oven on ahead of time so it reaches the correct temperature before the cookies go in. This ensures even baking. Line two baking sheets with parchment paper. The parchment paper prevents sticking and helps with easy cleanup, just as it provides a neat surface for the cookies in the photograph.
- Dry Ingredient Blend: In the medium mixing bowl, combine the all-purpose flour, baking soda, and salt. Whisk them together thoroughly. This step, often called aerating or simply mixing, distributes the leavening agent (baking soda) and salt evenly throughout the flour, which is crucial for the cookies’ rise and flavor. Set this bowl aside.
Making the Cookie Dough
- Creaming Butter and Sugar: In the large mixing bowl, place the softened unsalted butter and the 300g (1 ½ cups) of granulated sugar. Using an electric mixer, beat them together on medium speed for about 2-3 minutes. This process is called creaming. The goal is to make the mixture light in color and fluffy in texture. Properly creamed butter and sugar incorporate air, which contributes to the cookies’ tenderness. The butter must be softened, not melted, for this to work correctly.
- Incorporating Eggs: Add the two large eggs and the additional egg yolk to the creamed butter and sugar mixture, one at a time. Beat well after each addition until fully combined. Then, mix in the vanilla extract. The extra egg yolk is a key element for achieving the rich, sunny yellow color seen in the cookies.
- Combining Wet and Dry: Gradually add the dry ingredient blend (from step 2) to the wet ingredients in the large mixing bowl. Start with the mixer on low speed to prevent the flour from flying out. Mix only until the flour is just combined and no dry streaks remain. Overmixing at this stage can develop too much gluten, resulting in tough cookies, rather than the tender crumb visible in the broken cookie. Use the silicone spatula to scrape down the sides and bottom of the bowl to ensure everything is well incorporated. The dough will be soft.
Shaping and Baking to Golden Perfection
- Sugar Coating: Place the extra 50g (¼ cup) of granulated sugar into the small, shallow bowl.
- Forming the Cookies: Scoop out portions of dough, about 2 tablespoons each, and roll them between your palms to form smooth balls. Then, roll each ball generously in the granulated sugar, ensuring it’s fully coated. This sugar coating is what gives the cookies their delightful sparkle and contributes to the attractive crinkled surface seen in the image.
- Arranging on Baking Sheets: Place the sugar-coated dough balls onto the prepared baking sheets, leaving about 2 inches of space between them. They will spread during baking, as evidenced by their final shape in the photograph. Do not flatten them; they will settle into their characteristic shape naturally.
- Baking Process: Bake the cookies in the preheated oven for 10-12 minutes. The cookies are done when the edges are lightly golden, and the tops are set and have developed their signature cracks. The overall color should be a warm, inviting yellow, not deeply browned. The cookies in the image exhibit these exact characteristics.
- Cooling is Key: Once baked, let the cookies rest on the baking sheets for about 5 minutes. This allows them to firm up slightly. Then, carefully transfer them to a wire cooling rack to cool completely. This two-step cooling process is important for achieving the perfect final texture—soft and slightly chewy on the inside, with a tender exterior. The fine crumbs visible in the image hint at this delightful texture.
Sharing the Sunshine
Once cooled, these Sunshine Crinkle Cookies are ready to be enjoyed. Their beautiful appearance and delicious taste are sure to bring a bit of brightness to anyone’s day. They store well in an airtight container at room temperature for several days.
Anyone who tries their hand at this recipe is encouraged to share pictures of their golden, crinkled results. There’s a special kind of joy in sharing homemade goodness, and these cookies are certainly worth sharing!