
Sunshine Honey Cheesecake Glow
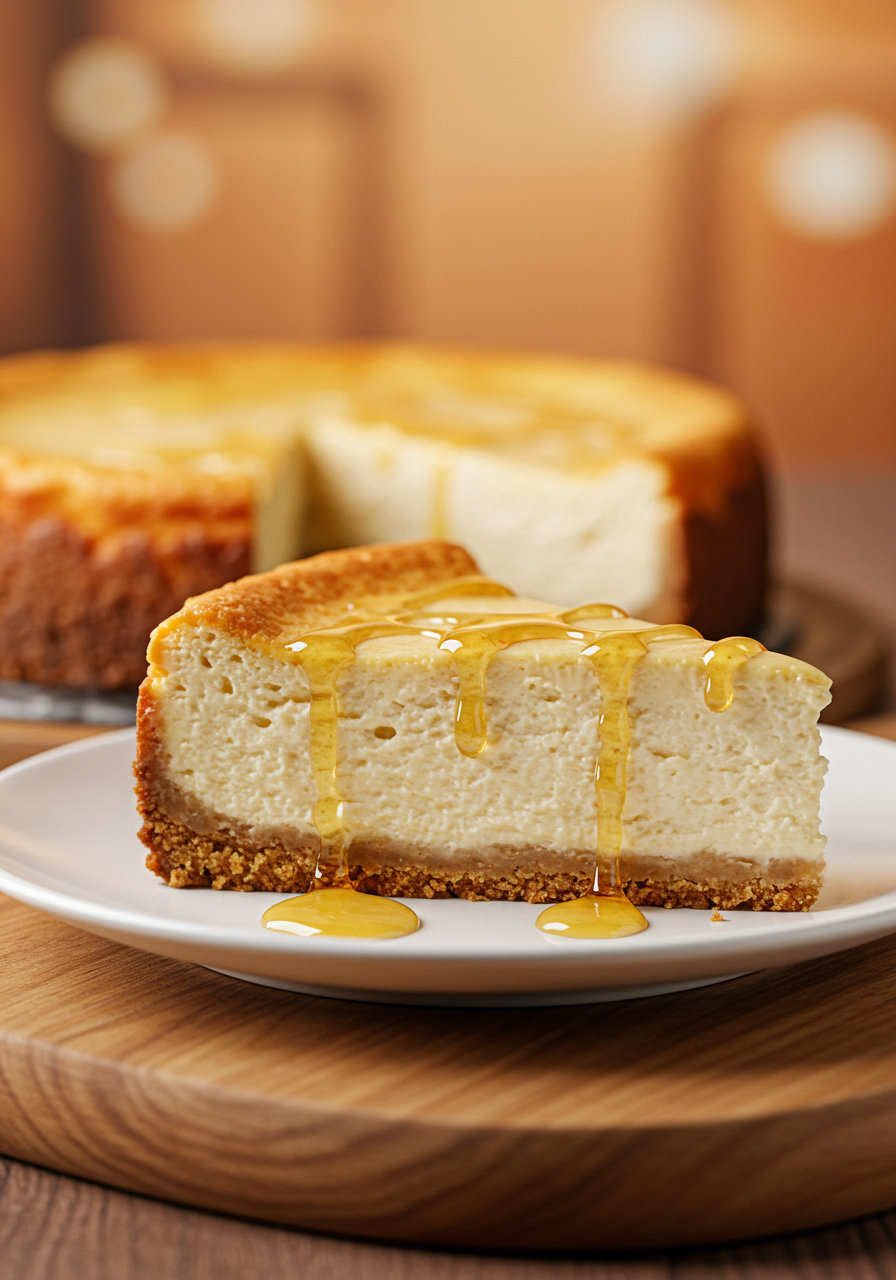
Imagine presenting a stunning, homemade cheesecake, rich and creamy, with a perfectly crisp crust. This Golden Baked Classic Cheesecake, drizzled generously with sweet honey as seen in the beautiful image, is a dessert that brings pure joy. It might seem like a sophisticated bake, but with clear guidance, even novice bakers can achieve wonderful results. This guide will walk through each step, making the process approachable and fun.
Kitchen Essentials You’ll Gather
Before embarking on this delightful baking journey, it’s helpful to have the right tools at hand. Here’s what will be needed:
- ♨️ Oven
- 🥣 9-inch Springform Pan (This type of pan has removable sides, which is key for easily taking out the cheesecake without damaging it.)
- 🧱 Food Processor (excellent for crushing graham crackers) or a sturdy Ziploc bag and a Rolling Pin
- 🍲 Large Mixing Bowls (at least two will be useful)
- 🥄 Measuring Cups and Spoons (for accurate ingredient amounts)
- 🔄 Electric Mixer (a stand mixer or handheld mixer is recommended for achieving that perfectly smooth cream cheese; a sturdy whisk and some energetic stirring can also work)
- 🔪 Spatula (essential for scraping the bowl to ensure all ingredients are mixed, and for spreading batter evenly)
- 🥘 Large Roasting Pan (this needs to be deep enough to hold water for the water bath – a special baking technique that will be explained soon!)
- 🔗 Whisk (useful for some steps if not using an electric mixer for everything)
- 📏 Parchment Paper (optional, for lining the bottom of the springform pan for extra easy release)
Halal Ingredients You’ll Need
The quality of ingredients makes all the difference. For this cheesecake, look for these halal items:
- For the Buttery Graham Cracker Crust:
- 🍪 1 ½ cups Halal Graham Cracker Crumbs (this is about 10-12 full graham cracker sheets)
- 🍚 ¼ cup Granulated Sugar
- 🧈 6 tablespoons (85g) Halal Unsalted Butter, melted
- For the Rich Cream Cheese Filling:
- 🧀 32 ounces (900g / four 8-ounce packages) Halal Full-Fat Cream Cheese, softened to room temperature (this is very, very important for a smooth, lump-free filling!)
- 🍚 1 ¾ cups Granulated Sugar
- 🌽 ¼ cup Cornstarch (this helps give the cheesecake a wonderful structure and a silky smooth texture)
- 🥄 1 tablespoon Alcohol free Vanilla Extract
- 🥛 ½ cup Halal Sour Cream or Halal Full-Fat Heavy Cream, at room temperature (like the cream cheese, having this at room temp helps it mix in smoothly)
- 🥚 4 Halal Large Eggs, at room temperature
- For the Sweet Honey Garnish:
- 🍯 ¼ cup Honey (or more, according to preference for that lovely drizzle)
Step-by-Step Guide to Your Golden Cheesecake
Preparing the Foundation: The Crust
A good cheesecake starts with a fantastic crust!
- Get the Oven Ready: Position an oven rack in the middle of the oven – this is usually the best spot for even baking. Preheat the oven to 350°F (175°C).
- Make the Crumbs: If starting with whole graham crackers, pulse them in a food processor until they become fine crumbs, almost like sand. If a food processor isn’t available, place the crackers in a resealable plastic bag, seal it, and crush them with a rolling pin. Once crushed, measure out 1 ½ cups of crumbs.
- Mix the Crust Ingredients: In a medium-sized bowl, combine the graham cracker crumbs, ¼ cup of granulated sugar, and the melted butter. Stir everything together with a fork until all the crumbs are moistened. The finished mixture should resemble damp sand.
- Form the Crust: Tip the crumb mixture into the 9-inch springform pan. Press the crumbs firmly and evenly onto the bottom of the pan and about 1 inch up the sides. The bottom of a flat-bottomed glass or a measuring cup can be very helpful for packing the crumbs tightly. The image shows a cheesecake with a substantial, golden crust, so ensure it’s well-compacted for a similar look.
- Pre-Bake the Crust: Place the pan in the preheated oven and bake for 10 minutes. This quick bake helps the crust become firm and wonderfully crisp. After 10 minutes, carefully remove it from the oven and set it on a wire rack to cool down a bit while the filling is prepared. Now, reduce the oven temperature to 325°F (160°C), as this lower temperature is ideal for baking the cheesecake filling.
Crafting the Creamy Filling
This is where the magic happens for that luscious, smooth cheesecake texture.
- Soften that Cream Cheese!: It can’t be stressed enough – the cream cheese must be truly at room temperature. This means it should feel soft when gently pressed. If the cream cheese is cold, it will be very difficult to get a smooth filling and may result in unwanted lumps. Nobody wants a lumpy cheesecake!
- Beat the Cream Cheese Smooth: Place the softened cream cheese into a large mixing bowl. Using an electric mixer on medium speed, beat the cream cheese for about 2-3 minutes. The goal is for it to become completely smooth and creamy, with absolutely no lumps. Remember to scrape down the sides and bottom of the bowl frequently with a spatula to ensure every bit gets mixed.
- Add Sweetness and Structure: With the mixer on medium-low speed, gradually add the 1 ¾ cups of granulated sugar and the cornstarch to the beaten cream cheese. Continue to beat until everything is just combined and the mixture is smooth. It’s best not to overbeat at this stage.
- Flavor Boost: Stir in the vanilla extract and the room-temperature sour cream (or heavy cream) on low speed. Mix just until these ingredients are blended into the batter. Scrape the bowl again to make sure it’s all incorporated.
- Incorporate Eggs Gently: Add the room-temperature eggs one at a time. Beat on low speed just until each yolk disappears into the batter before adding the next. This is a crucial step: Overmixing the batter after the eggs are added can incorporate too much air. This can cause the cheesecake to puff up dramatically in the oven and then sadly crack as it cools. Gentle mixing is the secret here.
Assembling and Baking to Golden Perfection
Now, it’s time to bring it all together and bake.
- Prepare for the Water Bath: A water bath, sometimes called a bain-marie, is a technique where the cheesecake pan is placed inside a larger pan that’s partially filled with hot water. This method is fantastic because it adds moisture to the oven environment and helps the cheesecake bake more evenly and gently. This even baking is key to preventing cracks and achieving that ultra-creamy texture. Here’s how to set it up:
- Take two large sheets of heavy-duty aluminum foil. Carefully wrap the outside of the springform pan with these foil sheets. Make sure the foil comes up high enough on the sides and is well-sealed so no water can seep into the pan during baking. It might be good to use a couple of layers to be extra safe.
- Fill the Crust: Pour the prepared cream cheese filling into the cooled, pre-baked crust. Use a spatula to spread it evenly.
- Set up the Water Bath in the Roasting Pan: Place the foil-wrapped springform pan (now containing the filling) into the large roasting pan. Carefully pour hot (recently boiled or very hot tap) water into the roasting pan, around the sides of the cheesecake pan. The water should come about 1 to 1.5 inches up the sides of the springform pan. Be very careful not to splash any water onto the cheesecake filling itself.
- Bake the Cheesecake: Very carefully, transfer the roasting pan (with the cheesecake and water bath) to the preheated 325°F (160°C) oven. Bake for 70-85 minutes. The cheesecake is done when the edges are set and may look slightly puffed, while the center still has a slight jiggle (like set Jell-O) when the pan is gently nudged. The top of the cheesecake will be a beautiful golden brown, just like the one in the photograph. If, during baking, it seems the top is browning too quickly (though this is less common with a water bath and this moderate temperature), a loose tent of foil can be gently placed over the cheesecake for the remainder of the baking time.
The Crucial Cooling Process
Patience during the cooling stage is just as important as the baking itself for a perfect, crack-free cheesecake!
- Oven Cool-Down: Once the baking time is up, turn off the oven, but leave the cheesecake inside. Prop the oven door open just a little bit (a wooden spoon handle works well for this). Let the cheesecake cool down slowly in the warm oven for 1 hour. This very gradual decrease in temperature is another important technique to help prevent any surface cracks from forming.
- Room Temperature Cooling: After an hour in the cooling oven, carefully remove the roasting pan. Lift the springform pan out of the water bath (be cautious, the water will still be hot) and remove the aluminum foil from around the pan. Place the cheesecake on a wire rack and let it cool completely to room temperature. This usually takes about 2-3 hours.
- Chill Thoroughly: Once the cheesecake has cooled to room temperature, loosely cover it with plastic wrap. Try to avoid letting the plastic wrap touch the surface of the cheesecake if possible (sometimes inserting a few toothpicks around the edge can help hold the plastic up). Refrigerate the cheesecake for at least 6 hours, but preferably overnight. This chilling time is absolutely essential for the cheesecake to firm up completely and for all those delicious flavors to meld together.
Serving Your Masterpiece
The moment everyone has been waiting for!
- Release and Slice: Before serving, it can be helpful to run a thin, sharp knife around the edge of the cheesecake if it seems to be sticking to the sides of the springform pan (though often this isn’t necessary if the cooling process was followed carefully). Then, carefully unbuckle and remove the outer ring of the springform pan.
- The Perfect Slice: For those clean, beautiful slices just like the one in the image, use a large, sharp knife. Here’s a great tip: Dip the knife blade in hot water, then wipe it dry with a clean kitchen towel before making each slice. Repeat the hot water dip and wipe between every single cut. This little trick helps prevent the cheesecake from sticking to the knife and gives very neat edges.
- Honey Drizzle: Place a slice of the magnificent, golden-baked cheesecake on a serving plate. Just before it’s ready to be enjoyed, drizzle it generously with honey. Allow the honey to cascade elegantly down the sides of the slice and pool invitingly on the plate, exactly as showcased in the image. The warm, floral notes of the honey provide a perfect, sweet counterpoint to the rich, tangy flavor of the cheesecake.
This entire process, while it involves several steps and a bit of patience, is incredibly rewarding. The wonderful aroma of cheesecake baking and filling the kitchen is a delight in itself. Sharing a slice of this homemade Golden Baked Classic Cheesecake, knowing the care and attention that went into its preparation, is a truly special experience. Feel encouraged to embark on this baking adventure and then proudly share the delicious outcome with friends and family! Everyone will undoubtedly be impressed by this lovely, homemade treat.