
Sweet Little Bear Paw Booties
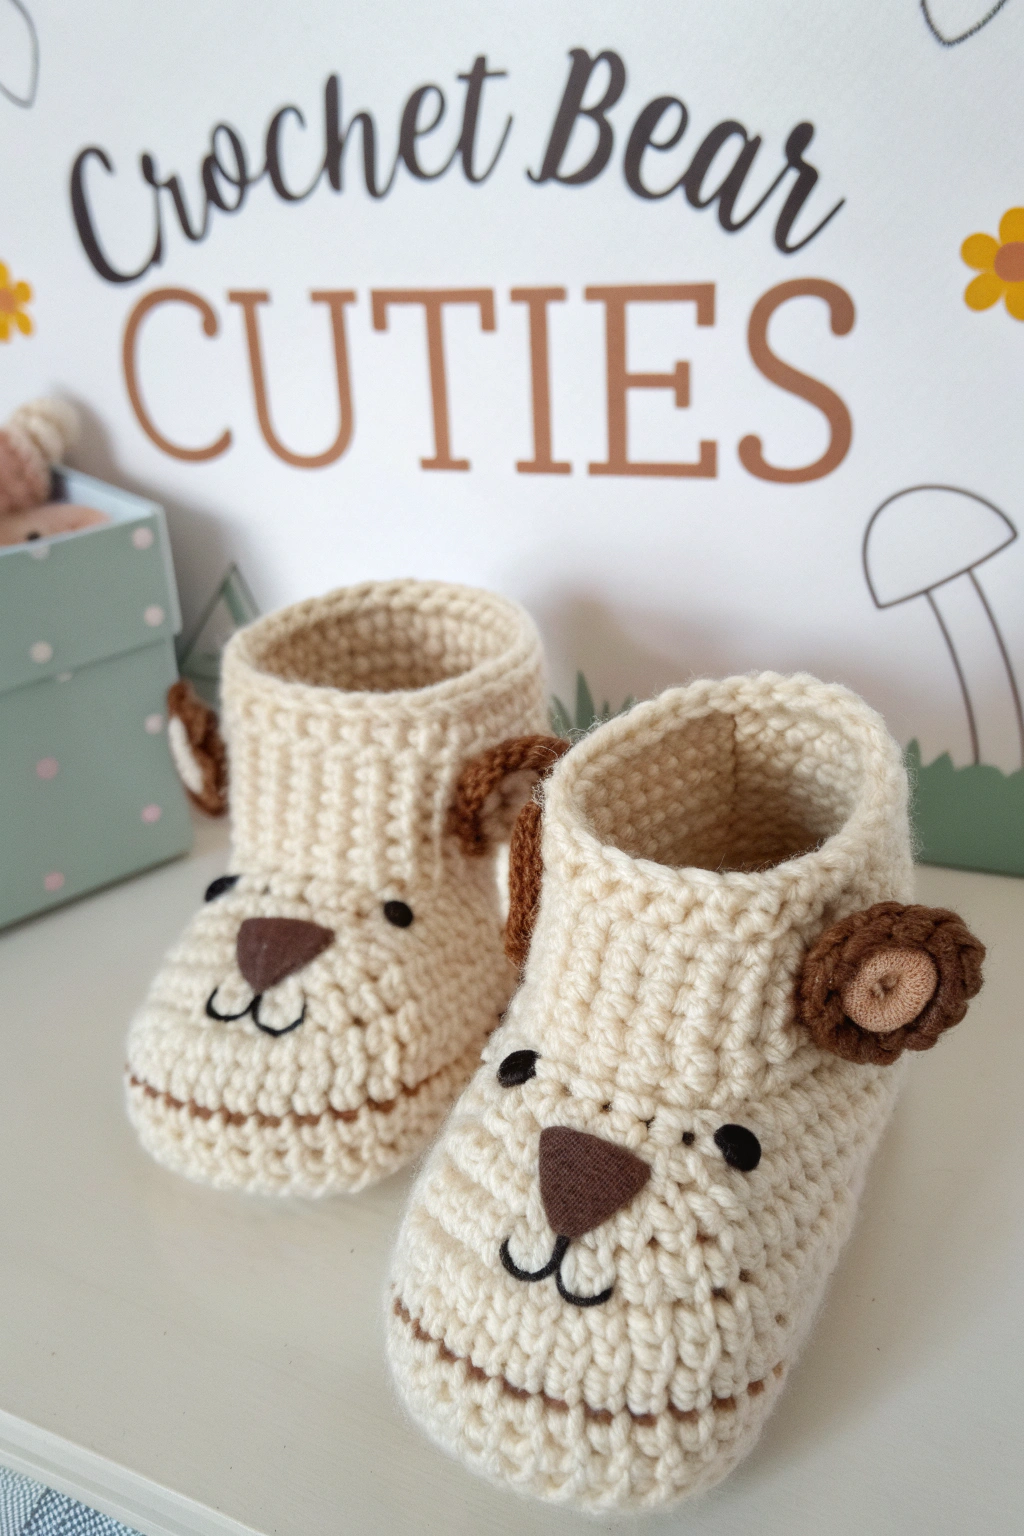
How about we dive into a super sweet project together and whip up some truly heartwarming little shoes for a special munchkin? Today, We’re thrilled to show you, nice and easy, how to assemble these oh-so-adorable Crochet Bear Booties – yep, just like the ones you see shining in the picture! Just imagine those tiny toes all snug and the happy giggles they’ll bring! These booties are such a pleasure to put together, and even if you’re just getting started with your crochet hook, we’ll go through every step as a team.
What You’ll Need To Gather
Before we begin, let’s get all our supplies ready. Having everything on hand makes the process smooth and enjoyable!
- 🧶 Worsted Weight Yarn:
- Off-white or Cream (main color for bootie body and sole) – approx. 50g
- Dark Brown (for sole accent, outer ears, and nose) – small amount
- Light Tan or Beige (for inner ears) – very small amount
- Black (for mouth embroidery) – tiny scrap
- 🪡 Crochet Hook: Size 4.0mm (G/6) or a size that matches your yarn to get a nice, firm fabric.
- ✂️ Scissors: For snipping yarn.
- 🪡 Tapestry Needle (or Yarn Needle): Essential for weaving in ends and sewing pieces together.
- ⚫ Two Small Black Buttons: For the eyes (approx. 6-8mm diameter). Safety Note: If these booties are for a very young baby who might put things in their mouth, consider embroidering the eyes instead for safety.
- 💡 Stitch Markers: (Optional, but super helpful for beginners to mark the first stitch of a round).
- 🟫 Small piece of Brown Felt: For the nose (optional, you can also crochet a small triangle).
- 🧵 Brown Sewing Thread and Needle: If using a felt nose.
Getting Started: Basic Stitches and Terms Explained
Don’t worry if some of these terms are new! We’ll explain them as simply as possible. These are the building blocks for our booties.
- Slip Knot: This is how you get the yarn onto your hook to begin. It’s just a loop with a knot that tightens when you pull the working yarn.
- Chain (ch): The foundation of many crochet projects. You yarn over (wrap yarn around your hook) and pull it through the loop already on your hook. That’s one chain!
- Single Crochet (sc): A basic, sturdy stitch.
- Insert your hook into the designated stitch.
- Yarn over and pull up a loop (you’ll have two loops on your hook).
- Yarn over again and pull through both loops on your hook. That’s one single crochet!
- Half Double Crochet (hdc): A stitch that’s a little taller than a single crochet, great for the cuff.
- Yarn over.
- Insert your hook into the designated stitch.
- Yarn over and pull up a loop (you’ll have three loops on your hook).
- Yarn over again and pull through all three loops on your hook. That’s one half double crochet!
- Slip Stitch (sl st): Used to join rounds, move yarn across stitches without adding height, or finish edges.
- Insert your hook into the designated stitch.
- Yarn over and pull the yarn through the stitch AND through the loop already on your hook, all in one motion.
- Magic Ring (or Adjustable Ring): A wonderful way to start projects worked in the round (like our ears) because it allows you to pull the starting hole completely closed. There are many great video tutorials online if you search “magic ring crochet”!
- Working in Rounds: You’ll be working in a spiral or joined circles to form parts like the sole and foot.
- Working in Rows: You’ll work back and forth, turning your work at the end of each row, to build up a flat piece (like the cuff).
- Increase (inc): To make your piece wider, you’ll work two stitches into the same stitch. For example, “2 sc in next st” means you put two single crochet stitches into that one stitch.
- Back Loop Only (BLO): Stitches normally go under both top loops of the stitch below. For BLO, you’ll insert your hook only under the loop that’s farthest from you. This technique gives us that lovely ribbing on the cuff.
Let’s Make Some Adorable Bear Booties!
We’re going to build these booties piece by piece. Take your time, enjoy the rhythm of the stitches, and remember that every stitch brings you closer to a super cute finish! We’ll make two identical booties.
The Bootie Sole (Make 2)
We’ll start with the bottom of the bootie, using your Off-White/Cream yarn. This sole is worked in joined rounds.
- Round 1: Ch 9.
- Work 2 sc in the 2nd ch from hook (this is your first increase).
- Sc in each of the next 6 ch.
- Work 4 sc in the last ch (this shapes the toe).
- Now, working along the other side of the foundation chain: Sc in each of the next 6 ch.
- Work 2 sc in the last ch (which was the first ch you worked into, completing the heel).
- Sl st to the first sc to join the round. (20 sc)
- Round 2: Ch 1 (doesn’t count as a stitch here and throughout).
- 2 sc in each of the next 2 sts.
- Sc in each of the next 6 sts.
- 2 sc in each of the next 4 sts.
- Sc in each of the next 6 sts.
- 2 sc in each of the next 2 sts.
- Sl st to the first sc to join. (28 sc)
- Round 3: Ch 1.
- (Sc in next st, 2 sc in next st) twice.
- Sc in each of the next 6 sts.
- (Sc in next st, 2 sc in next st) four times.
- Sc in each of the next 6 sts.
- (Sc in next st, 2 sc in next st) twice.
- Sl st to the first sc to join. (36 sc)
Now, we’ll add that lovely Dark Brown accent line you see just above the sole.
- Round 4: Change to Dark Brown yarn. Ch 1.
- Sc in each st around.
- Sl st to the first sc to join. (36 sc)
- Fasten off the brown yarn, leaving a tail to weave in.
You now have a neat oval sole with a brown border!
Forming the Bootie Upper (Make 2)
Switch back to your Off-White/Cream yarn. We’ll now build up the sides of the bootie. For a sturdy fabric, we’ll work these rounds in the back loop only for the first round where we attach to the sole, then normally.
- Round 5: Join Off-White/Cream yarn with a sl st to any stitch of Round 4. Ch 1.
- Working in BLO for this round only: Sc in each st around.
- Sl st to the first sc to join. (36 sc)
- Tip: Working in BLO here helps the sides of the bootie stand up nicely from the sole.
- Rounds 6-8: Ch 1.
- Sc in each st around.
- Sl st to the first sc to join. (36 sc) (Repeat for 3 rounds total)
Now we’ll start shaping the top of the foot. This involves some decreases (working stitches together to reduce the count). A common decrease is sc2tog (single crochet two together): Insert hook in next st, yarn over, pull up loop (2 loops on hook). Insert hook in following st, yarn over, pull up loop (3 loops on hook). Yarn over, pull through all 3 loops. That’s one decrease.
- Round 9 (Toe Shaping): Ch 1.
- Sc in each of the next 10 sts.
- (Sc2tog, sc in next st) 6 times.
- Sc in each of the next 8 sts.
- Sl st to the first sc to join. (30 sc)
- Round 10 (More Toe Shaping): Ch 1.
- Sc in each of the next 9 sts.
- Sc2tog 6 times.
- Sc in each of the next 9 sts.
- Sl st to the first sc to join. (24 sc)
- Round 11: Ch 1.
- Sc in each st around.
- Sl st to the first sc to join. (24 sc)
- Do not fasten off. We’ll attach the cuff directly.
Your bootie foot part is now taking shape!
Crafting the Ribbed Cuff (Make 2)
The cuff has that wonderful stretchy, ribbed look which comes from working Half Double Crochet (hdc) stitches in the Back Loop Only (BLO), in rows. We will work this as a flat piece and then sew it on.
Using your Off-White/Cream yarn:
- Row 1: Ch 11. (This determines the height of your cuff. You can make it shorter or taller by chaining less or more).
- Hdc in the 2nd ch from hook and in each ch across. (10 hdc)
- Ch 1, turn.
- Row 2: Working in BLO for this row and all following rows:
- Hdc in each st across. (10 hdc)
- Ch 1, turn.
- Repeat Row 2 until the cuff piece is long enough to comfortably wrap around the opening of your bootie (Round 11, which has 24 sts). This will likely be around 22-24 rows, but test it by gently stretching it around the bootie opening. It should meet snugly.
- Once long enough, fasten off, leaving a long tail for sewing.
- Sew the short ends of the cuff rectangle together to form a tube.
Assembling the Main Bootie Shape
Now, we’ll attach the cuff to the top of the bootie foot.
- With the bootie right side out, and the cuff seam at what will be the back of the bootie, position the cuff around the opening of the bootie (the edge of Round 11).
- Using your tapestry needle and the yarn tail from the cuff (or a new piece of yarn), carefully sew the bottom edge of the cuff to the stitches of Round 11 of the bootie. Try to make your stitches neat and even.
Fashioning the Bear Ears (Make 4 Outer Brown, 4 Inner Tan/Beige)
These little ears are what really bring the bear to life! We’ll make two-layered ears. Each ear has a dark brown outer circle and a smaller light tan/beige inner circle.
Outer Ear (Make 4 with Dark Brown yarn):
- Round 1: Start with a magic ring. Ch 1 (does not count as st). Work 6 sc into the magic ring. Pull the ring tight. Sl st to the first sc to join. (6 sc)
- Round 2: Ch 1. Work 2 sc in each st around. Sl st to the first sc to join. (12 sc)
- Fasten off, leaving a long tail for sewing the ear to the bootie.
Inner Ear (Make 4 with Light Tan/Beige yarn):
- Round 1: Start with a magic ring. Ch 1. Work 6 sc into the magic ring. Pull the ring tight. Sl st to the first sc to join. (6 sc)
- Fasten off, leaving a tail for sewing.
Assembling the Ears: Take one inner ear circle and place it centered on one outer ear circle. Using the tail from the inner ear and your tapestry needle, sew the inner ear to the outer ear. Repeat for all four ears. You’ll have two complete ears per bootie.
Bringing Your Bear to Life: Facial Features
This is where the magic happens and your bootie becomes a bear!
- Attaching the Ears:
- Refer to the original image for placement. The ears are positioned on the sides of the cuff, slightly towards the front.
- Using the long tail from the outer brown part of an assembled ear, sew one ear securely to each side of the bootie cuff. Make sure they are symmetrical.
- The Nose:
- The nose is a neat dark brown triangle.
- Felt Option (as in the image): Cut a small, neat triangle shape from your brown felt. Position it on the front of the bootie, below the cuff, centered. Using brown sewing thread and a sewing needle, carefully stitch the felt nose onto the bootie.
- Crochet Option: With brown yarn: Ch 2. Work 3 sc in 2nd ch from hook. Fasten off, leaving a tail to sew. This forms a tiny triangle. Sew this onto the bootie.
- Embroidering the Mouth:
- Using your black yarn scrap and tapestry needle, embroider the mouth just below the nose. The mouth consists of two small, connected “u” shapes or a simple “w” shape, as seen in the image.
- Secure the ends of the black yarn neatly on the inside of the bootie.
- Attaching the Button Eyes:
- Position the two small black button eyes above and to the sides of the nose.
- Using sewing thread (or a strand of your black yarn split to be thinner) and a sewing needle, sew the buttons on securely.
- Remember the safety note: if for a baby, embroider French knots or satin stitch circles for eyes instead.
Finishing Touches
The last step is to weave in all those yarn ends!
- Turn the bootie inside out.
- Thread each loose yarn tail onto your tapestry needle.
- Weave the needle back and forth through the stitches on the inside of the bootie for about an inch or two before snipping the yarn close to the fabric. This prevents your hard work from unraveling.
Do this for all remaining ends on both booties.
Your Pawsitively Sweet Booties are Ready!
And there you have it! Two absolutely charming, handcrafted bear booties, brimming with personality. Just look at those sweet faces! Pat yourself on the back – you’ve taken yarn and a hook and produced something truly special. These little booties are sure to be treasured.
We’d be so thrilled to see your finished bear booties! Feel free to share pictures of your adorable new footwear. Happy stitching, and may your hooks always be busy with joyful projects!