
Sweet Steps First Baby Booties
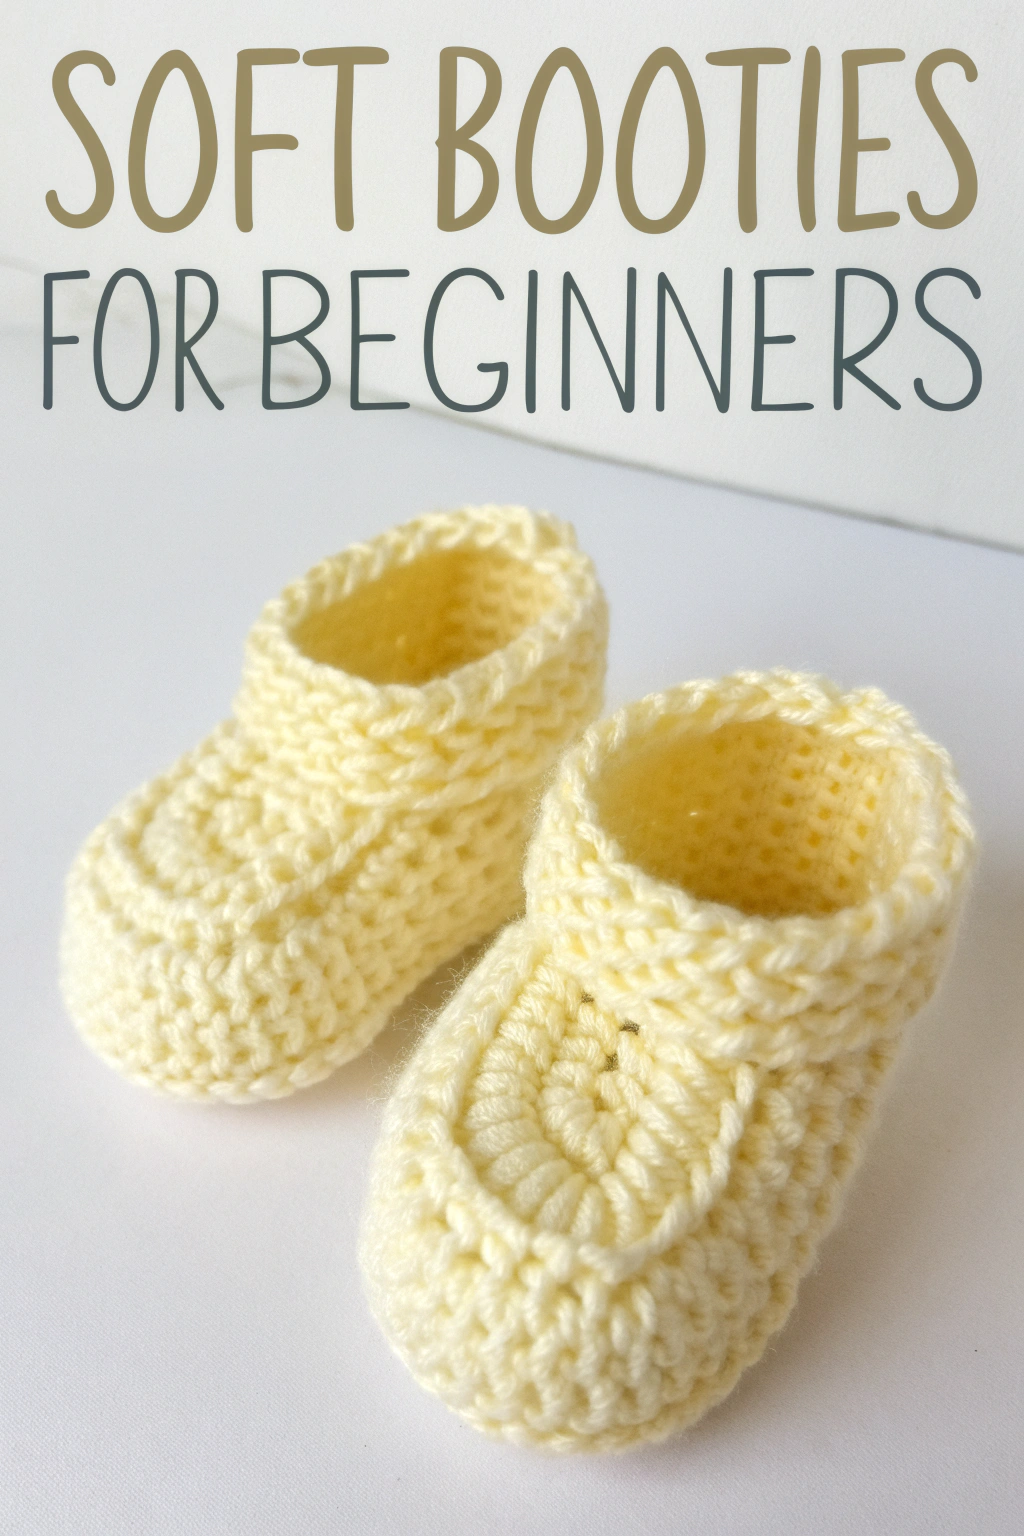
Have you ever wanted to fashion something truly special and cozy for a little one? Making baby booties is a wonderfully rewarding project, and this particular pair, pictured right here, is perfect even if you’re just starting your crochet journey. Look at those soft, pale yellow booties – aren’t they just adorable? They feature a comfy folded cuff and a neat little panel on top. Let’s walk through exactly how to bring these tiny treasures to life, step by step. No complicated techniques, just pure, simple crochet goodness!
What You’ll Need
Before we begin, gather these bits and bobs:
- 🧶 Yarn: About 50g of a soft DK (Double Knitting) or Worsted Weight yarn in a lovely pale yellow, just like the pair in the image. Baby alpaca, merino, or a soft acrylic blend works beautifully.
- 🪝 Crochet Hook: A size that matches your yarn. For DK/Worsted, a 4.0mm (G/6) or 4.5mm (7) hook is usually a good starting point. Check your yarn label!
- ✂️ Scissors: For snipping yarn ends.
- 🧵 Yarn Needle: (Also called a tapestry needle) with a large eye for weaving in ends.
- ✨ Stitch Marker: Optional, but super helpful for keeping track of the start of your rounds.
Understanding the Basics (For Absolute Beginners!)
Don’t worry if these terms sound new! We’ll explain as we go.
- Slip Knot: The very first loop you put on your hook to start any crochet project.
- Chain (ch): A foundational stitch that looks like a little chain link. You make it by pulling yarn through the loop on your hook.
- Slip Stitch (sl st): A tiny stitch used to join parts together or finish off rounds smoothly. You insert your hook, pull yarn through the stitch and the loop on your hook in one go.
- Single Crochet (sc): A basic, short stitch. Insert hook, pull up a loop (2 loops on hook), yarn over, pull through both loops.
- Half Double Crochet (hdc): A stitch slightly taller than sc. Yarn over, insert hook, pull up a loop (3 loops on hook), yarn over, pull through all 3 loops. This stitch gives the main body of the bootie its lovely texture.
- Double Crochet (dc): Taller than hdc. Yarn over, insert hook, pull up a loop (3 loops on hook), yarn over, pull through 2 loops (2 loops left), yarn over, pull through remaining 2 loops.
- Front Post Double Crochet (FPdc): This sounds fancy but just means working a dc around the post (the vertical part) of a stitch from the row below, inserting your hook from front to back to front around the post. This makes the stitch pop forward, forming the raised edge seen on the top panel.
- Working in Rounds: Making stitches in a continuous spiral or joined circle, rather than back and forth in rows.
Let’s Make Some Booties! (Instructions for One Bootie – Make Two!)
We’ll build this bootie from the sole up.
The Sole
We begin by making an oval shape for the bottom of the foot.
- Start: Form a slip knot and chain 10 (ch 10).
- Round 1: Work 2 hdc in the 3rd chain from the hook (the skipped 2 chains count as the first hdc). Then, work 1 hdc in each of the next 6 chains. In the very last chain, work 5 hdc (this makes the toe curve). Now, working along the other side of the starting chain, work 1 hdc in each of the next 6 loops. In the last loop (where you put your first 2 hdc), work 3 more hdc (this makes the heel curve). Join the round with a sl st to the top of the beginning chain-2. (You should have 22 hdc total).
- Tip: Place a stitch marker in the first stitch of the round to easily find where it begins and ends!
- Round 2: Chain 2 (counts as first hdc here and throughout). Work 1 hdc in the same stitch. Work 2 hdc in the next stitch. Then, 1 hdc in each of the next 6 stitches. Work 2 hdc in each of the next 5 stitches (around the toe). Then, 1 hdc in each of the next 6 stitches. Work 2 hdc in each of the last 3 stitches (around the heel). Join with a sl st to the top of the beginning ch-2. (32 hdc total).
- Round 3: Chain 1 (does not count as a stitch). Work 1 sc in each stitch all the way around. Join with a sl st to the first sc. (32 sc total). Do not fasten off.
Shaping the Bootie Sides
Now we work upwards to form the body of the bootie.
- Round 4 (Building the sides): Chain 1. This round is worked in the Back Loops Only (BLO). This means you only insert your hook under the loop furthest away from you for each stitch. Work 1 sc in the BLO of each stitch around. Join with a sl st to the first sc (worked in both loops). (32 sc). Working in the BLO helps the sides stand up nicely from the sole.
- Round 5: Chain 2 (counts as 1 hdc). Work 1 hdc in each stitch around. Join with a sl st to the top of the beginning ch-2. (32 hdc).
- Round 6 (Start shaping the toe): Chain 2. Work 1 hdc in the next 9 stitches. Now, we’ll decrease to shape the front: [hdc2tog (half double crochet two together – yarn over, insert hook, pull up loop, insert hook in next stitch, pull up loop, yarn over, pull through all loops on hook)] 6 times. Work 1 hdc in the remaining 10 stitches. Join with a sl st to the top of the beginning ch-2. (26 stitches total).
- Round 7: Chain 2. Work 1 hdc in the next 9 stitches. [hdc2tog] 3 times. Work 1 hdc in the remaining 10 stitches. Join with a sl st to the top of the beginning ch-2. (23 stitches total).
Forming the Top Panel and Cuff
This part gives the bootie its distinct look, seen clearly in the image.
- Round 8 (Top Panel Foundation): Chain 1 (does not count as stitch). Work 1 sc in the next 10 stitches. Now, skip the next 3 stitches (this forms the opening under the panel). Work 1 sc in the remaining 10 stitches. Join with a sl st to the first sc. (20 sc).
- Round 9 (Building the Panel): Chain 3 (counts as first dc). Work 1 dc in the next 9 stitches. Now, working around the posts of the skipped 3 stitches from Round 7 (look down below the gap): Work 1 FPdc around the post of the first skipped hdc, 1 FPdc around the post of the second skipped hdc, 1 FPdc around the post of the third skipped hdc. This forms the raised edge you see on the panel in the photo. Continue working 1 dc in the remaining 10 sc stitches from Round 8. Join with a sl st to the top of the beginning ch-3. (23 stitches: 20 dc + 3 FPdc).
- Beginner Tip: For the FPdc, remember to yarn over first, then insert your hook from front-to-back-to-front around the vertical ‘post’ of the specified stitch below, complete the dc as usual. It might feel fiddly at first, but it produces that lovely raised detail.
- Round 10 (Cuff): Chain 2 (counts as 1 hdc). Work 1 hdc in each stitch around. Join with a sl st to the top of the beginning ch-2. (23 hdc).
- Round 11 & 12: Repeat Round 10. (23 hdc).
Finishing
- Fasten Off: Cut the yarn, leaving about a 6-inch tail. Pull the tail through the last loop on your hook to secure it.
- Weave in Ends: Thread the yarn tail onto your yarn needle. Weave it securely back and forth through the inside stitches of the bootie to hide it. Snip off any excess yarn close to the work. Do the same for the starting tail at the sole.
- Fold the Cuff: Gently fold the top two rows (Rounds 11 & 12) down towards the outside to form the soft cuff, just like in the picture.
- Make the Second Bootie: Repeat steps 1-15 to complete the pair!
Your Tiny Triumph!
Take a moment to admire your handiwork! You’ve just fashioned a pair of absolutely charming baby booties. Notice the sturdy sole, the gentle curve of the toe, the neat top panel with its defined edge, and that cozy folded cuff – all details visible in the example image, now replicated by your own hands.
Making something small like this is such a satisfying way to practice your stitches and produce a genuinely useful and lovely item. Imagine the tiny feet that will wiggle inside these! Don’t hesitate to try this pattern again, perhaps in different soft colors.
We’d be thrilled to see your finished booties! Feel free to share photos of your sweet little pieces online. Happy crocheting!