

The Marigold Knit Bag A Beginner-Friendly Pattern
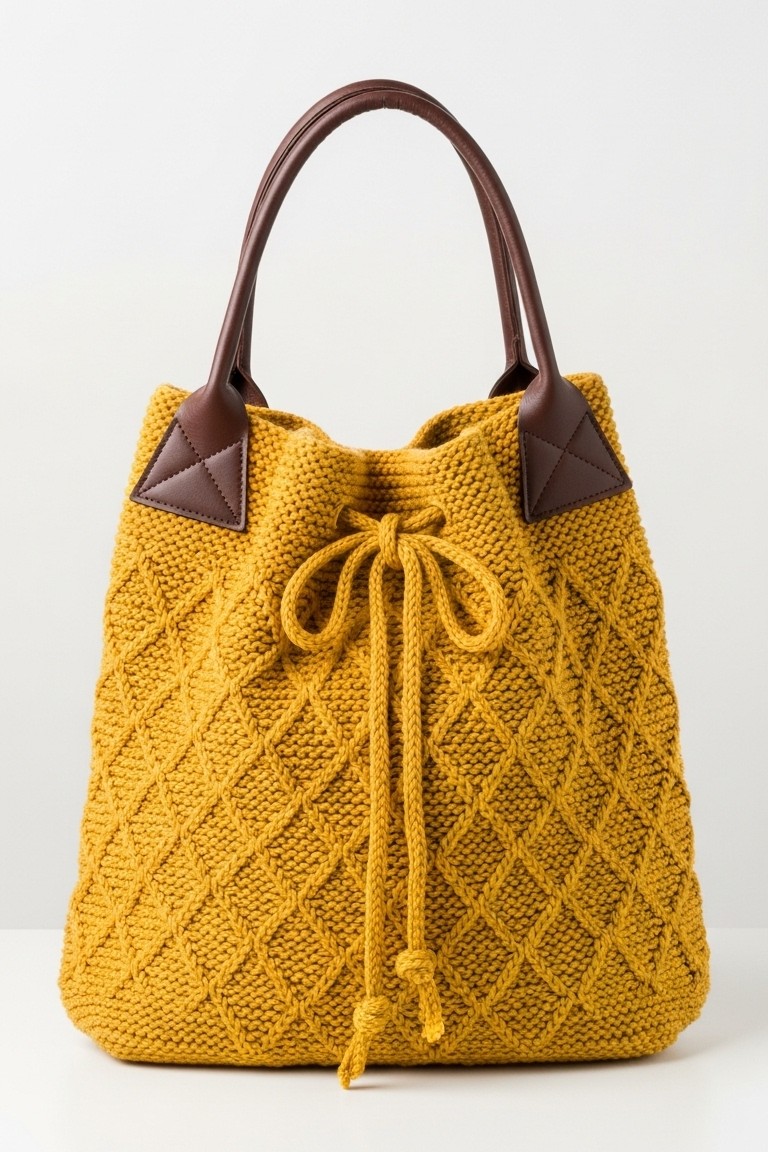
There’s an unmatched satisfaction that comes from carrying something you’ve brought to life with your own hands. This marigold knit bag is designed to give you that exact feeling. It’s more than just a practical accessory; it’s a beautiful showcase of your developing craft, featuring deep diamond stitchwork, sturdy brown handles, and a classic drawstring top that pulls everything together.
This tutorial is your complete roadmap. We will move step-by-step, making sure every technique is clear and easy to follow. By the time you weave in the last end, you won’t just have a new bag—you’ll have a piece of handmade art you’ll be genuinely proud of. Let’s get started!
What You’ll Need
Here are the tools and materials required to make your bag. Gathering everything first makes the whole process smooth and enjoyable.
- 🧶 Yarn: 3 skeins (approx. 600 yards) of worsted weight yarn in a mustard yellow color. A wool or cotton blend will give you great stitch definition for the diamond pattern.
- 🪡 Knitting Needles: 5.0mm (US 8) knitting needles. You can use straight needles or circular needles for knitting flat.
- ✨ Double-Pointed Needles (DPNs): A set of 5.0mm (US 8) DPNs to make the drawstring.
- 👜 Bag Handles: One pair of brown, sew-on faux leather bag handles, about 18-20 inches long. The ones on this bag have a triangular base for sewing.
- 🧵 Darning Needle: A blunt-tipped tapestry or darning needle for seaming the sides and weaving in ends.
- ✂️ Scissors: A sharp pair for trimming your yarn.
- ✔️ Stitch Markers: These are optional but highly recommended for tracking the diamond pattern.
- 🔢 Row Counter: Also optional, but this little tool is a lifesaver for keeping your place in the pattern.
Getting Started The Basics
Before we jump into the bag itself, let’s get comfortable with the foundational techniques. Don’t worry, each one is a simple building block.
Casting On
This is the very first step of any knitting project. Casting on is the method you use to get the initial loops of yarn onto your needle. We will use the long-tail cast-on, which makes a nice, sturdy edge for the bottom of our bag.
The Basic Stitches
This entire bag is composed of just two stitches. Once you master these, you can make almost anything!
- The Knit Stitch (k): This is the most fundamental stitch in knitting. You’ll insert your right needle into the front of a loop on the left needle from left to right, wrap the yarn, and pull a new loop through.
- The Purl Stitch (p): This is the reverse of the knit stitch. You’ll insert your right needle into the front of a loop on the left needle from right to left, wrap the yarn, and push a new loop through to the back.
The Diamond Lattice Pattern
This is the gorgeous texture on the body of the bag. It looks complex, but it is just a thoughtful arrangement of the knit and purl stitches you just learned about. It’s a 10-stitch, 10-row repeat. The key is to be patient and trust the instructions. Placing a stitch marker after every 10 stitches will make this a breeze!
Casting Off
When you’ve finished knitting, you need a way to take the live loops off your needle without them unraveling. Casting off (or binding off) is the simple technique used to secure your final row of stitches, giving your work a finished edge.
Building Your Bag Step-by-Step
This bag is constructed as one long, flat panel that we will later fold and seam. This makes the process very straightforward.
Part 1: The Main Panel
- Cast On: Using your 5.0mm needles and the long-tail method, cast on 80 stitches. This will form the width of your bag.
- Knit the Base: To form the sturdy garter stitch base, you will simply knit every single stitch of every row.
- Rows 1-12: Knit all stitches. You will now have a solid, squishy fabric that is the bottom of your bag.
- Begin the Diamond Pattern: Now for the fun part! The following 10-row repeat forms the beautiful diamond pattern. The “RS” means “Right Side,” which is the pretty exterior of the bag, and “WS” means “Wrong Side,” the interior.
- A helpful tip: Place a stitch marker after every 10th stitch across your needle. This way, you just have to focus on the 10-stitch pattern between your markers.
- Row 1 (RS): Knit 5, Purl 5. Repeat this pattern (from the *) all the way across the row.
- Row 2 (WS): Knit 4, Purl 1, Knit 1, Purl 4. Repeat across the row.
- Row 3 (RS): Knit 3, Purl 2, Knit 2, Purl 3. Repeat across the row.
- Row 4 (WS): Knit 2, Purl 3, Knit 3, Purl 2. Repeat across the row.
- Row 5 (RS): Knit 1, Purl 4, Knit 4, Purl 1. Repeat across the row.
- Row 6 (WS): Purl 5, Knit 5. Repeat across the row.
- Row 7 (RS): Purl 4, Knit 1, Purl 1, Knit 4. Repeat across the row.
- Row 8 (WS): Purl 3, Knit 2, Purl 2, Knit 3. Repeat across the row.
- Row 9 (RS): Purl 2, Knit 3, Purl 3, Knit 2. Repeat across the row.
- Row 10 (WS): Purl 1, Knit 4, Purl 4, Knit 1. Repeat across the row.
- Continue the Pattern: Repeat these 10 rows (Rows 1-10) over and over again. Your panel will get longer and the diamond pattern will emerge beautifully. Continue until your entire piece measures about 28 inches from the cast-on edge. This length will form the front and back of your bag.
- Form the Top Cuff: Just like the base, the top cuff is simple garter stitch. This section is where the drawstring will be threaded.
- Next 16 rows: Knit all stitches.
- Cast Off: Cast off all your stitches loosely. Don’t pull too tightly, as you want the opening of the bag to have some stretch. Cut the yarn, leaving a long tail (about 20 inches) for seaming.
Part 2: Assembling Your Masterpiece
You now have a long, beautiful piece of knitted fabric. It’s time to give it its final bag shape.
- Seam the Sides: Fold your knitted panel exactly in half, with the pretty diamond pattern (the Right Sides) facing inward. Line up the edges perfectly. Using your darning needle and the long tail of yarn you left, stitch up one of the side seams. A mattress stitch is perfect here, as it will be nearly invisible from the outside. Once one side is done, use a new piece of yarn to seam the other side.
- Make the Drawstring: Now for the I-Cord. Using your Double-Pointed Needles, cast on 4 stitches.
- Knit these 4 stitches.
- Do not turn your work. Instead, slide the stitches to the other end of the needle. The working yarn will be coming from the last stitch.
- Gently pull the yarn across the back and knit the first stitch, then knit the remaining 3 stitches.
- Repeat this process—knit 4, slide to the other end, pull yarn across the back, and knit again. You are forming a small, round cord of knitting. Continue until your I-Cord is about 40 inches long. Cast off and trim the yarn.
- Add the Drawstring and Handles:
- Turn your bag right-side out. Admire that pattern!
- Attach a safety pin to one end of your I-cord and thread it through the garter stitch cuff at the top of the bag. Weave it in and out every few stitches, going all the way around, so both ends come out the front.
- Tie a simple knot at each end of the I-cord to prevent it from slipping back through.
- Position your brown leather handles on the outside of the bag, just below the drawstring cuff. Using your darning needle and a length of matching yarn (or strong thread), securely sew the handle tabs to the bag. Follow the stitching holes on the tabs for a neat, strong finish.
Your Finished Bag
Take a moment to step back and look at the wonderful bag you just made. Feel the texture of the stitches and the sturdiness of the handles. Caring for it is simple; hand wash in cool water if needed and lay it flat to dry.
You took yarn and needles and methodically worked through each step to produce something truly special. Be proud of what you’ve accomplished! We’d love to see your finished piece—share a photo of your new favorite bag.