

The Perfect Homemade Orange Cake
A slice of this vibrant orange cake is like a bit of bottled sunshine. With its wonderfully moist, tender crumb and bright citrus aroma, it’s a simple dessert that never fails to delight. This recipe is an ideal project for anyone just starting their baking adventure, showcasing how fresh, straightforward ingredients can be transformed into something truly special.
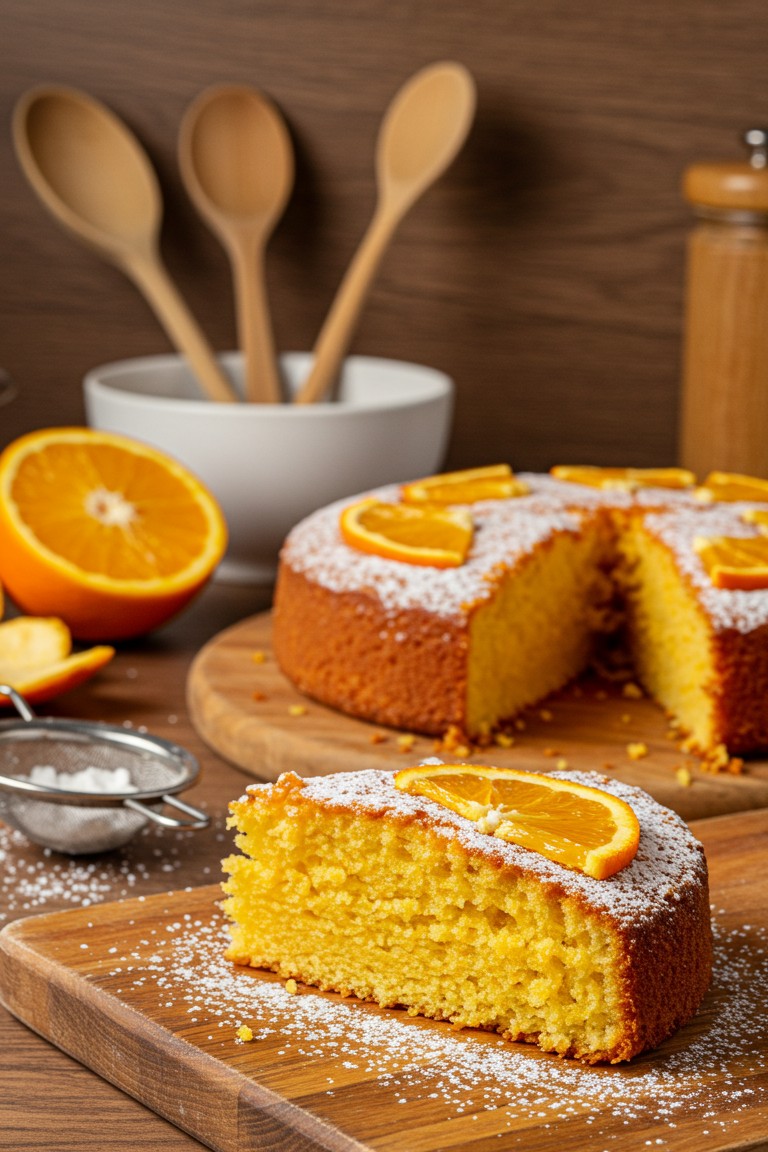
The method is designed to be clear and supportive, guiding the home baker through every phase to achieve the beautiful, golden cake pictured, complete with its delicate powdered sugar topping and fresh orange garnish.
Gathering the Necessities
A successful bake begins with organization. Taking a few moments to gather all the required equipment and ingredients beforehand makes the entire process feel calm, focused, and much more enjoyable.
Equipment
- 🥣 Large bowl for mixing
- 🥣 Medium bowl for dry ingredients
- ✨ Electric mixer (handheld or stand)
- 🍊 Fine-mesh grater or a zester
- 🥄 Standard measuring cups and spoons
- A flexible spatula
- 🍰 9-inch (23 cm) round cake pan
- 🌬️ Wire rack for cooling
- Parchment paper
- 🤍 Small sieve
Halal Ingredients
- 🍊 2 large, fresh oranges
- 🍚 1 ½ cups (300g) granulated sugar
- 🧈 ½ cup (113g) unsalted butter (halal), softened
- 🥚 3 large eggs (from a halal-certified source if preferred), at room temperature
- 🥛 ½ cup (120ml) whole milk (halal), at room temperature
- 🌾 2 cups (240g) all-purpose flour
- 🥄 2 teaspoons baking powder
- 🧂 ½ teaspoon salt
- ❄️ 2-3 tablespoons powdered sugar for decoration
Assembling the Orange Cake
These steps break down the process into simple, manageable actions. Following them closely will build a cake with a fantastic texture and deep, natural orange flavor.
- Prepare the Pan and Oven First, position an oven rack in the middle of the oven and preheat it to 350°F (175°C). Next, prepare the cake pan. Grease the bottom and sides with a little butter, then place a round piece of parchment paper on the bottom. This ensures the cake will release easily and cleanly after baking.
- Build the Flavor Base The bright, zesty character of this cake comes directly from the fresh oranges. Using a fine grater, remove the colorful outer peel—the zest—from both oranges and place it in the large mixing bowl. Avoid grating the white layer underneath, called the pith, as it has a bitter taste. Add the granulated sugar to the zest and use fingertips to rub them together until the sugar is fragrant and slightly damp. This technique infuses the sugar with orange oil for maximum flavor. Squeeze the oranges to get ½ cup of juice and set it aside.
- Cream Butter and Sugar Add the softened butter to the orange sugar. Using an electric mixer on medium speed, beat the mixture for 3 to 5 minutes. This important technique, known as creaming, aerates the butter and dissolves the sugar. The mixture will visibly transform, becoming much lighter in color and fluffier in texture. This step is the foundation for a light, soft cake.
- Incorporate the Eggs Add the room-temperature eggs one at a time, mixing thoroughly after each one is added. It is crucial to add them slowly to allow each egg to fully incorporate into the batter, preventing it from looking curdled. Remember to pause and scrape down the sides of the bowl with a spatula to ensure everything is evenly combined.
- Combine Wet and Dry In the medium bowl, whisk the flour, baking powder, and salt together. This distributes the baking powder evenly, which helps the cake rise. Now, add the ingredients to the main bowl in alternating additions: begin by mixing in one-third of the flour mixture, followed by half of the milk and orange juice. Repeat with another third of the flour, the rest of the liquids, and finish with the last of the flour. Mix on the lowest speed just until the last streaks of flour disappear. Do not over-mix, as this can result in a dense cake.
- Time to Bake Gently pour the finished batter into the prepared pan and smooth the surface with the spatula. Bake for 30-35 minutes. The cake is done when its top is golden brown and a toothpick inserted into the center emerges clean, without any wet batter attached.
Final Flourishes for a Beautiful Finish
The last steps are all about presentation, transforming the lovely baked cake into the finished dessert seen in the photograph.
- Cooling is Essential Once removed from the oven, let the cake cool in its pan on a wire rack for 15 minutes. This allows it to set slightly. Afterward, invert the cake onto the rack, gently remove the pan, and peel off the parchment paper. Allow it to cool completely to room temperature. A fully cooled cake is necessary for the topping to look its best.
- A Dusting of Sugar For the delicate, snowy top, spoon the powdered sugar into a small sieve. Hold it a few inches above the cake and tap the side gently, moving it around to cover the entire surface with a light, even dusting.
- Garnish with Fresh Orange The garnish serves as a beautiful hint of the flavor within. Slice a fresh orange very thinly. Cut a few of these round slices in half. Artfully arrange the half-moon slices on top of the cake. When a piece is cut, place another orange slice on it for a lovely presentation.
With these steps completed, a beautiful and delicious homemade orange cake is ready to be shared and enjoyed. Mastering this recipe is a wonderful achievement and opens the door to a whole world of baking possibilities.