

The Ripple & Pom-Pom Summer Bag
There’s a special kind of joy that comes from carrying something you’ve made with your own hands. This gorgeous tote bag, with its sunny colors and playful details, is the perfect project to bring that joy to your wardrobe. It’s ideal for a trip to the market, a day at the beach, or simply for adding a pop of handmade charm to your outfit.
This guide will walk you through every step of the process, from the sturdy base to the fun pom-pom finish. Don’t worry if you’re new to crochet; we’ll go over everything you need to know in simple, clear terms. Let’s gather our supplies and begin this wonderful project!
What You’ll Need
Before we start, let’s get all our tools and materials together. For this bag, a sturdy cotton yarn is recommended as it holds its shape well.
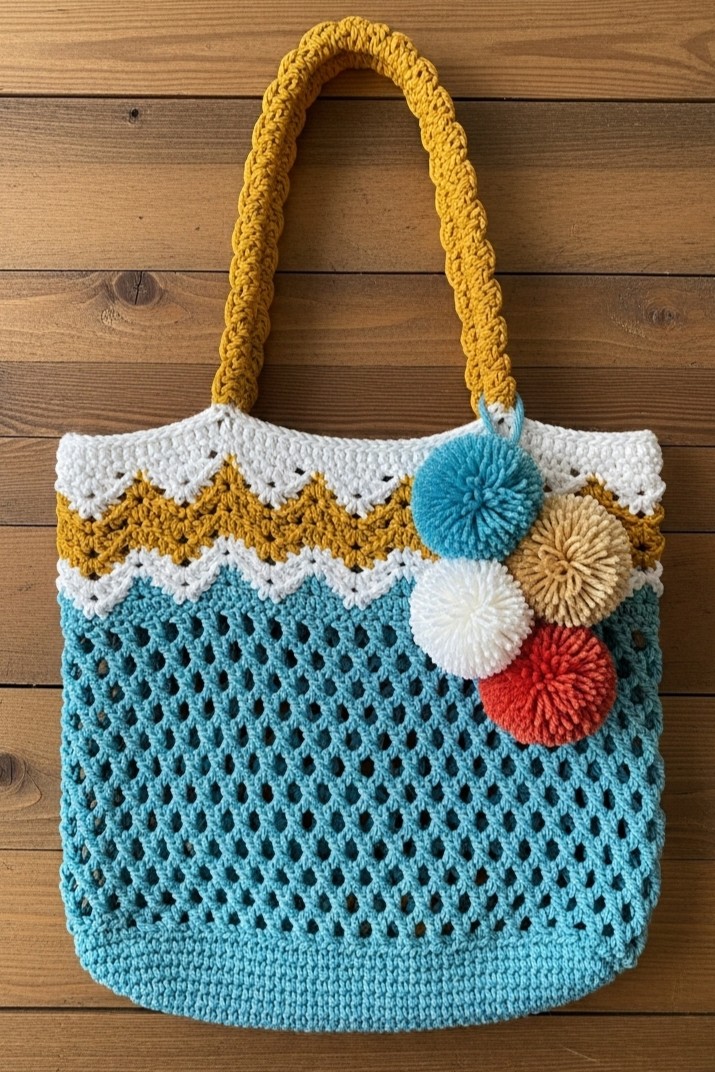
- 🧶 Worsted weight cotton yarn in four colors: Teal (main body), White (chevron accent), Mustard Yellow (chevron accent and handle), and a small amount of Red-Orange (for one pom-pom).
- 🪝 A 5.0mm (H-8) crochet hook.
- ✂️ A pair of sharp scissors.
- 🧵 A darning or tapestry needle for weaving in the ends.
- 🎉 A pom-pom maker (this is optional, but makes the process much faster!).
A Quick Stitch Guide for Beginners
This pattern uses a few fundamental crochet stitches. Here’s a quick rundown of how to form each one.
- Chain (ch): This is the foundation of almost all crochet. Make a slip knot on your hook, then use the hook to grab the yarn (this is called a “yarn over”) and pull it through the loop that’s already on your hook. That’s one chain!
- Slip Stitch (sl st): This is used to join pieces or rounds. Insert your hook into the designated stitch, yarn over, and pull the yarn through both the stitch and the loop on your hook in one smooth motion.
- Single Crochet (sc): This is a short, dense stitch. Insert your hook into a stitch, yarn over, and pull up a loop (you’ll have two loops on your hook). Yarn over again and pull through both loops.
- Double Crochet (dc): This is a taller stitch that works up faster. Yarn over first, then insert your hook into a stitch. Yarn over and pull up a loop (you’ll have three loops on your hook). Yarn over and pull through the first two loops. Yarn over one last time and pull through the remaining two loops on your hook.
The Step-by-Step Guide
We’ll build this bag section by section. Take your time with each part and enjoy the process of watching your bag come to life.
Part 1: The Solid Base
The bag starts with a sturdy, solid oval base made with the main Teal yarn. This ensures your belongings stay secure.
- Foundation: With your Teal yarn, chain 31.
- Round 1: Work 2 single crochet (sc) stitches into the second chain from the hook. Then, work 1 sc in each of the next 28 chains. In the very last chain, work 4 sc stitches. Now, you will turn your work to continue along the other side of the foundation chain. Work 1 sc in each of the next 28 chains. In the last space (which is the same one you started in), work 2 more sc stitches. Join with a slip stitch to the first sc.
- Round 2: Chain 1. Work 2 sc in each of the first 2 stitches. Work 1 sc in each of the next 28 stitches. Work 2 sc in each of the next 4 stitches (this is the curve at the end). Work 1 sc in each of the next 28 stitches. Work 2 sc in each of the last 2 stitches. Join with a slip stitch to the first sc.
- Rounds 3-5: Continue working in rounds, adding increases evenly at both curved ends to keep the base flat. A good way to do this is to add 6 stitches per round, with 3 spaced out on each end. Your base is complete when it reaches your desired width.
Part 2: Building the Mesh Body
Now we switch to the airy, open mesh pattern for the body of the bag, still using the Teal yarn. This section works up quickly!
- Transition Round: Chain 1 and work one round of single crochet in the back loop only. This will form a neat line that helps the bag stand upright.
- Round 1 of Mesh: Chain 3 (this counts as your first double crochet and chain-1 space). Skip the next stitch, then work 1 double crochet (dc) in the stitch after that. Chain 1, skip the next stitch, work 1 dc in the next stitch. Repeat the section between the asterisks (*) all the way around. Join with a slip stitch to the 2nd chain of your starting chain-3.
- Subsequent Rounds: Continue repeating Round 1 of the mesh pattern. Just keep going in rounds until the teal section of your bag is the height you want it to be, just before where the chevron pattern begins.
Part 3: The Chevron Top
This is where the fun colorwork happens! The zigzag, or chevron, pattern is made by using increases and decreases.
- First White Row: Switch to your White yarn. Chain 3 (counts as 1 dc). Work 1 dc in the next 2 stitches. In the next stitch, work 3 dc (this is your peak). Work 1 dc in each of the next 3 stitches. Skip the next 2 stitches (this is your valley). Work 1 dc in each of the next 3 stitches. Repeat the instructions between the asterisks (*) around the entire top of the bag. Join with a slip stitch.
- Mustard Row: Switch to your Mustard Yellow yarn and repeat the exact pattern from the previous row, making sure your peaks and valleys line up perfectly.
- Second White Row: Switch back to your White yarn and repeat the pattern one last time.
- Final Edge: To get a clean, straight top edge above the points of the chevron, work one final round of single crochet with the White yarn. Fasten off and weave in your ends.
Part 4: The Sturdy Handle
This bag features a thick, rope-like handle with a beautiful braided texture. To achieve this look, we’ll use a special technique called a Romanian Cord, which creates a dense, round, and non-stretchy strap.
- Making the Cord: With your Mustard Yellow yarn, chain 3.
- Step 1: Work 1 sc in the 2nd chain from the hook, and 1 sc in the last chain. (2 sc total). Do not chain 1.
- Step 2: Turn your work clockwise so you are looking at the side edge. You will see a prominent horizontal bar (or “bump”) on this edge. Insert your hook under that bar, yarn over, pull up a loop. Yarn over, and pull through both loops on your hook to complete the stitch.
- Step 3: From now on, you will always repeat the following: Turn your work. Insert your hook under the two prominent horizontal bars that are now on the side edge. Complete a single crochet. The cord will build upon itself, creating a dense, rounded strap with a braided look.
- Continue: Repeat Step 3 until your handle is the desired length (a good length is about 20-24 inches, but you can measure it against your shoulder for comfort). Fasten off, leaving a long tail for sewing.
- Attachment: Position the ends of the handle on the inside of the bag, centered on each side. Using your darning needle and the long yarn tail, sew the handle securely in place. Go over your stitches several times to ensure it’s very strong.
Part 5: The Playful Pom-Poms
The final touch is the cheerful cluster of pom-poms!
- Using your pom-pom maker or the traditional cardboard donut method, make four dense, fluffy pom-poms: one Teal, one White, one Mustard Yellow, and one Red-Orange.
- Leave a long tail on each pom-pom when you tie it off.
- Use these tails to tie the four pom-poms together in a tight cluster, as seen in the image.
- Attach the entire cluster securely to the side of the bag, right below the chevron pattern.
Polishing Your Masterpiece
Take a moment to weave in any remaining loose ends with your darning needle. This step is what gives your project a truly professional and finished look.
And there you have it! You’ve just put together a stunning, functional piece of fiber art. Feel the weight of it, admire the stitches, and get ready to receive compliments. Enjoy taking your beautiful new bag out into the world.