
Warmest Welcome Knitted Booties
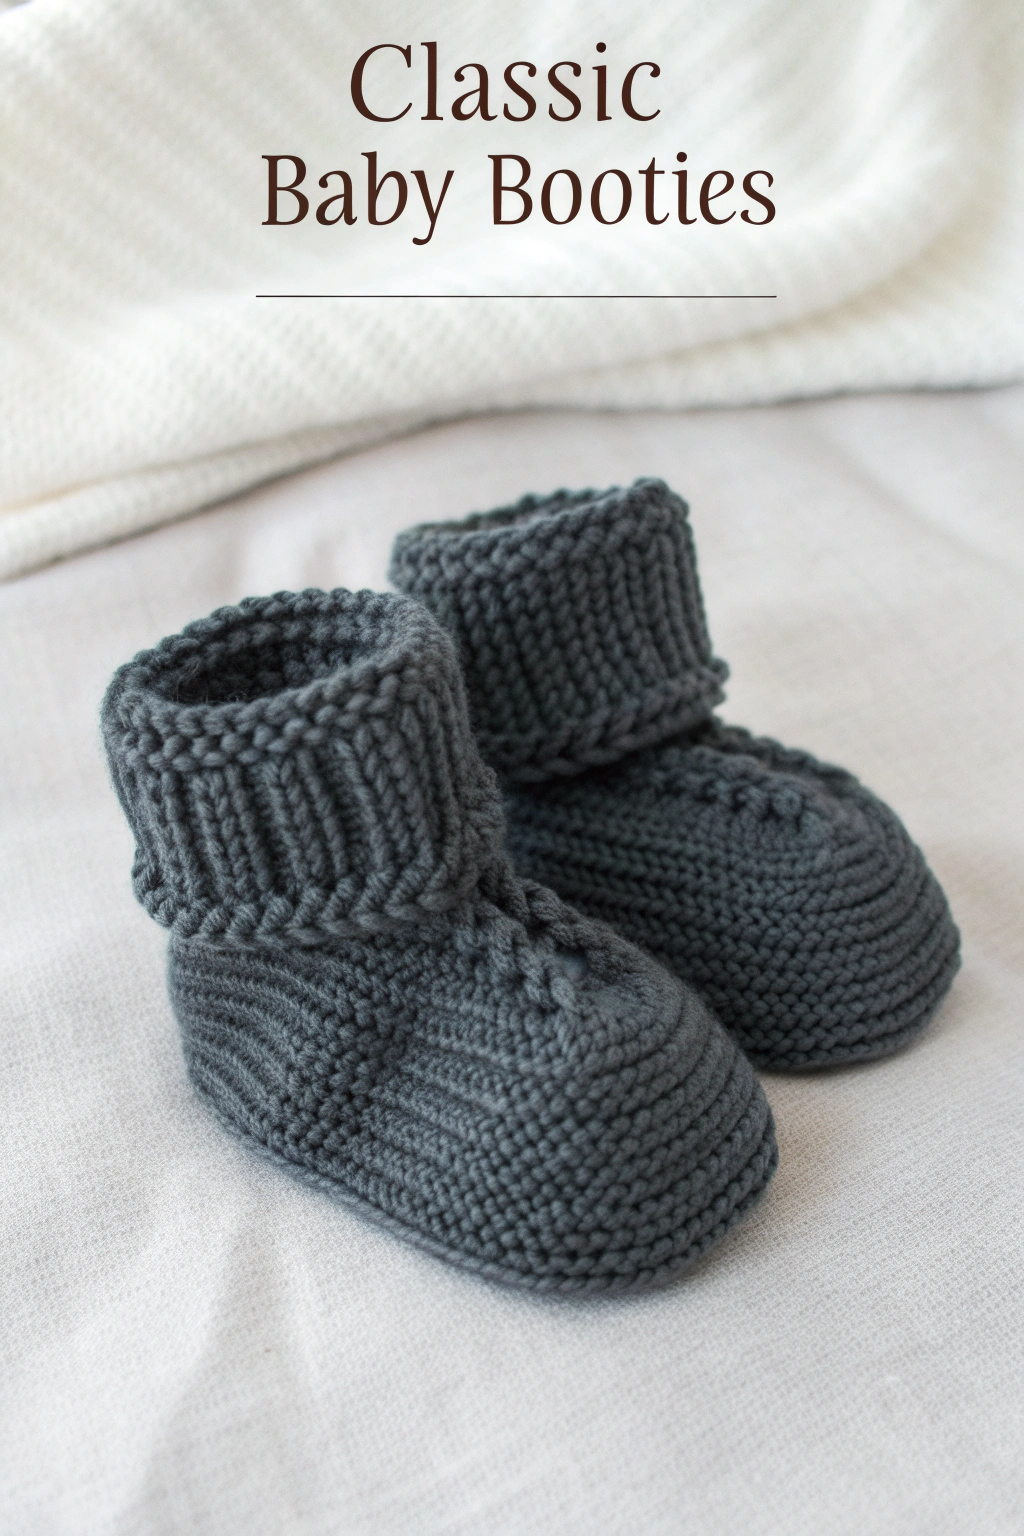
There’s something incredibly special about hand-knitted baby items, isn’t there? Imagine those tiny feet Wiggling in a pair of soft, cozy booties you’ve lovingly put together stitch by stitch. These Classic Baby Booties, as seen in the image, are just the project to fill your heart with warmth, both during the making and when you see them worn. Their timeless design, featuring a snug ribbed cuff and a comfy garter stitch body, makes them a perfect first knitting adventure or a delightful quick make for more seasoned hands. The dark grey color is wonderfully versatile, and the textures are simply lovely to behold and to touch.
Why You’ll Adore Making These Booties
These aren’t just any baby booties; they are a journey into the satisfying world of knitting. The design is charmingly simple yet full of lovely details:
- A generously folded ribbed cuff ensures they stay on little feet.
- A distinct horizontal ridge neatly separates the cuff from the foot, adding a touch of classic style.
- The main foot and sole are worked in cushy garter stitch, which is wonderfully stretchy and forgiving for beginners.
- A clear garter stitch band runs across the instep, providing structure and a traditional look.
- They are constructed flat and then seamed, a straightforward technique for newcomers.
Get ready to experience the joy of transforming a skein of yarn into something truly precious!
Gather Your Supplies
Before we begin, let’s get your toolkit ready. For one pair of booties (sized approximately for 0-3 months):
- 🧶 Yarn: About 50g of DK (double knitting) weight yarn in a dark grey. A soft wool or a wool-acrylic blend is ideal for comfort and washability.
- 🥢 Knitting Needles: 4mm (US size 6) straight knitting needles.
- ✂️ Scissors: For snipping yarn.
- 🧵 Tapestry Needle: A blunt-ended needle with a large eye, for seaming the booties and weaving in ends.
- 📏 Measuring Tape: Handy for checking your progress (optional but helpful).
Understanding the Basics (Your Knitting ABCs!)
Don’t worry if these terms are new! We’ll walk through them.
-
Casting On:
This is how you get your very first loops of yarn onto your knitting needle to begin. Think of it as laying the foundation. There are many methods, but a simple “long-tail cast-on” or “thumb method” is great for beginners (look up a quick video tutorial if you’re unsure – seeing it helps immensely!).
-
The Knit Stitch (k):
This is one of the two fundamental stitches in knitting. You’ll insert your right needle into the front of a loop on your left needle, wrap yarn around the right needle, and pull a new loop through. This forms a ‘V’ shape on the Right Side of your work.
-
The Purl Stitch (p):
The trusty companion to the knit stitch. For a purl stitch, you bring your yarn to the front of your work, insert your right needle into the loop on your left needle from back to front, wrap the yarn, and push a new loop through to the back. This forms a little horizontal bump on the Right Side.
-
Garter Stitch:
The simplest and often first fabric a knitter learns. You knit every stitch of every row. This produces a wonderfully squishy, reversible, bumpy fabric. The foot and sole of these booties are made in garter stitch.
-
1×1 Rib Stitch (K1, P1 Rib):
This is a stretchy fabric, perfect for cuffs. You alternate one knit stitch, then one purl stitch across your row. On the next row, you knit the knit stitches and purl the purl stitches as they face you, so the columns of ‘V’s and bumps line up.
-
Knit Two Together (k2tog):
This is a common way to decrease, or reduce the number of stitches on your needle, helping to shape your knitting. You simply insert your right needle into two stitches on the left needle at the same time (as if to knit them) and knit them together as one stitch.
-
Binding Off (Casting Off):
This secures your live stitches at the end of your project so they don’t unravel. It makes a neat, finished edge.
-
Pick Up and Knit (PUK):
This technique allows you to add new stitches along an existing edge of your knitting – for example, along the side of the instep flap we’ll be making.
-
Right Side (RS) / Wrong Side (WS):
The RS is the “public” side of your knitting, the side that will show on the outside. The WS is the inside. For garter stitch, both sides look the same. For ribbing, the RS is usually where the pattern looks most defined.
Let’s Start Knitting! (Step-by-Step Guide)
We’ll make one bootie at a time. They are knit flat and then seamed. Remember to take your time and enjoy the process!
(These instructions are for a bootie approximately 3.5-4 inches long, suitable for 0-3 months. Adjust stitch counts slightly for different sizes/yarn weights if you’re feeling adventurous, but these numbers are a great starting point.)
Part 1: The Cuff
The cuff is worked in 1×1 rib stitch for stretchiness and is designed to be folded down.
- Cast on 32 stitches. (Leave a tail of about 6-8 inches for seaming later).
- Row 1 (WS): Purl 1 stitch, Knit 1 stitch. Repeat (P1, K1) across the entire row, ending with K1.
- Beginner Tip: Since the first row sets up the rib, and the RS should start with a K1 for neatness when folded, we start the WS with P1.
- Row 2 (RS): Knit 1 stitch, Purl 1 stitch. Repeat (K1, P1) across the entire row, ending with P1.
- Repeat Rows 1 and 2 until the cuff piece measures about 2.5 inches from the cast-on edge. End having just completed a WS row, ready to start an RS row. This length will allow for a nice fold-over.
Part 2: The Transition Ridge & Ankle Start
This is where we form that lovely defined line seen in the image, separating the cuff from the foot.
- Next Row (RS – Ridge Row): Purl all 32 stitches. This single purl row on the right side is what pops out to form the ridge.
- Now, we switch to Garter Stitch for the ankle section.
- Next Row (WS): Knit all 32 stitches.
- Next Row (RS): Knit all 32 stitches.
- Repeat these last two garter stitch rows once more (so you’ve worked 4 rows of garter stitch in total after the purl ridge row).
Part 3: The Instep Flap (Top of Foot)
This garter stitch flap forms the top part of the baby’s foot.
- Row 1 (RS): Knit 11 stitches, then turn your work around, leaving the remaining 21 stitches unworked on your left needle for now. We are only going to work on these first 11 stitches for a bit.
- Note: For the 32 stitches, we’re allocating 11 for one side, 10 for the central instep, and 11 for the other side. We’ll work the central 10 stitches next. My apologies, let’s correct that for clarity:
- Corrected Row 1 for Instep Flap (RS): Knit 11 stitches (this is side 1, put them on a stitch holder or spare piece of yarn if it’s easier to manage). Now, focusing on the next 10 stitches on your left needle for the instep: Knit these 10 stitches. Then turn your work, leaving the final 11 stitches unworked on the left needle for now (these are side 2).
- You are now working back and forth only on these 10 central instep stitches.
- Row 2 (WS of instep flap): Knit all 10 stitches.
- Row 3 (RS of instep flap): Knit all 10 stitches.
- Repeat Rows 2 and 3 (working in garter stitch on these 10 instep stitches only) until this instep flap measures about 1.5 inches long from where you started it (roughly 12-14 rows).
- End having just completed a WS row of the instep flap. Bind off these 10 instep stitches. Cut your yarn, leaving a 6-inch tail. You now have 11 stitches on hold for side 1, a finished instep flap, and 11 stitches on hold for side 2.
Part 4: Forming the Main Foot and Sole
Now we bring it all together to form the sides of the foot and the sole.
- With the Right Side of your work facing you, re-join your yarn to the first set of 11 stitches (side 1) that were waiting on your needle or holder.
- Set-up Row (RS):
- Knit across these 11 stitches (side 1).
- Now, you need to pick up and knit stitches evenly along the side edge of your garter stitch instep flap. Aim to pick up and knit about 8 stitches. (To do this, insert your right needle into the edge of the flap, wrap yarn, and pull through a loop, just like a knit stitch. Repeat along the edge.)
- Next, pick up and knit 10 stitches evenly across the bound-off edge of the instep flap.
- Then, pick up and knit about 8 stitches down the other side edge of the instep flap.
- Finally, knit across the remaining 11 stitches (side 2) that were on hold.
- You should now have approximately 11 (side 1) + 8 (PUK side flap) + 10 (PUK top flap) + 8 (PUK side flap) + 11 (side 2) = 48 stitches on your needle. (Don’t worry if it’s 47 or 49, it’ll be fine!).
- Work in Garter Stitch (knit every row) on all these stitches for about 1 inch. This builds up the sides of the foot. End having just completed a WS row.
- Shape the Sole (Toe End):
- Decrease Row 1 (RS): K1, k2tog, knit until 3 stitches remain, k2tog, K1. (You’ve decreased 2 stitches).
- Decrease Row 2 (WS): Knit all stitches.
- Repeat Decrease Rows 1 and 2 until you have about 16 stitches remaining.
- Bind off all remaining stitches. Cut yarn, leaving a long tail (about 12-15 inches) for seaming the sole.
You’ve finished knitting all the parts for one bootie! It will look like a sort of flattened ‘T’ shape with a ribbed top. Give yourself a pat on the back! Now, repeat all steps to make the second bootie identical to the first.
Part 5: Finishing Touches (Seaming)
This is where your flat knitted pieces magically transform into adorable booties! We’ll use the tapestry needle and the yarn tails. A mattress stitch gives a nice invisible seam if you know it, but any neat whip stitch or backstitch will work well.
- Seam the Center Back: Fold the bootie in half lengthwise with the Right Sides facing each other (so the wrong side is out). Starting at the top edge of the ribbed cuff, sew down the back of the cuff and the ankle section, stopping where the sole shaping began (where you started picking up stitches for the main foot/sole part). Use the yarn tail you left at the cast-on edge if it’s long enough, or a new piece of yarn.
- Seam the Sole: Keeping the bootie folded with Right Sides together, use the long tail from binding off the sole stitches to sew the sole. Start at one corner of the bound-off sole edge and sew across this edge (this forms the toe). Then, continue sewing, attaching the garter stitch edges of the sole piece to the lower edges of the foot (the picked-up stitch sections and the lower parts of the original side stitches).
- Weave in All Ends: Turn the bootie right side out. Thread any remaining yarn tails onto your tapestry needle and weave them discreetly into the inside of the bootie for a few inches before snipping off the excess. This prevents unraveling and looks tidy.
- Fold Down the Cuff: Fold the ribbed cuff over to the outside.
And there you have it – one perfectly formed Classic Baby Bootie! Repeat the seaming for the second bootie.
Your Beautifully Hand-Made Booties
Step back and admire your handiwork! You’ve taken yarn and needles and patiently worked each stitch to fashion something truly special. These little booties are not just footwear; they are a token of love and care, ready to keep tiny toes snug and warm.
Don’t hesitate to try this project. Even if you stumble a bit, every stitch is a learning experience. The joy of seeing those finished booties will be immense. We’d absolutely love to see your finished pieces! Share a photo of your booties – perhaps on a tiny model, or just looking cute on their own! Happy knitting!