

Your Chic Crochet Circle Tote
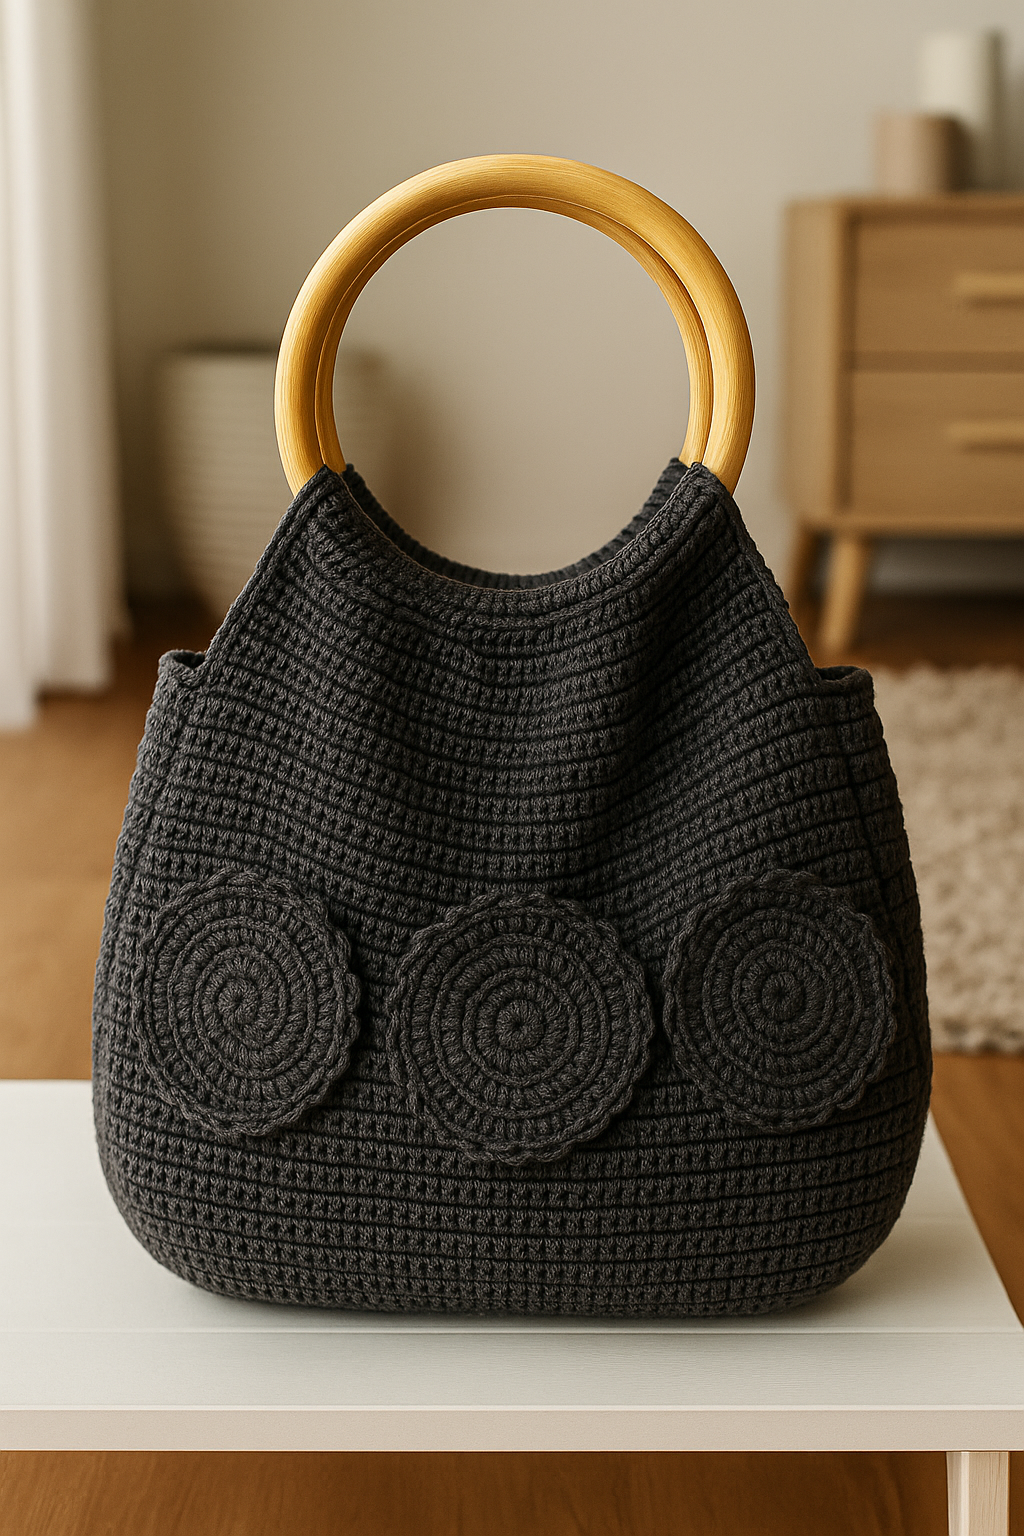
There’s a special kind of pride that comes from using something you’ve brought to life with your own two hands. Take a look at this gorgeous tote bag. With its modern charcoal grey body, striking wooden handles, and charming spiral details, it’s a true statement piece.
The secret to this bag’s modern, structured look lies in combining the right material with the right technique. To get the exact texture you see in the picture, we’ll be using a thick, cord-like yarn—often known as cotton macrame cord—but we will be fashioning it with the technique of crochet. This gives your bag a sturdy, stylish form that stands on its own, and we’re here to show you exactly how to do it, step by step.
What You’ll Need
Before we begin, let’s gather our tools. Having everything ready makes the whole process smooth and enjoyable.
- 🧶 Yarn: 2 skeins of a 5mm cotton cord suitable for crochet. This is often sold as ‘macrame cord’ or ‘cotton rope’ and is key to giving the bag its structured form. Choose a deep charcoal grey color.
- 🪝 Crochet Hook: An 8.00mm hook will work well with the recommended yarn.
- 🪵 Handles: Two round wooden handles, approximately 6 inches (15 cm) in diameter.
- ✂️ Scissors: A sharp pair for clean cuts.
- 🪡 Tapestry Needle: A large-eye, blunt needle for weaving in ends and assembly.
- 📍 Stitch Marker: This little helper is essential for keeping track of your rounds.
The Basic Stitches and Techniques
This entire bag is fashioned from a few fundamental techniques. Let’s get familiar with them. Don’t rush this part—understanding these basics is the foundation for a wonderful final piece.
Slip Knot and Chain (ch): Every crochet project starts here. A slip knot is the adjustable loop you put on your hook. A chain is a series of interconnected loops that forms the base for other stitches. To make one, you simply wrap the yarn over your hook and pull it through the loop that’s already there.
Magic Circle: The bag’s base and decorative medallions start with a magic circle. This technique allows you to begin working in the round and pull the center completely closed, leaving no hole. It’s a bit of yarn magic!
Single Crochet (sc): This is the primary stitch for the bag. To make a single crochet, you insert your hook into a stitch, yarn over, pull a loop through (you’ll have two loops on your hook), yarn over again, and pull through both loops. It’s a short, dense stitch that gives the bag its solid fabric.
Single Crochet in the Back Loop Only (sc blo): This is the special technique that gives the bag its distinct ribbed texture. A normal stitch goes under both top loops (which look like a ‘V’). For sc blo, you will insert your hook only under the back loop of that ‘V’ before completing your single crochet.
Slip Stitch (sl st): A slip stitch is the shortest stitch, used to join work or move the yarn without adding height. You insert your hook, yarn over, and pull the yarn through the stitch and the loop on your hook in one motion.
Let’s Build Your Tote Bag
Ready? Take a deep breath, and let’s start. Remember to use your stitch marker to mark the first stitch of every round—this will be your best friend!
Part 1: The Flat Base
We’ll begin by forming a flat circle that will serve as the bottom of your tote.
- Start with a magic circle.
- Round 1: Make 6 sc into the magic circle. Pull the tail to close the circle tightly. Place your stitch marker in the first sc. (6 stitches)
- Round 2: Work 2 sc in every stitch around. (12 stitches)
- Round 3: [1 sc in the next stitch, 2 sc in the stitch after that]. Repeat this pattern all the way around. (18 stitches)
- Round 4: [1 sc in each of the next 2 stitches, 2 sc in the stitch after that]. Repeat around. (24 stitches)
- Continue this pattern of increasing, adding one more sc between the increases on each round, until your base measures about 8 inches (20 cm) in diameter. Your last round will be something like [1 sc in each of the next 8 stitches, 2 sc in the next].
Part 2: The Body Walls
Now, we’ll stop increasing and start building the walls of the bag upwards. This is where that lovely texture comes in.
- To transition from the base to the walls, you will now work one full round of sc in the back loop only (sc blo). Do not make any increases in this round. This forces the stitches to start moving upward.
- From here on, you will work in a continuous spiral. Simply keep making one sc blo in every stitch of every round. Move your stitch marker up at the beginning of each new round.
- Continue working rounds of sc blo until the side of your bag measures approximately 9 inches (23 cm) tall from the base.
Part 3: Shaping the Top & Attaching Handles
This part requires a little focus, as we’ll shape the bag to fit the handles perfectly. We’ll be working back and forth in rows for a short section to form the dipped front and back, then attaching the handles.
- Lay your bag flat to find the side-points. Place temporary stitch markers on each side, dividing the bag in half.
- Front Dip: Starting one stitch after a side marker, sl st in the next 5 stitches, sc in the next 15 stitches (or however many stitches are in the center), and sl st in the last 5 stitches before the next side marker. This forms the lower edge of the front opening. Fasten off your yarn.
- Repeat the exact same process on the other side for the back dip.
- Attaching Handles: Now, re-join your yarn at one of the “high points” on the side of the bag. You will now be working single crochets around the wooden handle to secure it.
- Hold a wooden handle against the top edge of one of the side sections. Insert your hook into the first stitch of the high point, go around the handle, yarn over, and pull up a loop. Complete your sc. You are essentially wrapping the handle with your stitches.
- Continue making one sc in each stitch across the high point, making sure each stitch encases the wooden handle. This should be a tight, secure attachment. Once you reach the end of the high point, fasten off.
- Repeat this entire process for the three remaining high points to attach both handles securely.
Part 4: The Spiral Medallions
These three decorative circles are the final touch.
- For each medallion, start with a magic circle.
- Round 1: 6 sc into the circle. Pull to close.
- Round 2: 2 sc in each stitch around. (12 stitches)
- Round 3: [1 sc, 2 sc in the next st]. Repeat around. (18 stitches)
- Round 4: [1 sc in the next 2 stitches, 2 sc in the next st]. Repeat around. (24 stitches)
- Round 5: Work one sl st in each stitch around. This gives a clean, finished border. Fasten off, leaving a long tail for sewing.
- Make three medallions in total.
Adding the Final Polish
The last step is to weave in all your loose ends using the tapestry needle. Tuck them securely into the backs of your stitches so they are invisible and won’t unravel.
Using the long tails on your medallions, carefully sew them onto the front of your bag. Refer to the image for placement—they are centered horizontally along the front of the bag, nestled right above the base.
A Tote Full of Pride
Stand back and admire your handiwork. You just turned yarn and a pair of handles into a durable, stylish, and completely unique bag. Every time you carry it, you’ll feel that little spark of satisfaction from having made it yourself.
Feel free to experiment with different colors on your next one! We would absolutely love to see your finished bags, so please share a picture of your beautiful new accessory. Happy hooking!