
Your Go-To Green Floral Tote
What could be more rewarding than seeing a strand of yarn become a beautiful, useful piece through your own efforts? We’re setting off on an exciting crafting adventure to fashion this stunning Crocheted Tote Bag, highlighted by its sweet floral granny square pocket. It’s a wonderful project for anyone beginning their crochet journey, and I’ll provide clear, step-by-step guidance. Imagine the satisfaction of toting your belongings in a bag you meticulously pieced together!
What You’ll Need To Get Started
Before we dive in, let’s gather our supplies. Having everything ready makes the process smooth and enjoyable.
- 🧶 Yarn:
- Worsted weight cotton yarn in Forest Green (approx. 250-300 yards for the bag body and granny square border)
- Worsted weight cotton yarn in Cream (approx. 30-50 yards for the flower petals)
- 🪝 Crochet Hook: Size H/8 (5.00 mm) – or the size recommended for your chosen yarn.
- ✂️ Scissors: For snipping yarn.
- 🪡 Yarn Needle: (Also called a tapestry needle) For weaving in ends and sewing.
- ✨ Optional: Stitch markers can be helpful for keeping track of stitches, especially when working in rounds.
Understanding The Basic Crochet Stitches
If you’re an absolute beginner, these are the foundational stitches we’ll be using. Don’t worry, they’re simpler than they sound!
- Slip Knot: This is how you get the yarn onto your hook to begin. It’s a loop that can be tightened.
- Chain Stitch (ch): The most basic crochet stitch. You’ll yarn over (wrap yarn around your hook) and pull it through the loop already on your hook. This forms a chain, which is the foundation for many projects.
- Single Crochet (sc): A short, dense stitch.
- Insert your hook into the designated stitch or space.
- Yarn over and pull up a loop (you’ll have two loops on your hook).
- Yarn over again and pull through both loops on your hook. That’s one single crochet!
- Half Double Crochet (hdc): A stitch that’s a bit taller than a single crochet.
- Yarn over, then insert your hook into the designated stitch.
- Yarn over and pull up a loop (three loops on your hook).
- Yarn over again and pull through all three loops on your hook.
- Double Crochet (dc): Taller than an hdc, this stitch works up quickly.
- Yarn over, then insert your hook into the designated stitch.
- Yarn over and pull up a loop (three loops on your hook).
- Yarn over and pull through the first two loops on your hook (two loops remaining).
- Yarn over again and pull through the remaining two loops on your hook.
- Treble Crochet (tr): An even taller stitch, perfect for making petal shapes.
- Yarn over twice, then insert your hook into the designated stitch.
- Yarn over and pull up a loop (four loops on your hook).
- Yarn over and pull through the first two loops on your hook (three loops remaining).
- Yarn over and pull through the next two loops on your hook (two loops remaining).
- Yarn over again and pull through the final two loops on your hook.
- Slip Stitch (sl st): Used to join stitches or rounds, or to move yarn across stitches without adding height.
- Insert your hook into the designated stitch.
- Yarn over and pull the yarn through both the stitch and the loop on your hook in one motion.
- Magic Ring (Adjustable Ring): A technique to start projects worked in the round without leaving a hole in the center. If this feels tricky, you can usually substitute by chaining 2, and then working your first round of stitches into the second chain from the hook.
- Working in Rounds: You’ll be crocheting in a circle, joining the end of each round to the beginning before starting the next.
- Fasten Off: When you finish a piece or a color section, cut your yarn leaving a 6-8 inch tail, then pull the tail through the last loop on your hook to secure it.
- Weave in Ends: Using your yarn needle, thread the yarn tails through the backs of your stitches to hide them neatly and securely.
Let’s Begin! The Floral Granny Square Pocket
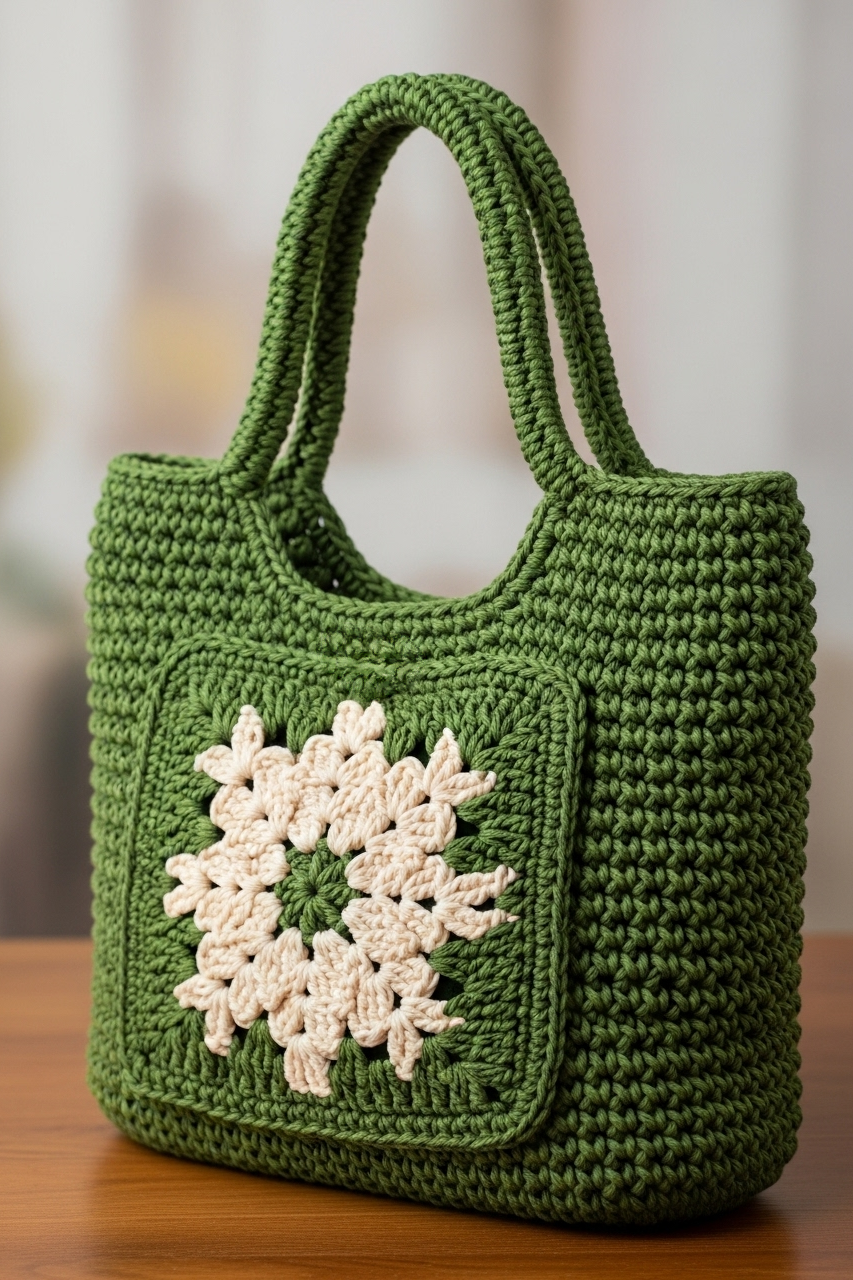
This beautiful pocket is the star of our bag! It features a green center, lovely cream petals, and a green border.
The Flower Center (Green Yarn)
- Round 1: With your Green yarn, make a magic ring.
- Chain (ch) 1 (this chain does not count as a stitch).
- Work 8 single crochet (sc) stitches into the magic ring.
- Pull the tail of the magic ring gently but firmly to close the center hole.
- Slip stitch (sl st) into the very first sc you made to join the round.
- Fasten off your green yarn, leaving a 6-inch tail. Weave this tail in later.
The Flower Petals (Cream Yarn)
Now, we’ll attach the Cream yarn to form those pretty petals.
- Round 1 (Petals):
- Join your Cream yarn with a slip stitch (sl st) in any of the 8 sc stitches of the green center.
- To make the first petal: In the same stitch where you joined:
- Chain (ch) 3 (this counts as your first part of the petal structure).
- Work 2 treble crochet (tr) stitches.
- Ch 3 again.
- Slip stitch (sl st) all into that same sc stitch from the green center. One petal is complete! It has a lovely pointed shape.
- To make the next 7 petals: Move to the next sc stitch of the green center. In this stitch, work: (sl st, ch 3, 2 tr, ch 3, sl st).
- Repeat this sequence (sl st, ch 3, 2 tr, ch 3, sl st) in each of the remaining 6 sc stitches around the green center. You will have 8 cream petals in total.
- After your 8th petal, sl st into the very first sl st where you joined the cream yarn to make the round neat.
- Fasten off your cream yarn, leaving a 6-inch tail.
Squaring Off the Flower (Green Yarn)
Next, we’ll frame our flower with green yarn to make it into a square.
- Round 1 (Squaring):
- Join your Green yarn with a sl st in any ch-3 space at the tip of one of your cream petals (this is one of the ch-3s that forms the point of a petal).
- First Corner: In this same ch-3 space, work: (ch 3 (counts as your first double crochet), 2 double crochet (dc), ch 2, 3 dc). This forms your first corner.
- First Side: Ch 1. In the ch-3 space at the tip of the next cream petal, work 3 half double crochet (hdc) stitches. Ch 1. This forms the first side section.
- Second Corner: In the ch-3 space at the tip of the next cream petal, work (3 dc, ch 2, 3 dc). This is your second corner.
- Second Side: Ch 1. In the ch-3 space at the tip of the next cream petal, work 3 hdc. Ch 1.
- Repeat this pattern (Corner, Side) two more times to complete all four sides and four corners of your square.
- To finish the round, sl st to the top of your beginning ch-3 (the one that counted as your first dc).
- Round 2 (Building the Square):
- Sl st across the next 2 dc stitches and into the first corner ch-2 space.
- Corner: In this ch-2 space, work: (ch 3 (counts as dc), 2 dc, ch 2, 3 dc).
- Side: [Ch 1. In the next ch-1 space along the side of your square (this is the space between the corner cluster and the hdc cluster from the previous round), work 3 dc. Ch 1. In the next ch-1 space (between the hdc cluster and the next corner), work 3 dc.]
- Next Corner: In the next corner ch-2 space, work (3 dc, ch 2, 3 dc).
- Repeat this pattern of (Side, Corner) around all four sides.
- After your last side section and ch-1, sl st to the top of the beginning ch-3 to join.
- Round 3 (Edging the Square):
- Ch 1 (does not count as a stitch). Work 1 sc in the same stitch.
- Work 1 sc in each dc stitch across the side.
- Work 1 sc in each ch-1 space along the side.
- When you reach a corner ch-2 space, work (1 sc, ch 1, 1 sc) into that corner space. This keeps the corners defined.
- Continue working 1 sc in each stitch and ch-1 space, and (1 sc, ch 1, 1 sc) in each corner ch-2 space all the way around.
- Sl st to the very first sc you made to join.
- Fasten off, leaving a long tail (about 15-20 inches). We’ll use this tail later to sew the pocket onto the bag. For now, set your completed granny square aside.
Fashioning the Bag Body (Green Yarn)
The body of this bag is worked in sturdy single crochet stitches, starting with a rectangular base and then working up the sides in rounds.
The Bag Base
- With your Green yarn, ch 26. (This will give a base width of about 9-10 inches. You can adjust this number for a wider or narrower bag).
- Row 1: Work 1 sc in the 2nd ch from your hook, and then 1 sc in each remaining ch across. You will have 25 sc stitches. Turn your work.
- Row 2: Ch 1 (this is a turning chain and does not count as a stitch). Work 1 sc in each sc stitch across (25 sc). Turn your work.
- Rows 3-10 (or desired depth): Repeat Row 2 until your base measures about 3 inches deep. Do not fasten off.
Transitioning to the Bag Sides
Now, we’ll work around the edges of our rectangle to start building upwards.
- Edging Round:
- Ch 1. Work 1 sc in each stitch along the long edge you just finished.
- When you get to the corner, work 3 sc into the corner stitch/space. This helps the fabric turn upwards nicely.
- Continue working sc stitches evenly down the short side of your rectangle (you’ll work approximately 1 sc per row-end).
- Work 3 sc in the next corner.
- Work 1 sc in each stitch along the other long edge (the foundation chain edge).
- Work 3 sc in the next corner.
- Work sc stitches evenly up the remaining short side.
- Work 2 sc in the final corner (the first sc of this round counts as the third stitch for this corner).
- Sl st to the very first sc of this edging round to join. Do not turn your work from now on.
The Bag Sides
We’ll work in continuous rounds of single crochet.
- Round 1 (Establishing the sides):
- Ch 1. Work 1 sc into the back loop only (BLO) of each sc stitch from the previous round, all the way around. Working in the back loop only for this first round creates a defined bottom edge for your bag.
- Sl st to the first sc (the one made in BLO) to join.
- Round 2 onwards (Building height):
- Ch 1. Work 1 sc into both loops of each sc stitch from the previous round, all the way around.
- Sl st to the first sc to join.
- Repeat this Round 2 until your bag sides measure approximately 10-12 inches tall from the base, or your desired height.
- After your final round, fasten off the green yarn, leaving a 6-inch tail.
Adding the Handles (Green Yarn)
The handles are robust and comfortably rounded. We will make two identical handles.
- Make 2 Handles:
- With your Green yarn, ch 8.
- Row 1: Work 1 sc in the 2nd ch from the hook and in each ch across (7 sc). Turn.
- Row 2: Ch 1, 1 sc in each sc across (7 sc). Turn.
- Repeat Row 2 until the strap measures approximately 16-18 inches long (or your preferred handle length).
- Do not fasten off after the last row.
- Fold the strap in half lengthwise, with the “right side” (the side you want showing) facing out.
- Ch 1. Now, you will single crochet through both layers of the folded strap along the long open edge. Insert your hook through the corresponding stitches of both layers for each sc. This will seam the strap into a sturdy, slightly flattened tube.
- Continue working sc stitches through both layers until you reach the end of the strap.
- Fasten off, leaving a long tail (about 10-12 inches) on each handle for sewing.
Assembling Your Beautiful Bag
This is where all your lovely pieces come together!
- Attach the Pocket:
- Lay your bag body flat with the front side facing you.
- Position the Floral Granny Square Pocket on the front of the bag, centering it how you like it. Pin it in place if helpful. The image shows it centered and a couple of inches down from the top edge of the bag.
- Thread the long tail you left on the granny square onto your yarn needle.
- Neatly sew the pocket to the bag along three sides (the bottom and the two vertical sides), leaving the top edge of the granny square open to form the pocket opening. A whip stitch or a mattress stitch works well for a clean attachment. Make sure your stitches are secure.
- Attach the Handles:
- Decide on the placement for your handles on the top rim of the bag. They should be evenly spaced from the sides and from each other. The image shows the handles attached to the inside of the bag’s top rim, a little way down from the very edge.
- Thread a yarn tail from one end of a handle onto your yarn needle.
- Securely sew one end of the handle to the inside top edge of the bag. Use several sturdy stitches, going back and forth a few times to ensure it’s very strong.
- Repeat this process to attach the other end of the same handle to the bag, forming a loop.
- Attach the second handle in the same way on the opposite side of the bag, making sure it aligns with the first handle.
- Weave in All Ends:
- Carefully weave in any remaining loose yarn tails on the inside of the bag using your yarn needle. This makes your work look professional and prevents unraveling.
Tips for Success and Enjoyment
- Tension is Key: Try to keep your stitches consistent – not too tight, not too loose. This comes with practice!
- Count Your Stitches: Especially on the base and early rounds of the bag, counting helps ensure your piece stays the right shape.
- Embrace “Frogging”: If you make a mistake, don’t be afraid to pull out your stitches (it’s called frogging because you “rip-it, rip-it”!). It’s all part of the learning process.
- Enjoy the Rhythm: Once you get the hang of the stitches, crochet can be very relaxing and meditative.
Caring for Your Handmade Tote
Since this bag is made with cotton yarn, it should be fairly easy to care for:
- Gently hand wash in cool water with a mild detergent if needed.
- Rinse well, and gently squeeze out excess water (do not wring).
- Lay the bag flat on a towel to air dry. Reshape it while it’s damp.
Your Wonderful Work is Complete!
Step back and admire the fantastic tote bag you’ve just brought into existence! Every stitch tells a story of your effort and developing skill. This bag isn’t just an accessory; it’s a testament to your patience and ability to fashion something truly special.
We would absolutely love to see your finished tote bag! Please do share pictures of your handiwork. Happy crocheting on your next yarn adventure!