

Your Stunning Blue Shell Stitch Tote
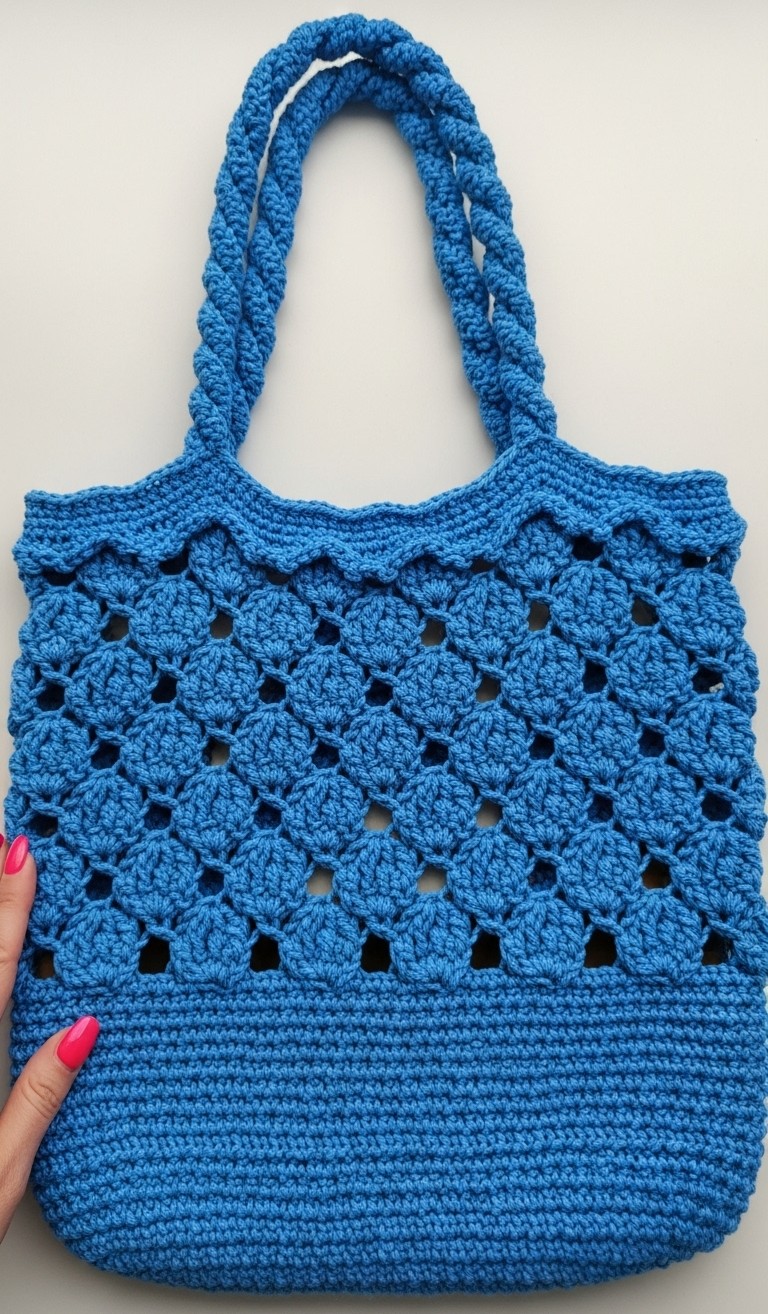
Isn’t it just the best feeling to use something you’ve lovingly made with your own hands? Just look at this gorgeous blue tote bag in the image! It’s such a perfect, vibrant medium blue – ideal for trips to the market or toting around your latest WIP (Work In Progress). The body features a beautiful openwork shell stitch pattern, and those sturdy, twisted handles? They’re super stylish and oh-so-practical. And the really great news? You can absolutely make one just like it! I’m so excited to guide you through every step, even if you’re picking up a crochet hook for the very first time!
This project is such a wonderful way to learn and practice some key crochet stitches, and you’ll end up with a truly lovely and useful piece. Just imagine all the compliments you’re going to get!
Gather Your Supplies
Before we dive in, let’s get our tools and materials ready. For this specific bag, you’ll want:
- 🧶 Yarn: About 200-250g of a sturdy cotton or cotton-blend yarn in a medium blue (worsted weight, category 4, is ideal).
- 🪝 Crochet Hook: A 5.0mm (H-8) hook, or the size recommended on your yarn label to achieve a nice, firm fabric for the base and defined shells.
- ✂️ Scissors: For snipping your yarn.
- 🧵 Tapestry Needle: A blunt needle with a large eye, essential for weaving in those yarn ends neatly at the end.
Understanding the Basic Stitches (Your Crochet ABCs!)
Don’t worry if these terms are new; they’re simpler than they sound! We’ll be using a few core stitches for this bag:
- Slip Knot: This is how you’ll get the yarn onto your hook to begin. It’s just a loop with a knot that can slide to tighten.
- Chain Stitch (ch): The foundation of many crochet projects. You’ll yarn over your hook (wrap the yarn around the hook from back to front) and then pull that yarn through the loop already on your hook. That’s one chain! We often make a series of these to start.
- Single Crochet (sc): A short, dense stitch that builds a solid fabric.
- Insert your hook into the stitch or space where you want to place it.
- Yarn over your hook.
- Pull the yarn through the stitch (you’ll have two loops on your hook).
- Yarn over again.
- Pull the yarn through both loops on your hook. That’s one single crochet!
- Double Crochet (dc): A taller stitch, about twice the height of a single crochet, used to form the lovely shells.
- Yarn over your hook before inserting it.
- Insert your hook into the indicated stitch or space.
- Yarn over.
- Pull up a loop (you’ll have three loops on your hook).
- Yarn over.
- Pull through the first two loops on your hook (two loops will remain).
- Yarn over again.
- Pull through the remaining two loops on your hook. That’s one double crochet!
- Slip Stitch (sl st): A very short stitch used to join parts of your work (like the end of a round to the beginning) or to move your yarn across stitches without adding much height.
- Insert your hook into the indicated stitch.
- Yarn over.
- Pull the yarn through the stitch AND through the loop already on your hook, all in one smooth motion.
A little tip for beginners: Practice these stitches on a small square (called a swatch) first until you feel comfortable with the motions. Consistent tension (not too tight, not too loose) is key!
Let’s Begin Your Beautiful Blue Bag!
We’ll construct this bag from the bottom up, starting with a solid base, then moving to the shell stitch body, adding a pretty top edge, and finally fashioning those distinctive handles.
Section 1: Crafting the Sturdy Base
The base of the bag in the image is constructed with tight, solid stitches, single crochet, worked in rounds to form a sturdy, slightly oval or rectangular foundation with a notable depth. This ensures your bag can hold its contents well and stands nicely.
Let’s make an oval base approximately 10 inches long and 3-4 inches wide at its widest part, with a good depth.
- Start: Make a slip knot and chain 25. (This will be the approximate length of your base. Adjust if you want it longer or shorter).
- Round 1:
- Work 2 sc in the 2nd chain from your hook (this is your first increase for the curved end).
- Sc in each of the next 22 chains.
- Work 3 sc in the last chain (this forms the curve at the other end).
- Now, working along the other side of the foundation chain: sc in each of the next 22 chains (working into the unused loops of the foundation chain).
- Work 1 sc in the very first chain where you put your initial 2 sc (this completes the 3 sc for this end).
- Join with a sl st to the first sc of the round. (You should have 50 stitches).
- Beginner Tip: It can be helpful to place a stitch marker in the first stitch of each round so you know where it begins and ends.
- Round 2:
- Ch 1 (this does not count as a stitch).
- 2 sc in the first stitch (same stitch as join).
- 2 sc in the next stitch.
- Sc in each of the next 22 stitches.
- 2 sc in each of the next 3 stitches (these are the 3 sc that formed the curve at the end).
- Sc in each of the next 22 stitches.
- 2 sc in the last stitch.
- Join with a sl st to the first sc. (You should have 56 stitches).
- Round 3:
- Ch 1.
- Sc in the first stitch. 2 sc in the next stitch. (Repeat this once more: sc in next st, 2 sc in next st).
- Sc in each of the next 22 stitches.
- (Sc in next st, 2 sc in next st) – repeat this 3 times over the curved end.
- Sc in each of the next 22 stitches.
- Sc in next st, 2 sc in next st.
- Join with a sl st to the first sc. (You should have 62 stitches).
- Rounds 4 – approx. 15 (or until the solid base section measures about 2.5 – 3 inches / 6 – 7.5 cm in height from the start of Round 4, or your desired depth):
- Ch 1.
- Sc in each stitch around.
- Join with a sl st to the first sc. (Stitch count remains 62, or your current count if you adjusted). This section builds up the solid, deep sides of the base, as seen in the image. The photo shows a base with a substantial height made of these plain single crochet rounds before the shell pattern begins. Aim for approximately 10-13 rounds of just single crochet here after the initial shaping rounds (Rounds 1-3) to achieve a similar look.
Section 2: Building the Gorgeous Shell Stitch Body
Now for the fun part – the airy shell stitch! This pattern is composed of repeating shell motifs. Each shell is a cluster of five double crochet stitches that fan out, anchored by single crochet stitches. This creates the openwork, textured fabric you see in the image. Your stitch count from the base needs to be a multiple of 6 for this pattern to work out evenly. If your stitch count (e.g., 62) isn’t a multiple of 6, you can add or decrease a few stitches evenly in this first shell round to adjust. (For 62 stitches, it’s close. You can perhaps skip one stitch at the end of the setup if needed, or add 4 sc evenly spaced in the last round of the base to get to 66). Let’s assume you have a multiple of 6, for example, 66 stitches.
- Round 1 (Shell Setup):
- Ch 1, sc in the same stitch as the join.
- Skip the next 2 stitches, work 5 dc stitches all into the next stitch (this is your shell).
- Skip the next 2 stitches, sc in the next stitch.
- Repeat from * to * all the way around.
- After your last shell, skip the last 2 stitches and join with a sl st to the first sc of the round. You will have 11 shells if you started with 66 stitches.
- Round 2 (Staggering the Shells):
- Ch 3 (this counts as your first dc of the first shell in this round). Work 2 more dc stitches into the same sc stitch you joined into (this forms a half-shell at the beginning).
- Skip the next 2 dc of the shell below, sc into the next dc (this is the center/3rd dc of the 5-dc shell from the round below).
- Skip the next 2 dc of the shell below, work 5 dc stitches into the next sc stitch (this sc is the one that sits between the shells from the round below).
- Repeat from * to * all the way around.
- After your last sc (which will be in the center of the last shell from Round 1), skip the next 2 dc, and work 2 dc stitches into the very first stitch where you began the round (this completes your first half-shell).
- Join with a sl st to the top of the beginning ch-3.
- Round 3:
- Ch 1, sc in the same stitch as the join (this is the top of your ch-3 from the previous round, which is the center of your first shell).
- Skip the next 2 dc, work 5 dc stitches into the next sc stitch (this sc is between shells from Round 2).
- Skip the next 2 dc, sc into the next dc (center of the shell below).
- Repeat from * to * all the way around.
- Join with a sl st to the first sc of the round.
Continue Repeating for Body Height: Keep repeating Round 2 and Round 3 alternately, until your bag reaches the desired height. The bag in the image has approximately 5-6 full rows of visible shells before the top edging begins. Remember to count your shells in each round to ensure you haven’t missed any!
Section 3: Adding the Elegant Scalloped and Finished Top Edge
A charming scalloped border finishes the top opening of the bag, which is then neatened with a final simple round, as seen in the image. This provides a decorative and clean touch.
- Final Shell Round (Top Edge Base):
- After your last body round (which should end like Round 3, joining to an sc), ensure you are positioned to start a shell in the next sc. If your last body round was like Round 2, simply proceed to the instructions for Round 3 one last time for the body, then continue here.
- If your last body round ended in an sc (like Round 3 of the body), then: Ch 1, sc in the same st. Skip 2 dc, 5 dc in next sc, skip 2 dc, sc in center of next shell. Repeat around. Join with sl st to the first sc.
- Finishing Edging Round:
- Ch 1, sc (or sl st for a flatter, more minimal edge) in the same stitch as the join.
- Work 1 sc (or sl st) in each stitch around the top opening of the bag, following the contours of the shells from the previous round. This means working into each of the 5 dc of a shell and into the sc between shells.
- Join with a sl st to the first sc (or sl st).
- Fasten off your yarn, leaving a 6-inch tail for weaving in. This round provides a clean, defined finish to the top edge, as seen in the photo.
Section 4: Fashioning the Twisted Rope Handles
The handles are robust, twisted cords, meticulously fashioned from the same blue yarn. Each handle consists of two such twisted cords, laid parallel and securely attached to the bag’s interior rim. This gives them that lovely chunky, durable look.
We will make four identical flat strips, then twist them in pairs.
- Make 4 Identical Strips:
- Chain 7.
- Row 1: Sc in the 2nd chain from the hook, and in each of the next 5 chains across. (6 sc)
- Ch 1, turn your work.
- Row 2: Sc in each of the 6 sc across.
- Ch 1, turn.
- Repeat Row 2 until each strip measures approximately 20-24 inches long (or your desired handle length). The longer the strip, the more twists you can get, or the longer the handle drop.
- Fasten off, leaving a long tail (about 10-12 inches) on each strip for sewing.
- Assemble the Twisted Ropes:
- Take two of your flat strips. Lay them one on top of the other, aligning the ends.
- Using one of the long tails and your tapestry needle, sew the short ends of these two strips together securely.
- Now, hold these sewn ends in one hand, and with your other hand, twist the two strips together tightly along their entire length. Twist them quite firmly.
- Once twisted to your satisfaction, carefully sew the other short ends of the two strips together, capturing the twist. You can also add a few small, discreet tacking stitches along the length of the twisted rope if you feel it needs extra security to hold the twist, but often a tight twist and securely sewn ends are enough.
- This completes one “twisted rope” part of your handle.
- Repeat this process with the remaining two flat strips to make your second identical “twisted rope.”
- Attaching the Handles to the Bag:
- Decide on the placement for your handles. They should be positioned evenly on either side of the bag, attached to the inside, just below the finished top edge. A good placement might be about 2-3 inches in from each side seam (if you imagine where side seams would be).
- Take one of your finished twisted ropes. Position one end on the inside of the bag. Using the yarn tail and tapestry needle, sew it very securely to the bag, stitching through the bag fabric and the handle end multiple times. Go back and forth to make it strong.
- Attach the other end of the same twisted rope to the bag on the same side, forming a loop.
- Repeat with the second twisted rope for the other side of the bag. The image shows two such twisted ropes forming each handle loop, attached very close together, side-by-side. So, you’ll attach your two twisted rope sections parallel to each other at each connection point to achieve this double-rope handle effect.
Finishing Touches
The most important finishing touch is to weave in all your loose yarn ends.
- Thread each yarn tail onto your tapestry needle.
- Weave the needle back and forth through the backs of your stitches for a couple of inches, changing direction once or twice to secure the end. Snip any remaining yarn close to the fabric.
- This makes your work look neat and prevents it from unraveling.
Your Handmade Treasure!
And there you have it – your very own blue shell stitch tote bag, made with your own two hands! Step back and admire your beautiful handiwork. Feel the wonderful texture of the shells and the sturdiness of the handles. This bag isn’t just an accessory; it’s a testament to your growing skills and patience.
Don’t you just love the feeling of completing something so lovely and useful? I hope you enjoyed this journey. We’d be thrilled to see photos of your finished bags! Share them with pride, and happy crocheting on your next adventure!