
Your Stunning Handmade Grey Knit Tote
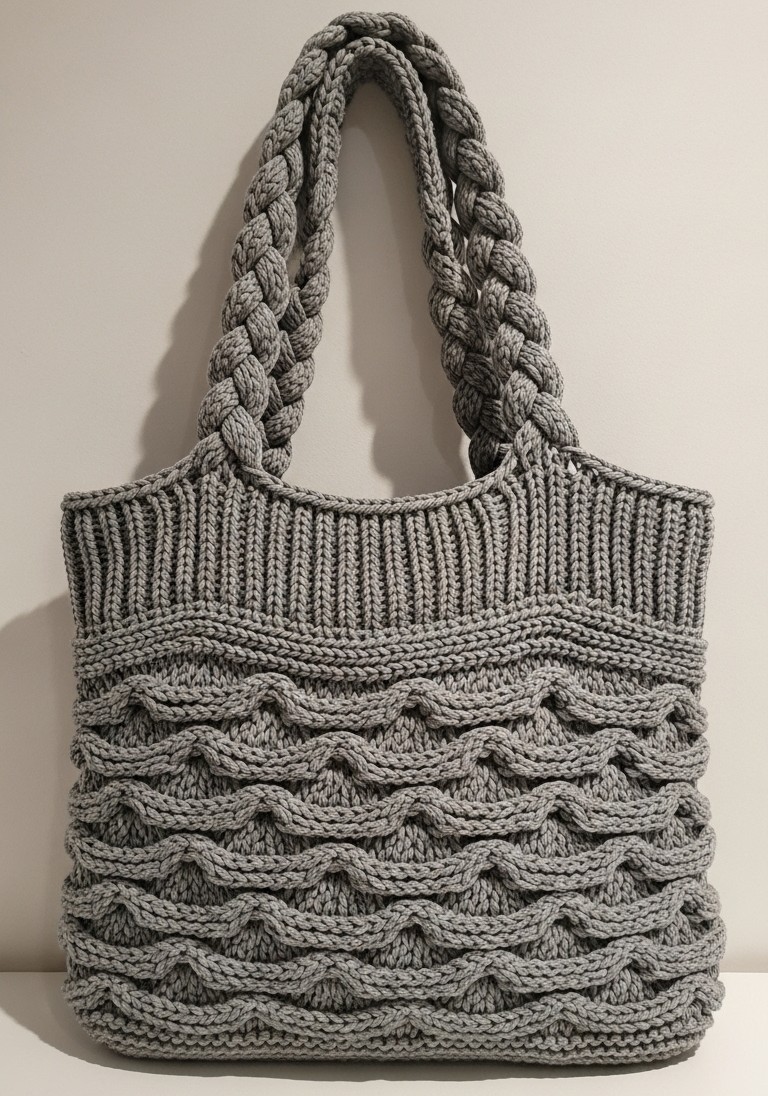
Ever admired a beautifully textured knitted bag and wished you could fashion one yourself? Well, good news! Today, we’re going to embark on a wonderful journey to make the gorgeous grey knitted tote bag you see in the picture. With its chunky, touchable waves and sturdy braided handles, this bag isn’t just a carryall; it’s a statement piece you’ll be proud to say you made with your own two hands.
This project is perfect even if you’re just starting your knitting adventure. We’ll go through every step together, explaining all the basics in simple terms. So, grab your needles, pick out some lovely yarn, and let’s get started on building this beautiful accessory.
What You’ll Need
To bring this chic grey tote into being, you’ll want to gather these supplies:
- 🧶 Yarn: Chunky weight yarn (Category 5 or 6). The bag in the image uses a sturdy grey yarn, possibly a cotton or cotton blend, which gives excellent stitch definition for the wave pattern. You’ll need approximately 400-500 grams (or about 400-550 yards, depending on the specific yarn).
- 🥢 Knitting Needles: Size 10 mm (US 15) straight knitting needles, or the size recommended on your yarn label to achieve a nice fabric for the chunky yarn.
- ✂️ Scissors: For cutting yarn.
- 🧵 Tapestry Needle: A large-eyed blunt needle for seaming the bag and weaving in ends.
- 📏 Measuring Tape: To check your bag’s dimensions.
Getting Started: Essential Knitting Know-How
Before we dive into the bag itself, let’s quickly review the basic knitting actions you’ll be using. If these are new to you, don’t worry! They are the building blocks of knitting, and you’ll master them in no time.
- Casting On: This is how you get your first stitches onto your needle to begin knitting. Imagine you’re making a series of slip knots along your needle.
- Knit Stitch (K): This is the most fundamental stitch. You insert your right needle into the front of a stitch on your left needle, wrap the yarn, and pull a new loop through. It forms a flat ‘V’ shape on the right side of your work.
- Purl Stitch (P): The second basic stitch, often described as the reverse of a knit stitch. You insert your right needle into the front of the stitch from right to left, wrap the yarn, and push a new loop through. It forms a horizontal ‘bump’ on the right side of your work.
- Garter Stitch: The simplest fabric. You knit every stitch of every row. This produces a reversible, bumpy, and stretchy fabric. The separator bands and handle strips in our bag use this.
- Stockinette Stitch: You knit all stitches on one row (the right side, or RS), and then purl all stitches on the next row (the wrong side, or WS). This forms a fabric that is smooth with ‘V’s on the right side and bumpy on the wrong side. The main part of our wave pattern uses this as a base.
- Knit Two Together (k2tog): This is a simple decrease. You insert your right needle into two stitches on your left needle at the same time (as if to knit) and knit them as one stitch. This reduces your stitch count by one.
- Yarn Over (yo): This is a simple increase that also forms a small decorative hole, essential for lace patterns like our waves. Simply bring your yarn from the back to the front between the needles, and then over the top of the right needle to the back again before knitting the next stitch.
- Binding Off (Casting Off): This is how you finish your knitting, securing the stitches so they don’t unravel.
- Seaming: Using a tapestry needle and yarn to sew your knitted pieces together.
Take a little time to practice these on a small sample if you’re brand new. It’s all about getting comfortable with how the yarn and needles feel.
Let’s Make Your Gorgeous Grey Tote!
This bag is worked in a few main parts: the front and back panels (which are identical) featuring the beautiful wave pattern, the braided handles, and then it’s all assembled.
A Quick Note on Gauge
“Gauge” is just a fancy term for how many stitches and rows fit into a certain measurement (like 4 inches or 10 cm) with your specific yarn and needles. It’s not super critical for a bag, but if you want your bag to be a specific size, making a small test square (called a swatch) with the wave pattern can be helpful. For this bag, let’s aim for a finished size of roughly 14 inches (35.5 cm) wide and 12 inches (30.5 cm) tall, excluding the handles.
Part 1: The Main Bag Panels (Make 2 Identical)
Each panel consists of a small garter stitch base, four repeats of the wave pattern section, and a top ribbed band.
Let’s determine your cast-on number: The wave pattern we’ll use is a multiple of 10 stitches, plus 2 extra stitches. If your chunky yarn gives you about 2.5 stitches per inch with 10 mm needles: For a 14-inch wide panel, you’d need 14 inches * 2.5 sts/inch = 35 stitches. The closest multiple of 10 to 35 is 30. So, 30 + 2 = 32 stitches. Or, if you want it a bit wider, 40 + 2 = 42 stitches. Let’s proceed with casting on 32 stitches for a good-sized tote. Adjust if you want it significantly wider or narrower, keeping the (multiple of 10) + 2 rule in mind.
Panel Instructions (Make 2):
- Cast on 32 stitches using your 10 mm needles and chunky grey yarn.
Bottom Garter Stitch Edge: 2. Rows 1-4: Knit all stitches. This forms a small garter stitch border at the bottom.
Now for the Wave Pattern! Each wave pattern section consists of a Garter Stitch Separator and the Wave Rows. You will repeat this entire “Wave Pattern Section” 4 times.
Wave Pattern Section (Repeat 4 times in total):
*   **Garter Stitch Separator Rows:**
    *   **Row 1:** Knit all stitches.
    *   **Row 2:** Knit all stitches.
    *   **Row 3:** Knit all stitches. (This makes the distinct garter ridge seen between the wave bands in the image).

*   **Wave Rows (Feather and Fan Variation):**
    *   **Row 1 (RS - Right Side):** Knit all stitches.
    *   **Row 2 (WS - Wrong Side):** Purl all stitches.
    *   **Row 3 (RS - Pattern Row):** K1 (edge stitch), ***k2tog** twice (knit two stitches together, do this two times), **(yo, k1)** four times (yarn over then knit 1, do this sequence four times), **k2tog** twice.* Repeat the instructions between the asterisks (***) across the row until you have 1 stitch left. K1 (edge stitch).
        *   *Let's break down that repeat: For 32 stitches, you have 1 edge stitch, then 3 repeats of the 10-stitch pattern (k2tog twice = -2 sts; yo, k1 four times = +4 sts; k2tog twice = -2 sts. Net change is 0 for the pattern itself), then 1 edge stitch. Perfect!*
        *   **Tip:** When you do a **yarn over (yo)**, you're essentially just wrapping the yarn around your right needle. This **makes** an extra stitch and a little hole, which is part of the wave's charm. Make sure that wrap goes fully over the needle.
    *   **Row 4 (WS):** Knit all stitches. (Knitting this wrong side row helps the yarn overs open up and defines the wave).

*You have now completed one full Wave Pattern Section (Separator + Wave Rows). **Repeat this entire section 3 more times**, so you have 4 bands of waves in total.*
Top Ribbed Band: After completing your 4th Wave Pattern Section:
- Next Row (RS): K1, P1. Repeat from * across the row. (This is 1×1 ribbing).
- Next Row (WS): K1, P1. Repeat from * across the row. (If your first stitch on the RS was a knit, it will look like a purl from the WS, so you’ll knit it to maintain the rib. Essentially, knit the knit stitches and purl the purl stitches as they face you).
- Continue in K1, P1 ribbing for about 2.5 – 3 inches (6-7.5 cm), or until this ribbed band is the depth you like. The bag in the image has a substantial ribbed top.
- Bind off all stitches in rib pattern. (When binding off, knit the knit stitches and purl the purl stitches before passing them over).
- Cut yarn, leaving a long tail (about 15-20 inches) for seaming later.
Congratulations! You’ve fashioned one panel. Now, make a second identical panel.
Part 2: Crafting the Braided Handles (Make 2)
The handles on this bag are robust and braided. Each handle is made by braiding three thick knitted strands together. So, you’ll need to make a total of 6 strands.
Knitted Strands (Make 6):
- Using your 10 mm needles and chunky yarn, cast on 5 stitches.
- Knit every row (garter stitch) until the strip measures approximately 25-30 inches (63-76 cm) long, or your desired handle length. These chunky garter stitch strips will be thick and sturdy.
- Tip: Don’t make them too short! They will shorten a bit when braided. It’s better to have them slightly longer and trim if needed than too short.
- Bind off all stitches. Leave a short tail for securing the braid later.
- Repeat to make 5 more identical strands.
Braiding the Handles:
- Take 3 of your knitted strands. Align their ends and temporarily tie them together or use a clip to hold them.
- Braid these three strands together just like you would braid hair, keeping the tension fairly even but not too tight (you want the braid to be full, not constricted).
- When you reach the end, secure the strands temporarily.
- Adjust the braid to make sure it’s smooth and even. Once you’re happy, use the yarn tails from the ends of the strips (or a new piece of yarn) and your tapestry needle to securely sew the three strands together at both ends of the braid. Trim any excess.
- Repeat with the remaining 3 knitted strands to form your second braided handle.
Part 3: Assembling Your Tote
Now for the exciting part – seeing your bag take shape!
- Seam the Sides and Bottom:
- Take your two knitted bag panels. Lay them flat with the right sides (the pretty, wavy sides) facing each other. The wrong sides should be facing outwards.
- Using the long yarn tail you left on one panel and your tapestry needle, begin to sew one side seam, from the top of the ribbed edge down to the bottom cast-on edge. Use a mattress stitch for a neat, almost invisible seam if you know it, or a simple whip stitch ensuring you go through both layers.
- Next, sew along the bottom edge (the cast-on edges) of the two panels.
- Finally, sew up the second side seam.
- You’ve now formed the main body of the bag!
- Turn the Bag Right Side Out: Admire your work! The waves and ribbing should be beautifully defined.
- Attach the Handles:
- Decide on the placement for your handles. They are attached to the inside of the ribbed top band. A good placement is usually about 2-3 inches (5-7.5 cm) in from each side seam.
- Take one braided handle. Position one end on the inside of the ribbed top band, ensuring the braid itself sits nicely above the bag’s edge.
- Using your tapestry needle and a length of matching yarn, securely sew the end of the handle to the inside of the bag. Stitch through all layers of the handle end and the ribbed band of the bag. Make several passes to ensure it’s very strong – bags carry weight! A rectangular or square box of stitching is often very secure.
- Attach the other end of the same handle to the ribbed band on the same side of the bag, ensuring the handle forms a nice loop without twisting.
- Repeat this process to attach the second braided handle to the other side of the bag.
- Weave in All Ends: Any remaining yarn tails should be neatly woven into the inside of your bag using the tapestry needle. This prevents unraveling and gives a clean finish.
Tips for a Triumphant Tote!
- Count Your Stitches: Especially on the wave pattern rows, count your stitches at the end of the row to ensure your k2togs and yos have balanced out correctly.
- Lifelines: If you’re nervous about the wave pattern, you can use a “lifeline.” This is a piece of scrap yarn threaded through all the stitches on your needle after completing a correct pattern repeat. If you make a mistake later, you can unravel back to the lifeline without losing all your work.
- Tension: Try to keep your knitting tension (how tightly or loosely you knit) consistent for an even fabric. Chunky yarn is quite forgiving, though!
- Don’t Rush: Enjoy the process. Knitting is a relaxing and rewarding activity. Each stitch brings you closer to your finished piece.
Flaunt Your Finished Piece!
You’ve done it! You’ve worked up an absolutely stunning, textured grey knitted tote bag. Imagine the compliments you’ll receive. This bag is not only stylish but also a testament to your growing knitting skills.
We would be so thrilled to see your completed bags! Feel free to share photos and tag us or mention this guide. Seeing your unique interpretations is always a joy.
Happy knitting, and enjoy your beautifully fashioned tote!