
Your Teal Diamond Statement Bag
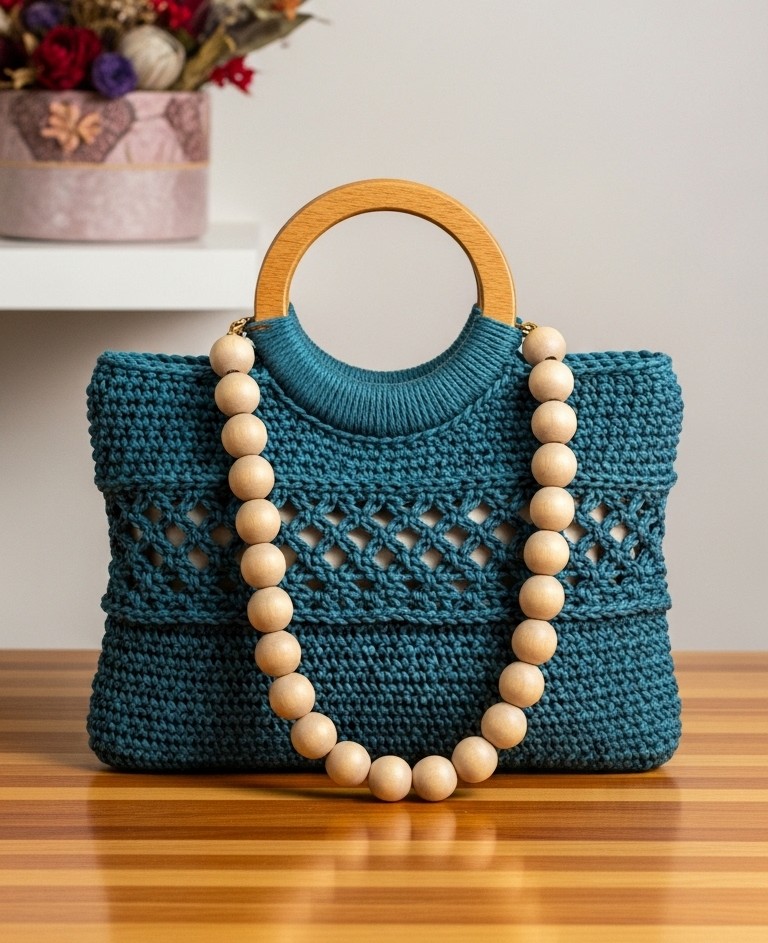
Have you ever spotted a handbag so lovely you just had to have it? Well, get your hooks ready, because today we’re going to embark on a delightful journey to fashion the gorgeous teal diamond handbag you see in the picture. This piece, with its rich teal color, elegant wooden handles, and eye-catching diamond lace panel, is a true showstopper. And the best part? You can proudly say, “I made this!” Guiding you step-by-step, we’ll work up this beautiful accessory together. Even if you’re newer to crochet, don’t you worry – we’ll go through everything with care.
✨ What You’ll Need to Gather ✨
Before we dive in, let’s get all our supplies ready. Having everything on hand makes the process smooth and joyful!
- 🧶 Yarn: About 200-250 grams of Worsted weight (Category 4) cotton or a smooth cotton blend yarn. The bag in the image is a beautiful deep teal color.
- 🪝 Crochet Hook: A 5.0 mm (H-8) hook, or the size that helps you get a nice, firm fabric with your chosen yarn.
- 🪵 Wooden Handles: Two circular, light-colored wooden handles. The ones in the image are approximately 12-15 cm (about 5-6 inches) across.
- ⚪️ Wooden Beads: Around 20-30 large, round, light-colored wooden beads for the strap. Beads of 15-20mm diameter are perfect.
- 🧵 Strong Cord: A sturdy nylon or polyester cord for stringing those lovely beads.
- 🖇️ D-rings & Clasps (Optional but Recommended): Two small (around 1cm) gold-colored D-rings and two matching lobster clasps. This is for attaching the beaded strap as seen in the image, allowing it to be removable.
- 🪡 Tapestry Needle: For neatly weaving in all your yarn ends.
- ✂️ Scissors: A sharp pair for snipping yarn.
- 📏 Measuring Tape: To check your progress.
- ✨ Stitch Markers: These little helpers are fantastic for keeping track of stitches, especially for beginners! (Optional, but highly recommended).
- 🛍️ Fabric for Inner Pouch (Optional): About 40cm x 60cm (16×24 inches) of a light-colored cotton fabric if you wish to add an inner pouch.
Crochet Basics: Your Foundation Stitches
If you’re just starting, these are the fundamental building blocks we’ll be using. Take a moment to familiarize yourself with them. Even a little practice swatch can build your confidence!
- Slip Knot: This is how you get the yarn onto your hook to begin. It’s a loop that tightens when you pull the working yarn.
- Chain Stitch (ch): The most basic stitch. Yarn over your hook, then pull that yarn through the loop already on your hook. That’s one chain! We use chains to start projects and also to build spaces in patterns.
- Single Crochet (sc): A short, dense stitch. Insert your hook into the indicated stitch, yarn over, pull up a loop (you’ll have two loops on your hook). Yarn over again, and pull through both loops on your hook. One single crochet is complete!
- Double Crochet (dc): A taller stitch than the sc. Yarn over, insert your hook into the indicated stitch, yarn over, pull up a loop (three loops on hook). Yarn over, pull through the first two loops on hook (two loops remaining). Yarn over again, pull through the last two loops on hook. That’s one double crochet.
- Slip Stitch (sl st): Used to join stitches or move yarn across your work without adding height. Insert hook into stitch, yarn over, and pull yarn through the stitch AND the loop on your hook in one motion.
- Working in Rounds: Instead of turning your work at the end of each row, you’ll be working continuously in a spiral or joining the end of each round to the beginning to form a tube-like shape for the bag’s body.
- Turning Chain: At the start of a new row (when not working in rounds), you often make one or more chain stitches to bring your yarn up to the correct height for the first stitch of that row.
Let’s Begin Your Bag! Step-by-Step Instructions
We’re going to assemble this handbag piece by piece. Read each step carefully, and remember, crochet is a rhythm – you’ll find yours!
Part 1: Forming the Bag Base
The bag has a sturdy, flat rectangular base. We’ll use single crochet (sc) for this to give it good structure.
- Starting Chain: Make a slip knot. Chain 31 stitches. (This will give a base width of about 30 cm / 12 inches, adjust if you want a different size. If you adjust, ensure your final stitch count for the sides will work with the lace pattern later).
- Row 1: SC in the 2nd chain from your hook, and then SC in each chain across. You should have 30 SC stitches. Ch 1, turn your work. (The ch 1 is a turning chain and does not count as a stitch).
- Row 2 – approx. Row 10 (or desired depth): SC in each stitch across (30 sc). Ch 1, turn.
- Repeat this row until your base rectangle measures about 8-10 cm (3-4 inches) deep. This forms the bottom of your bag. Do not fasten off the yarn.
Part 2: Building Up the Bag Sides
Now we’ll start working in rounds to build the height of the bag.
- Transition to Sides (Round 1 of Sides): Ch 1 (does not count as a stitch). Do not turn. We are now going to work SC stitches evenly around all four edges of your rectangular base.
- Work 1 SC in each stitch along the long edge you just finished.
- When you reach a corner, work 1 SC into the corner stitch/end of row.
- Work SC stitches evenly down the short side of the rectangle (approx. 1 SC per row end).
- Work 1 SC into the corner.
- Work 1 SC in each stitch of the starting chain (the other long edge).
- Work 1 SC into the corner.
- Work SC stitches evenly up the other short side.
- Join with a slip stitch (sl st) to the first SC of the round. Place a stitch marker in this first stitch to mark the beginning of your rounds.
- Count your total stitches. This number needs to be a multiple that works for the diamond lace pattern. A multiple of 7 stitches per pattern repeat (2 sc for solid bar + 5 for diamond opening) is good. Adjust by adding/decreasing a few sc stitches evenly in this first round if needed. Let’s say you aim for a total stitch count like 84 or 91 stitches (e.g., (30 on long side + 12 on short side) x 2 = 84 sts).
- Lower Solid Band (Rounds 2 – approx. 6): Ch 1. SC in the same stitch as join, and in each SC stitch around. Join with a sl st to the first SC.
- Repeat this round until this solid SC band measures about 4-5 cm (1.5-2 inches) high. This is the solid teal band at the bottom of the bag body.
Part 3: The Beautiful Diamond Lace Panel
This is the star of the show! The panel features diamond-shaped openings separated by solid vertical bars. We’ll use a combination of SC, chains (ch), and skipped stitches to achieve this. We’ll make each diamond shape over 3 forming rounds, with the 4th round starting the next diamond. The solid vertical bars are 2 SC stitches wide. The diamond opening starts 5 stitches wide. (Pattern repeat is 7 stitches: 2 sc for bar + 5 for diamond opening).
- Lace Panel Round 1 (Widest part of diamonds): Ch 1. SC in the same stitch as join and in the next stitch (this forms your first 2-sc solid bar).
*Ch 5, skip the next 5 stitches. SC in each of the next 2 stitches (next solid bar).*Repeat from*to*all the way around. After your lastch 5, skip 5, you should end right before your first 2-sc bar. Join with a sl st to the first SC of the round. - Lace Panel Round 2 (Narrowing the diamonds): Ch 1. SC in the same stitch as join and in the next SC (working into the 2-sc solid bar).
*Over the ch-5 space from Round 1: SC into the first chain of the ch-5, ch 3, skip the next 3 chains of the ch-5, SC into the fifth (last) chain of the ch-5. Then, SC into each of the next 2 SC stitches (the solid bar).*Repeat from*to*all the way around. Join with a sl st to the first SC. - Lace Panel Round 3 (Forming the diamond point): Ch 1. SC in the same stitch as join and in the next SC (working into the 2-sc solid bar).
*Over the ch-3 space from Round 2: SC into the first chain of the ch-3, ch 1, skip the middle chain of the ch-3, SC into the third (last) chain of the ch-3. (This 'sc, ch1, sc' group forms the V-point of the diamond). Then, SC into each of the next 2 SC stitches (the solid bar).*Repeat from*to*all the way around. Join with a sl st to the first SC. - Lace Panel Round 4 (Starting the next diamond row – identical to Round 1): Ch 1. SC in the same stitch as join and in the next stitch (this forms your first 2-sc solid bar).
*Ch 5, skip the next 5 stitches. (These 5 stitches to skip are the 'sc, ch1, sc' group from Round 3, plus one stitch on either side of this group if your foundation allows, effectively spanning the same 5-stitch diamond segment width as in Round 1). SC in each of the next 2 stitches (next solid bar).*Repeat from*to*all the way around. Join with a sl st to the first SC of the round. (Note: The ‘skip 5 stitches’ in this round is worked over the structure created by Round 3’s diamond point. The ‘sc, ch1, sc’ group naturally sits in the center of the 5-stitch diamond segment. The ch-5 will arch over this pointed structure to begin the opening of the next diamond directly above the point of the previous one.) - Repeat Lace Panel Rounds 1-4: Repeat these four rounds (Lace Panel Round 1, 2, 3, and 4) two or three times in total, or until the lace panel is the desired height (the image shows about 2-3 full vertical diamond repeats, making the lace band substantial). This means you will work R1, R2, R3, then R4 (which is R1 again); then R2, R3, R4 (which is R1 again), and so on for the desired number of diamond tiers.
Part 4: Upper Solid Band and Attaching Handles
After your lace panel is complete:
- Upper Solid Band (e.g., 5-6 rounds): Ch 1. SC in the same stitch as join, and in each SC stitch around. Join with a sl st to the first SC.
- Repeat this round until this top solid SC band measures about 4-5 cm (1.5-2 inches) high, or until your bag reaches the desired overall height before attaching handles. The bag in the image has a top band that is slightly narrower than the bottom solid band.
- Attaching the Wooden Handles: This round is crucial for a neat finish.
- Round 1 of Handle Attachment: Ch 1. Lay one wooden handle along the top edge of one side of your bag. You will be working SC stitches around the handle and through the stitches of your bag’s top edge simultaneously.
- Estimate how many stitches cover about half your bag’s circumference (for one handle). SC evenly along this section, passing your hook under the wooden handle and into the corresponding stitch of the bag, completing your SC. Ensure the stitches are snug but not too tight, and cover the wood neatly.
- When you reach the point where the second handle will start (the other side of the bag), continue SC in the bag stitches only for a few stitches if there’s a gap between handle ends, or proceed directly to attaching the second handle.
- Lay the second handle along the remaining top edge and SC around it and through the bag stitches, just like the first handle.
- Join with a sl st to the first SC.
- Round 2 of Handle Attachment (Optional, for sturdiness): Ch 1. Work one more round of SC into each SC stitch from the previous round (these stitches will be just below the wooden handles on the inside, or you can work them tightly just under the handle on the outside). This reinforces the attachment. Join with sl st.
- Fasten off your yarn and weave in the end securely.
- Round 1 of Handle Attachment: Ch 1. Lay one wooden handle along the top edge of one side of your bag. You will be working SC stitches around the handle and through the stitches of your bag’s top edge simultaneously.
Part 5: Fashioning the Beaded Strap
The elegant strap is made from wooden beads.
- Prepare D-rings (if using): If you’re using D-rings for a detachable strap, securely sew or crochet a small tab around each D-ring. Then, sew these tabs firmly to the sides of your bag, just below the wooden handles, where the strap will attach.
- Stringing the Beads: Cut a length of your strong cord, much longer than your desired strap length (e.g., 120 cm / 47 inches for a shoulder strap). Thread it through your tapestry needle if helpful.
- String your wooden beads onto the cord until the beaded section reaches your desired length. The strap in the image is a generous length.
- Securing the Strap:
- With Clasps: Tie one end of the cord securely to a lobster clasp. Pass the cord end back through the last few beads and tie off again/add a dab of glue if needed. Repeat for the other end with the second clasp. Clip the clasps to your D-rings.
- Without Clasps (Permanent): Tie one end of the cord securely to one side of the bag, looping it around some stitches of the upper solid band near a handle. Pass the cord end back through a few beads. Repeat on the other side of the bag with the other end of the cord. Ensure it’s very secure.
Part 6: Adding an Inner Pouch (Optional)
A simple pouch will prevent small items from peeking through the lace.
- Measure and Cut Fabric: Measure the interior width and height of your finished crochet bag. Cut two rectangles of fabric that are about 2cm (0.75 inch) wider and 4cm (1.5 inches) taller than these measurements (to allow for seams and a top hem).
- Sew the Pouch:
- Place the two fabric rectangles right sides together.
- Sew down one long side, across the bottom, and up the other long side, using a 1cm (0.375 inch) seam allowance. Leave the top edge open.
- Fold the top raw edge down by 1cm (0.375 inch) towards the wrong side and press. Fold it down again by about 2cm (0.75 inch) to encase the raw edge and press. Stitch this hem all the way around.
- Insert Pouch: Turn the fabric pouch right side out and slip it inside your crochet bag. You can either leave it loose or secure it by hand-stitching the top edge of the pouch to the inside of the crochet bag, just below the handles.
✨ Finishing Touches ✨
Take your tapestry needle and meticulously weave in any remaining yarn ends. This is the secret to a professional-looking finish! Step back and admire the beautiful teal diamond bag you’ve brought into being. Feel that amazing sense of accomplishment – it’s all yours!
Flaunt Your Fabulous Handbag!
You’ve patiently worked through each step, and now you have a stunning, handcrafted accessory that’s sure to turn heads. This Teal Diamond Statement Bag isn’t just something to carry your essentials; it’s a testament to your skill and dedication.
We would absolutely love to see your version of this bag! Please do share photos of your completed projects. Happy crocheting, and enjoy every moment with your new favorite handbag!