12 Winter Nail Art Ideas That Are Super Easy Yet Totally Chic
Get in the spirit of the holiday season with these simple yet trendy winter nail designs that only take a few tools and a bit of creativity to DIY at home!
Whether you’re a nail art novice or seasoned pro, you can create chic frosty styles for the winter holidays and all season long. From graphic snowflakes to shimmering snow globe glitter polish, these easy nail ideas work for short or long nails.
1. Sparkling Snowflake Nails
Start with a clean, white base color on your nails. Paint on tiny blue snowflakes at the tips or scattered in a winter wonderland design using thin nail striping tape for perfect lines every time. For easier application, choose premade snowflake decals and place with tweezers over the white polish. Finish by adding a shiny top coat for smooth festive flair in minutes.
To take this design up a notch, use silver striping tape to outline larger snowflakes on accent nails. Fill in the shapes with chunky blue and white glitter to create dimensional icy sparkle.
2. Ombre Glitter Gradient Tips
For this glittering ombre look, paint nails with a base shade then use makeup sponges to dab on 2 lighter polish colors towards your tips. Layer the incline glitter by brushing finely crushed mermaid-style particles onto unpainted stickers on the gradient area for even application. Repeat the sponging and glitter steps on every nail to build your own wintery glaciers.
Consider using a sheer pearly white overlay on your gradient base before adding glitter. This helps the icy ombre colors shine through while muting any harsh lines between shades. For bonus sparkle, apply large iridescent snowflake sequins on top with nail glue.
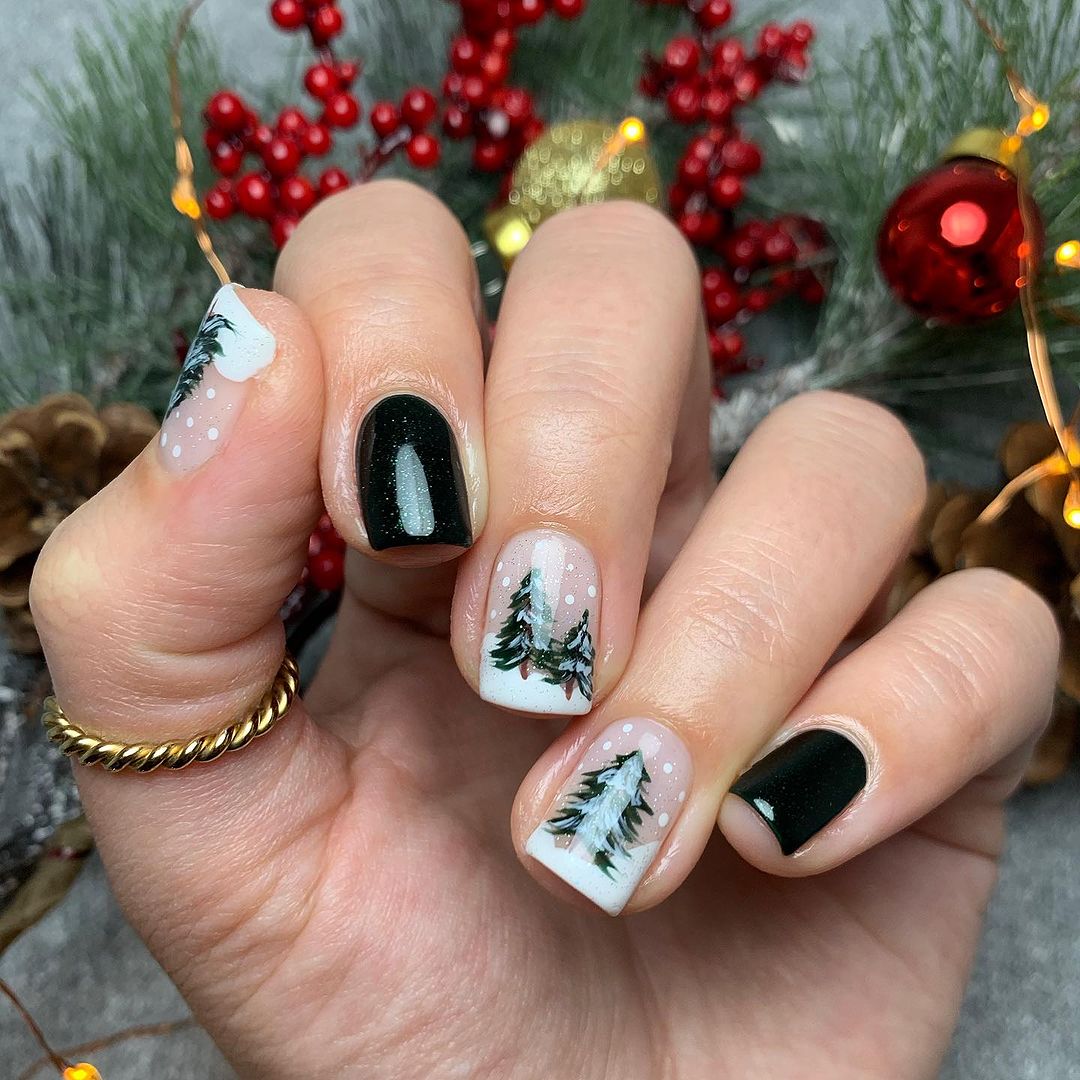
3. Frosted Tip French Manicure
This icy twist on the classic French manicure starts by painting your base color over nails, leaving the tips bare. Brush on 2 coats of sheer white on the tips and feather inward slightly while the polish is still wet for a frosted blend instead of a harsh line. Apply silver striping tape near the cuticle for extra sleek style.
For additional winter edge, use a steady hand to paint on snowy pine trees only on the frosted white tips. Outline trunks and branches with a dark forest or hunter green for sweet scenic accent nails.
4. Cozy Knit Sweater Nails
Recreate the look of your favorite winter accessory with this knit nail design. Start by painting your nails in a cream shade. Then use a small dense brush dipped in darker polish to paint “stripes” from side to side, working in the space from cuticle to tip.Repeat this stitch pattern on all nails for cohesive style.
For extra texture, apply a matte top coat over the knit pattern. Then take silver striping tape to add metallic “ribbing” details along the tips horizontal to the knit stripes. This adds light catching contrast inspired by cable knit threads.
5. Sparkly Snow Globe Glitter Nails
Encapsulate all the magic and charm of snow globe souvenirs on your own nails with this shimmering look. Whether you visit Aspen or Antarctica, a snow globe is the best memento, now in manicure form!
Start by painting a clear or sheen base color so the wintery scene inside really pops. Use a small brush to paint the outline of a circle dome shape over each nail, leaving the middle empty. Fill in the blank space with dense fine blue and silver holographic glitter to mimic swirling snow inside the globe. Outline again over the “glass” ridge with shiny glitter topcoat to seal in the design. For extra decoration, add mini silver stickers like snowflakes, pine trees, a snowman, or cute woodland creatures inside your nail snow globe!
6. Penguin Nail Art
What’s cuter than penguins all dressed up in their black and white tuxedo feathers? This arctic animal nail art is simple with black and white polish, easy to penguin stamping decals, and tiny touches of glitter and rhinestones.
Paint alternating nails with a fresh coat of black and white polish first. Accent your ring finger with mini silver and white rhinestones daintily placed in abstract icy shapes. Use a stamping kit to apply side-view penguin silhouette images leading into the design. Top it off with a sparkling snow effect by gently brushing iridescent glitter diagonally across the nails. Too cute!
7. Buffalo Plaid Flannel Nails
Nothing keeps you as toasty as your go-to flannel shirt. Translate the familiar criss-cross buffalo plaid pattern in dark holiday red and classic black colors onto lovely nail art. Paint them with an alternating checkerboard motif using striping tape for clean lines. Apply a matte topcoat when dry to mimic the cozy cotton texture of flannel.
Want to incorporate modern winter trips to the country? Apply minimal white polka dots, evergreen trees, or metallic etched snowflakes over the plaid design for subtle flair. This pays homage to campground adventures in style.
8. Evergreen Forest Holiday Lights Nails
Close your eyes and imagine the scent of fresh christmas trees lit up colorfully for the holidays. Now you can wear pine cone polish and glittering strung lights on your nails!
Start this organic nail design by painting on evergreen trees only using shades of emerald, forest, and hunter green polishes. Focus the pine trees on your ring and pinky nails for sweet asymmetry. Once dry, add tiny pops of red, teal, and bright white glitter vertically in strings crossing over the branches for cozy holiday lights. You’ll dream of firs and family time with this manicure.
9. Deep Red Poinsettia Flower Nails
What flower blossoms explosively in winter as bright as holiday decor? The poinsettia of course! Show off these seasonal blooms on your nails.
Paint dainty poinsettia flowers starting with muted dark green leaves and bright red petals on a few accent nails. Mix shades of true, crimson, cherry, and maroon polishes for rich layered flower color. Add tiny gold glitter flecks in the center of the poinsettias like sunshine stamens! Finish with a glossy topcoat for shiny petals that really pop against the nude or pale background nails.
10. Frosted Chocolate Peppermint Swirl Nails
Nothing satisfies sweet holiday cravings quite like favorite peppermint bark candy. Get the gourmet dessert look on frosted brown and snowy white swirl nails.
Start with a base coat of chocolate cream polish. Paint arcing lines of vanilla white starting at the base and leading up around the nail onto the tip in arched stripes. Before the polish dries, gently pull a toothpick from base to tip through the lines for a streaky swirl mix. Add red glitter striping tape near your cuticles for a candy cane touch! Yum.
11. Winter Solstice Metallic Nails
Celebrate the spirit of renewal on the year’s longest night with magical metallic nail shades. Cultures around the world mark rebirth during the winter solstice, now you can too with this sparkling manicure!
Paint a rich sapphire blue on most nails, leaving one accent nail bare. Brush on holographic silver chrome powder for a color shifting swirl design on the blank canvas nail. As the light catches, it will glow against the semiprecious cobalt background. Frame the special solstice nail with gold striping tape or vintage decals.
12. New Year’s Confetti Celebration Nails
Finish the year out with a bang (or rather a pop!) wearing exciting confetti celebration nails. They burst with glitter, sequins, and color splatter in true NYE party style.
Paint a blank base coat on each nail, swiping horizontally to fully cover. While still wet, fleck varied shapes, sizes and colors of confetti glitter as desired on every nail using a cuticle pusher tool for 3D texture. Outline randomly with silver striping for streamers. Top with circle glitter pieces and colorful sequins like you’re ringing in 2023 early! The glossy top coat helps set the fun and festive mani.
Now that you’ve gotten inspiration for stunning winter nail art straight from the virtual salon, it’s time to try these techniques and ideas at home! With the right polish colors and just a bit practice on easy striping tape and glitter ombré, you can become your own nail art pro. Show off your finished frosty fingertips and let us know your favorite designs in the comments below!