

Bloom Your Style Crochet Clips
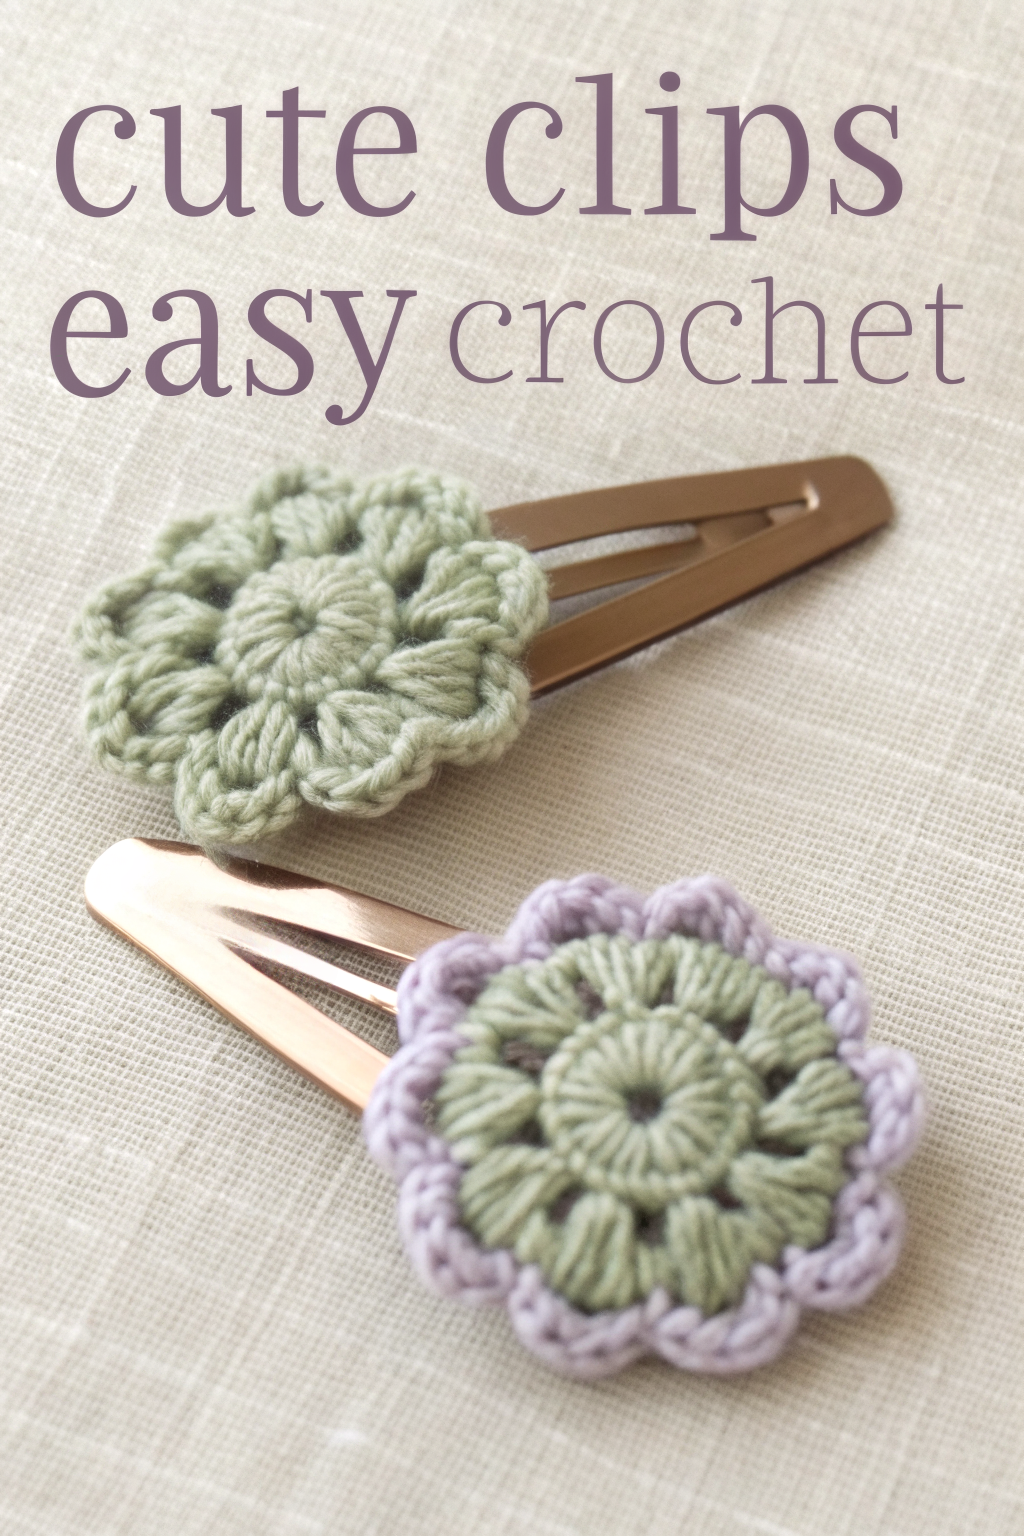
Hello lovely makers! Ever look at those simple snap clips and think they could use a little handmade charm? Well, you’re in the right place! Take a peek at the image – aren’t these little crochet flower hair clips just the sweetest? The wonderful news is that you can absolutely fashion these yourself, even if you’re just starting your crochet journey. We’re going to walk through it together, step by step, and soon you’ll have your own gorgeous floral accessories to wear or gift. There’s a special kind of joy in adding a touch of your own handiwork to your style!
What You’ll Need to Gather
Before we dive into the stitches, let’s get our supplies ready. Based on the image, a smooth cotton or acrylic yarn in a DK or Sport weight will give you that lovely definition.
- 🧶 Light Green Yarn (DK or Sport weight)
- 🧶 Lavender Yarn (DK or Sport weight, optional for the two-tone look)
- 🪝 Crochet Hook (Size 3.5mm or G/4 recommended)
- ✂️ Scissors
- 🧵 Yarn Needle (for weaving in ends)
- 📎 Metal Snap Clips (Bronze/Copper colored, approx. 5cm/2 inches long as shown)
- 🔥 Hot Glue Gun or 🧵 Needle & Thread (matching yarn color for sewing)
Getting Started: Essential Stitches Explained
Don’t worry if these terms are new! We’ll go slow. (We’ll use US crochet terminology).
- Magic Ring (MR): This is a way to start crocheting in the round without leaving a hole in the middle. You loop the yarn, work your first stitches into the loop, and then pull the tail tight to close the center.
- Chain Stitch (ch): Yarn over your hook, then pull that yarn through the loop already on your hook. That’s one chain! This stitch forms a small V shape.
- Slip Stitch (sl st): Insert your hook into the indicated stitch, yarn over, and pull the yarn through both the stitch and the loop on your hook in one motion. It’s used to join rounds or move across stitches without adding height.
- Single Crochet (sc): Insert your hook into the stitch, yarn over, pull up a loop (you’ll have 2 loops on your hook). Yarn over again, and pull through both loops on your hook. It’s a nice, tight stitch.
- Half Double Crochet (hdc): Yarn over before inserting your hook into the stitch. Insert hook, yarn over, pull up a loop (3 loops on hook). Yarn over one more time, and pull through all three loops on the hook.
- Puff Stitch (puff): This gives us those lovely textured petals in the middle layer. Here’s how we’ll do it: Yarn over, insert hook into the stitch, yarn over, pull up a loop (3 loops on hook). Repeat that sequence (yarn over, insert hook in SAME stitch, yarn over, pull up a loop) two more times. You should have 7 loops on your hook. Yarn over one last time and pull through all 7 loops. Give it a little tug to secure it. We’ll chain 1 immediately after to ‘close’ the puff, but that chain doesn’t count as a separate stitch in our counts unless specified.
A Little Tip: Try to keep your tension even – not too tight, not too loose. This helps your stitches look uniform and lovely. Count your stitches at the end of each round!
Fashioning Your Crochet Flower (Step-by-Step)
Let’s make the flower! We’ll detail the light green version first.
Round 1: The Center
- Start with your Light Green yarn and make a Magic Ring.
- Work 6 Single Crochet (sc) stitches into the ring. (6 sc)
- Pull the yarn tail gently but firmly to close the center of the ring.
- Join the round by making a Slip Stitch (sl st) into the very first sc you made.
Round 2: The Puffy Petals
- Chain 1 (this does not count as a stitch).
- Make a Puff Stitch (as explained above) in the same stitch where you just made the sl st. Remember to ch 1 immediately after completing the puff to close it.
- *Skip the next stitch. In the following stitch, make another Puff Stitch, followed by a ch 1 to close.*
- Repeat the sequence from * to * four more times. You should now have 6 puff stitches in total, each separated by the skipped stitch from Round 1. (6 puff sts, 6 ch-1 spaces after puffs)
- Join the round with a sl st into the top of the first puff stitch you made (not the ch-1 used to close it).
Round 3: The Scalloped Edge
(For the solid green flower, continue with Light Green yarn. For the two-tone flower shown, finish off the green yarn after Round 2, weave in the end securely, and join your Lavender yarn with a sl st into the top of any puff stitch before starting this round.)
- We will be working into the ch-1 spaces that were made after each puff stitch in Round 2.
- Find the first ch-1 space right after the puff you joined into. Make the following sequence all into that same ch-1 space: (1 sc, 2 hdc, 1 sc). This forms your first scallop petal edge.
- Move directly to the next ch-1 space after the next puff stitch. Work (1 sc, 2 hdc, 1 sc) into that space.
- Repeat step 3 four more times, working into each remaining ch-1 space around the flower. You will have 6 scallop petals forming the outer edge. (6 scallops total)
- Join the round with a sl st to the very first sc you made in this round.
- Fasten off your yarn, leaving a tail about 6 inches long for weaving in later.
Finishing Touches
- Using your yarn needle, carefully weave in the starting tail (from the magic ring) and the ending tail. Make sure they are secure so your beautiful flower doesn’t unravel.
- Repeat the process to make a second flower if you want a pair! Follow the color change instructions for Round 3 if you desire the two-tone look seen in the image.
Assembling Your Hair Clip
Now, let’s attach your finished flower to the snap clip.
- Option 1: Hot Glue (Quickest) Apply a small dot of hot glue to the wider, flat end of the snap clip (the part that doesn’t hinge open). Be careful not to use too much, or it might seep through the stitches. Quickly press the back center of your crochet flower firmly onto the glue dot. Hold for a few seconds until set.
- Option 2: Sewing (Most Secure) Using your yarn needle and a matching thread (or a strand split from your yarn), position the flower on the flat end of the clip. Make several small, neat stitches through the back loops of the crochet flower and around the metal base of the clip. Try to keep the stitches hidden from the front. Secure the thread with a knot and trim any excess.
Flaunt Your Floral Flair!
And there you have it! Your very own adorable crochet flower hair clips, fashioned by you. See how the puff stitches give that lovely dimension, just like in the picture, and the final round forms that perfect scalloped edge? Whether you chose the solid light green or the lavender-edged version, they add such a sweet, handmade touch.
Don’t hesitate to experiment with different yarn colors for future versions. Imagine these in bright summer shades or soft pastels! We hope you enjoyed bringing these little blooms to life. Feel free to share photos of your finished pieces – seeing your lovely work is always inspiring! Happy stitching!