

French Ombre Nails: These are The Trend Nails in The Summer
French ombre nails put you in a good mood and are super trendy this summer. We reveal how you can do the trendy nails yourself at home.
Actually, we knew this technique so far only as a color gradient in the hair. But now the look moves to the nails: French ombre nails are the new trend this summer!
On Instagram, you can already see these trend nails up and down. And we also immediately fell in love with the summery fingernails. Especially practical: You don’t have to choose just one color, but can use several at once.
Do French ombre nails yourself: Here’s how!
Don’t worry: You don’t have to run to the nearest nail salon to fulfill your dream of French ombre nails. You can also do the summer nail trend yourself at home. The trendy nail design is not as difficult as it looks!
What you need:
- Nail polish colors of your choice
- sponge
- greasy cream
- washable base
Step 1: File nails
File your nails into the desired shape. We think oval nails or ballerina nails are particularly great with French ombre nails. In addition, the longer your nails are, the more beautiful and gentle you can create the color gradient.
Step 2: Apply darker color
First, you should wet the sponge and wring it out well so that it is only slightly damp. Also have a clean and washable surface ready, for example a kitchen board. Lubricate the skin around the nails with a greasy cream or Vaseline, so that you don’t have to be afraid of slipping when stamping.
Now apply the darker color on your entire fingernail. Let everything dry well.
Step 3: Apply lighter color
Now apply a little of the lighter color to the base and then pick up the nail polish with the sponge. Now dab the color onto the tip of the nail. Use a little more color at the very front and then carefully smudge it towards the back.
Tip: If you are trying the technique for the first time, make sure that the contrast between the two colors is not too high – in other words, don’t use a very light and a very dark shade. It’s better to use shades from the same color family.
And another extra tip: It’s better to use a little less ink than too much in the stamping process. If in doubt, you can also layer them.
Step 4: Top coat
After the colors have dried, you should seal everything with a top coat. This makes the result look more even and also makes your trend nails last longer.
French ombre nails: Trendy color combos
The great thing about French ombre nails is that they are super changeable and from subtle to extravagant and colorful for everyone.
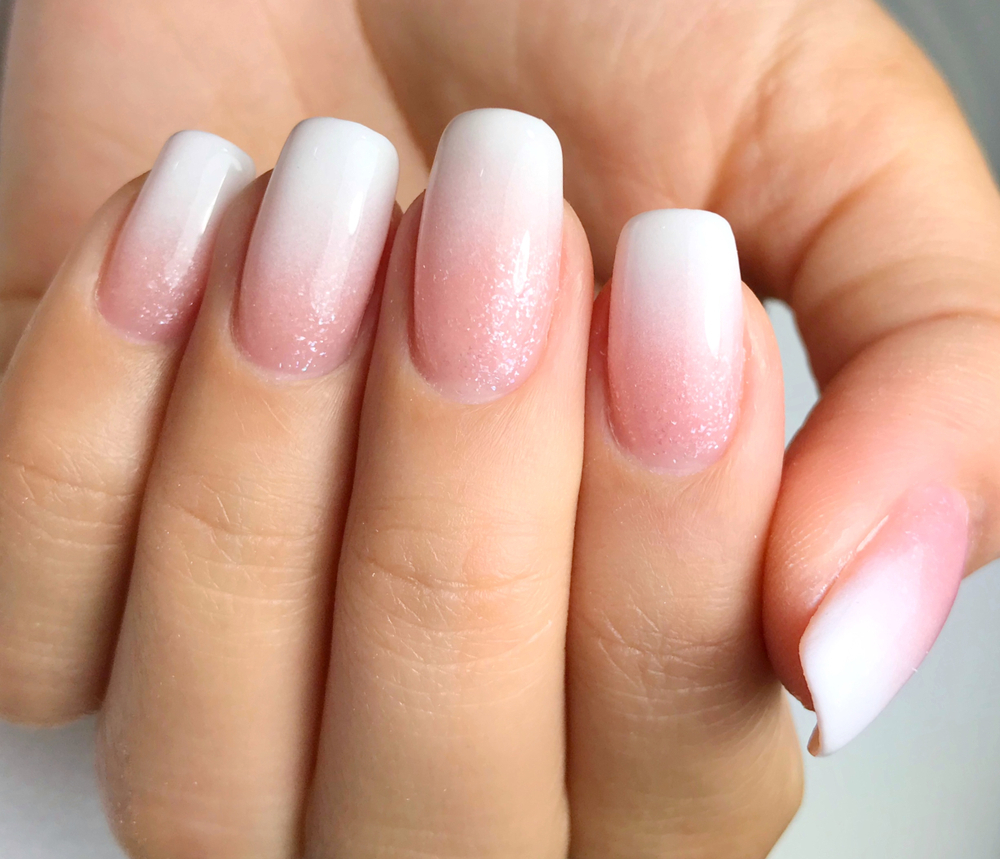
Do you like it very classic and discreet on the nails? Then choose delicate pink or nude tones for French ombre nails. We already know this from baby boomer nails, where a beautiful gradient of pink and white is created.
We find a delicate color gradient from dark to light gray or pastel apricot tones just as beautiful.
You prefer it summery and gaudy? Then choose colorful nail polishes for the ombré gradient. For example, if you have chosen a bright blue, apply it to your entire nail and dab a slightly lighter blue onto the nail tips with a sponge.
If you don’t want to decide on a color direction, you can of course apply a different color to each fingernail.
You don’t necessarily have to stick to the “front to back” scheme for French ombre nails. You can also achieve the ombré effect laterally by working from left to right. This is especially great for shorter nails.