

How to Do a Perfect French Manicure at Home
A classic French manicure is elegant, timeless and versatile. With the right tools and techniques, you can easily achieve flawless, salon-worthy French tip nails from the comfort of your own home.
In this comprehensive, step-by-step guide, you’ll learn how to properly prep your nails, apply crisp white tips, and seal it off with a neutral base color. You’ll also get pro tips to make your DIY manicure last, as well as how to remove it damage-free. If you’ve ever wondered how to get picture-perfect French tips that rival the work of professional manicurists, this is the definitive guide for you.
Choosing the Perfect French Manicure Shape and Length
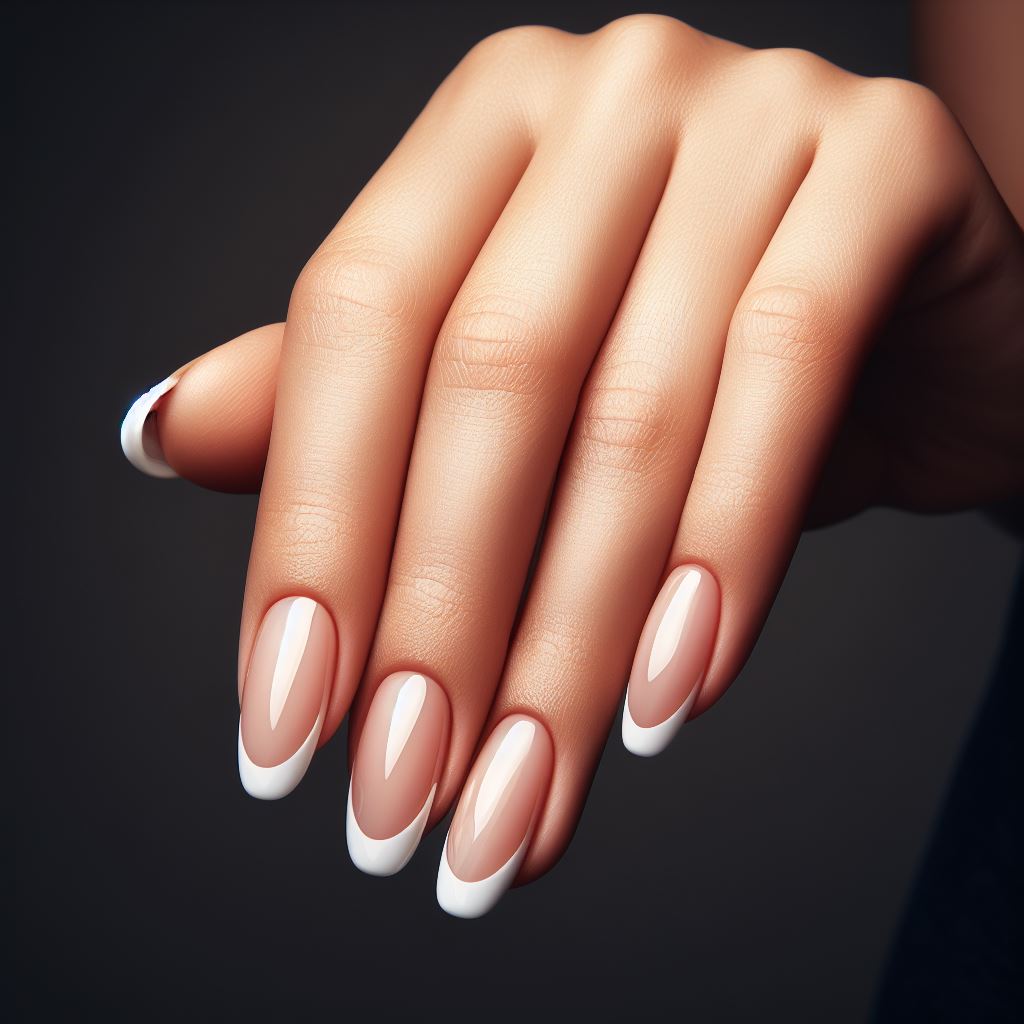
Before prepping your nails, decide on the exact shape and length you wish to file them. Square, round, oval, almond and squoval shapes are common french manicure styles. Look at celebrity and Instagram nail art to pick a shape that complements your hands and nail beds beautifully.
As for length, keep functionality in mind. Extremely long tips longer than 1 cm may hinder typing and completing daily activities comfortably. A universally flattering length for most is to extend just slightly beyond the fingertip.
For shaping tools, you’ll need both a nail file and buffer:
- Nail file grits – Start shaping with a coarser 180 to 240 grit nail file first. Then use finer 400 grit files to further smooth and soften sharp edges for the perfect curve.
- 3-way nail buffers – Use the different buffer surfaces (fine, medium and coarse) to refine the shape. Buff to condition and bring an amazing shine in preparation for polish.
Settle into a comfortable work area with good overhead lighting before beginning to file…
How to Prepare Your Nails Like A Pro
Before painting on any color for a French manicure or any polish, having a clean nail surface is key for perfect application and maximizing wear.
Follow these professional prep steps:
First, remove old nail lacquer if you have it on currently. Use an acetone-based polish remover like Zoya Remove Plus and cotton balls. Acetone breaks down color quickly.
Next, shape nails as mentioned above into your desired silhouette whether round, oval, square or almond tip.
Then use a cuticle remover solution and pusher tool to groom cuticles. After soaking for 30 seconds, gently push back and trim off any excess, overgrown skin around the nails. Never cut into your cuticles. Clean under free edges with a small brush.
Buff nails lightly to get rid of surface residues and condition. This fills in ridges leaving a pristine smooth nail plate for manicuring. Brush away buffing dust with a clean mascara wand type brush.
Lastly, wipe nails with isopropyl alcohol on a cotton pad to fully dehydrate and remove all oil or lotion. This allows the following base and tip polishes to adhere for many days without lifting or bubbles appearing.
Okay, blank canvas prepped and ready! Time for an incredible, salon-caliber DIY french manicure!
How To Apply The Perfect Crisp French Tips
For ultra clean lines, using french nail stickers or tape is genius. Simply apply them precisely along your nail tip acting as a barrier for the white polish.
Here are application steps for flawless white tips:
- Apply stickers or tape strips by lining up directly over your nails. Gently press down starting from cuticle area towards tip. Smooth borders fully over the edges to prevent seepage.
- Apply two to three thin coats of the white nail polish using long, clean strokes. Allow drying completely between coats. Using multiple thinner layers creates better opacity rather than attempting full coverage in one thick messy layer. High quality polishes provide the best coverage. Essie’s Blanc is the perfect true white.
- Once the white tip coats feel smooth and dry to the touch, seal them with a top coat layer. This prevents them getting messed up in next steps. Use quick dry top coats to speed up process.
- Now remove the tip guide stickers or tape gently. Reapply more topcoat over edges if there is any unevenness where stickers lifted polish.
Clean, professional looking french tips applied!
Now onto choosing the ideal sheer base color to contrast those crisp whites…
How to Select The Best Neutral Base Color
A classic french manicure pairs bright white nail tips with a sheer, neutral base color on rest of the nails. The most flattering shades pair seamlessly with your skin tone without contrasting too starkly against the whites.
General guidelines for picking shades:
- Fair, Cool-Undertoned Skin – Sheer dusty pinks and mauves
- Fair, Warm-Undertoned Skin – Nude pinks and beiges
- Medium to Dark Skin – Brick reds, deeper rose shades
When trying to choose your perfect neutral, paint a small sample of polish onto one nail tip to preview against your skin.
Here are some gorgeous, foolproof neutral shades for all skin tones:
- Sheer Pink – For fair skin, add the subtlest wash of color with translucent ballet pinks like Essie Mademoiselle
- Ballet Slipper – Slightly deeper while still soft, shades like OPI Bubble Bath are perfect nudes
- Milky Pink – For medium tones, opaque milky pinks beautifully pop like Essie Eternally Yours
- Blush Nude – Universally flattering on both cool & warm skin are hues like Essie Topless & Barefoot
- Muted Mauve – Pink-beige crossover tones like Zoya Rue suit olive skin richly
- Spiced Rose – Those with darker skin glow against deeper brick shades such as Dior Vernis Paris
Achieve A Salon Finish with Top Coat
Once your flawless white tips and neutral base color are painted on, locking everything in is essential for an extended, flawless wear.
Using a quality top coat over the entire completed manicure serves several purposes:
- Protects from chips, dents and smudges
- Creates an ultra high-gloss finish
- Prevents fading over time
- Allows even drying between polish layers
These top coats dry quickly while making manicures last:
Seche Vite Dry Fast Top Coat – Salon standard for its rapid drying and durable finish. Goes on super glossy.
Essie Gel Couture Top Coat – Gives regular polish 11-day wear of a gel manicure. Shiny and chip resistant.
Sally Hansen Insta-Dri – Budget friendly while drying in 60 seconds flat. Great for layering.
Apply one thin, even layer to seal and smooth over all nails. Let dry completely. Gently buff away any bubbles or bumps. Your high shine, pro-quality French manicure is good to go!
Make Your At-Home Manicure Last
Investing effort into a homemade French tips means you want pristine nails for as long as you can flaunt them! Follow these simple extenders:
- Reapply top coat every 2-3 days to maintain the protective seal on your manicure. This prevents moisture and other everyday damage from breaking through and ruining your lacquer.
- Wear dish gloves, latex gloves or glove liners when doing wet chores to protect from hot water and cleaning chemical exposure which can compromise polish adhesion and cause chipping.
- Daily application of cuticle oil keeps the nail beds and surrounding skin hydrated, flexible and conditioned to prevent cracking or lifting, especially in dry winter weather. Use lightly right after showering when cuticles are their softest to absorb the oils nicely.
- Limit direct nail contact with acetone as overuse can dry out nails. When removing polish opt for gentler, non-acetone based removers whenever you can.
- Try not to pick or peel at all as it quickly snowballs. Tiny lifts easily catch on fabric leading to bigger and bigger chips. If you notice cracks appearing, do some smoothing and re-seal quick with topcoat before they expand.
Follow those tips and your French perfection can last over a week or more!
Remove Your DIY Manicure Properly
When it’s finally time for a fresh polish or style change, removing french manicures requires care to avoid thinning nails and damaging the nail plate.
Soak a cotton ball with pure acetone-free nail polish remover or dilute vinegar solution. Hold over each nail for 30 seconds allowing it to penetrate before gently rolling off the white tips and base color. Repeat process, adding fresh remover and gently buffing until no leftover tint remains. Using indirect friction prevents over-scrubbing.
Follow with cuticle oil to rehydrate the entire nail area after exposure to remover. This keeps nails flexible and conditioned. A thin application of strengthening treatment can also help nourish nails post-removal while deterring breakage.
And there you have it – everything you need to know for salon-quality french manicure results at home from tools, shapes and lengthening, to application how-to’s, maintenance tricks, gentle removal and nourishment!
Let us know if you have any other questions in the comments! We’re happy to offer more specific product recommendations or troubleshoot any french manicure issues you may be having to help you nail the perfect tips every time.