

How to Give Yourself a Manicure at Home
Do your own manicure: We show you step by step everything you need to know. With our instructions you will be able to do your manicure in no time at all!
Do your own manicure – that’s how it works perfectly!
You love to dip your nails in bright colors? Of course, a bright red or rich pink only really comes into its own on perfectly groomed hands. But you don’t have to run to the nail studio or the beautician for that. The solution: Do your own manicure! A manicure like a pro works at home, too. We give you the best tips on how to do a manicure yourself and show you step by step instruction what you have to pay attention to when doing a manicure yourself. We also tell you how to get your nails in the best shape and which tricks you can use to make the nail polish last longer – and how you can make the nail polish dry faster. In addition, we have a few tips on what you should pay attention to during a manicure in the nail studio and how you can do something for your hands overnight with the right care. Here is the best guide for a perfect manicure in ten steps! Plus: Paint nails with your left hand – that’s how it gets perfect!
Tip 1: Finding the shape of your nail
Extremely angular was yesterday. Now the nails extend three to five millimeters beyond the fingertip, converge almond-shaped at the front and are elegantly rounded at the corners. By the way, this nail shape ensures the best stability for the nail. If the nail is too narrow and filed sharply, it bends slightly and tears – mostly where it really hurts: at the nail bed. If this shape is too unpractical for you, you can also wear it very short and file the sides a bit more angular during your next manicure. For both variants, adjust the curve of the arch to the shape of the nail bed as much as possible – this way the result will be particularly harmonious.
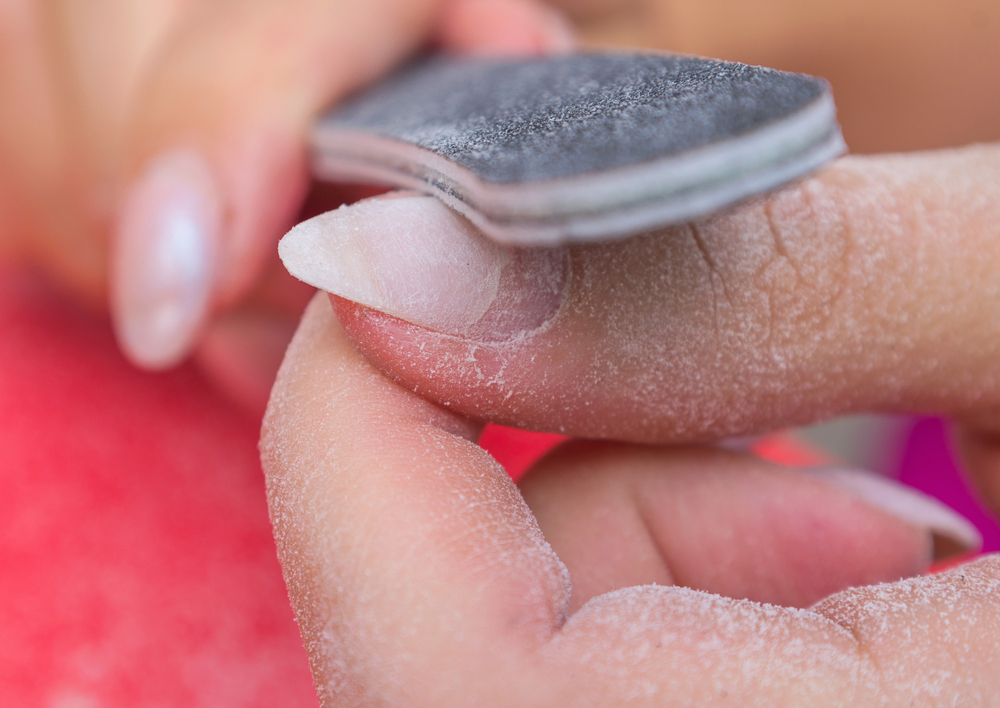
Tip 2: Filing correctly
This is how it works: It’s best not to wait until the length gets on your nerves, but to shorten your nails regularly when you do your own manicure. In general, it is better to file the nails rather than shortening them with nail scissors. With the nail file you have the most sensitive direct influence on the nail. If you have healthy nails, you can use a fine-grained flexible sapphire file in between. If the nails are brittle and splintery, however, padded files with a very fine grain will do better; they will give way under too much pressure.
Glass files are an alternative. Due to their roughened, but otherwise very smooth surface, they also gently shape soft nails, hardly wear out and can be easily cleaned under running water. Not for shortening, but for sealing the nail edges of brittle nails, it is best to use mineral files. These are files made of fine pressed silicon particles that rub into the nail when filing and seal it.
Tip 3: Applying varnish
- To ensure good adhesion of the paint, first degrease the surface with nail polish remover.
- To prevent discoloration, apply a caring base coat afterwards. Allow to dry for about five minutes.
- With light nail polish one layer is sufficient. Dark colors, on the other hand, should be applied twice during the manicure – wait about four minutes in between.
- Approximately ten minutes after the last coat, the top coat can be applied. It protects the nail polish and gives even more shine. The first few minutes after application, the varnish is particularly sensitive – so you should not touch it during this time. If an imprint does occur, products that dissolve and smooth the nail polish will help.
Tip from David Fowler, nail art designer at Maha Cosmetics, who regularly participates in the fashion shows in New York, London, Paris and Milan:
To distribute the color pigments evenly, rub the closed nail polish bottle briefly between the palms of your hands. Do not shake, otherwise small air bubbles will get into the nail polish. Then wipe the brush once and start painting: start in the middle, then the sides. To prevent the paint from running, always leave about one millimeter of space to the cuticle.
Tip 4: Color varnish for the fingers
Nail polishes are the new it bags for the fingers. Whether green or blue, nude or pink – you get what you like on your nails! Also beautiful in summer: white lacquered fingernails. Tip: By the way, you can give every nail polish a matt finish with a special top coat. Always beautiful: A colored nail polish in strong red and subtle nude shades in milk white, rosé or beige. And for those who like it pure: Either polish nails to a high gloss or brush on brightening nail whitener – it makes them look like brand new!
Tip 5: Manicure by a professional
If you do not want to do a manicure yourself, it is best to go to a nail studio. When choosing a nail studio, you should always pay attention to hygiene:
- Are your hands disinfected?
- Does the cosmetician disinfect her hands?
- Is she wearing gloves? (In some federal states regulation)
- Are tools sterilized or do they end up back in the stand immediately after use?
- Are there fresh towels?
- Are the armrests washable?
- Is the room clean – hardly any dust, no small stuff lying around?
Tip 6: Beautiful hands overnight
In the past, the hands were thickly smeared with all-purpose cream before going to bed and thin cotton gloves were pulled over them, today there are special night creams as extra nail care for the hands. With or without gloves: These creams are usually particularly rich and want to support the skin in its several hours’ rest with balancing plant extracts and oils to regenerate – the crowning touch to a manicure.
Tip 7: Against the signs of the times
Also new is the range of anti-age creams for the hands. Your secret? In addition to an extra-large portion of cell-protecting radical scavengers, they contain plenty of anti-ageing active ingredients (e.g. from olives or soya). Frequently, UVA and UVB light protection filters (SPF) are also incorporated into the cream, because one of the main factors for premature skin aging is UV light. Many anti-ageing formulations also contain mulberry or liquorice root extracts, which are said to lighten existing pigment spots slightly.
Tip 8: Using organic nail care
Natural ingredients are in vogue, such as green tea extract or smoothing argan oil. Some manufacturers even pay attention to tested ecological quality.
Whether organic or not: It is important that the nails are not forgotten when applying the cream to the hands. And that nails that splinter easily are cared for especially well – whether with nail oil or cream, is a matter of taste. Nail polish and especially the remover always dry out the nails. If you have constantly cracked, brittle nails, it is therefore better to avoid varnishing for a while or at least take regular breaks from varnishing using a nail care product.
Tip 9: How to keep nails healthy
Healthy fingernails need much zinc, vitamin A, B-vitamins and biotin. These substances are mainly found in oat flakes and turkey (zinc), carrots and apricots (vitamin A), broccoli and spinach (B vitamins), eggs and soybeans (biotin). Iron deficiency is often an indication of brittle nails, iron preparations or tablets containing biotin can help here.
Changes to the nail are often justified with deficiencies. But the famous white spots are not due to a calcium or protein deficiency, but e.g. attributed to manicure mistakes. The stains are often caused by a lack of fusion of the nail plates with air retention, which appear milky-white due to the changed light reflection. If transverse ligaments run across the nails (an indication of bacterial damage) or show streaky, dark pigmentation (in the worst case skin cancer), a doctor should be consulted.
Tip 10: Soothing hand massage
You can relax wonderfully with a quick hand massage, best given by your best friend or loved one. For this, spread some hand cream on the back of the hand and massage carefully between the hand bones from the wrist to the fingertips. Then gently press the skin between the knuckles of the hand and massage in circular movements. Then gently circle the back of the hand with your thumb. Now turn the hand upside down and knead the palm with strong, circular pressure movements up to the fingertips. Finally, gently stroke out the hand, then massage the other hand with the same movements. Your hands will thank you – they feel soft and relaxed through and through!