

The “Mason Jar” Hack to Keep Spring Onions Crisp for a Month
Nothing quite compares to the vibrant crunch and mild, peppery bite of fresh spring onions—also known as green onions or scallions. They are the perfect finishing touch to comforting soups, sizzling stir-fries, and classic baked potatoes. Yet, almost every home cook knows the familiar disappointment of reaching into the refrigerator crisper drawer only to find a sad, wilted, and slightly slimy bundle of green mush just a few days after bringing them home from the market. It feels like good produce thrown straight into the compost bin.
But what if there was a simple, practically zero-cost method to keep those delicate stalks fresh, vibrant, and crisp for up to an entire month? Enter the famous “mason jar hack.” Over the last few years, food enthusiasts across platforms like Reddit and TikTok have been raving about this brilliant storage technique. It requires no special equipment, just a standard glass jar and a few moments of preparation. Let us explore the science, the straightforward steps, and the real community experiences behind keeping spring onions reliably fresh for weeks on end.
The Anatomy of a Spring Onion (And Why They Spoil So Quickly)
To understand why the mason jar method is so incredibly effective, it helps to look at how spring onions are structured. They consist of a white bulb with a root end and hollow, tubular green shoots. These green shoots are packed with water, making them remarkably fragile. When placed directly into the typical thin plastic produce bags provided by grocery stores, the moisture from the onions evaporates but has nowhere to escape. This trapped condensation settles heavily on the delicate green leaves, accelerating decay and bacterial growth, which inevitably results in that dreaded slime.
Conversely, if left completely exposed to the dry, cold air of the refrigerator shelf, they lose their internal moisture rapidly, becoming shriveled, papery, and flavorless. The goal of optimal storage is a delicate balance: providing enough humidity to keep the plant cells plump, while preventing excess liquid from sitting on the fragile green parts.
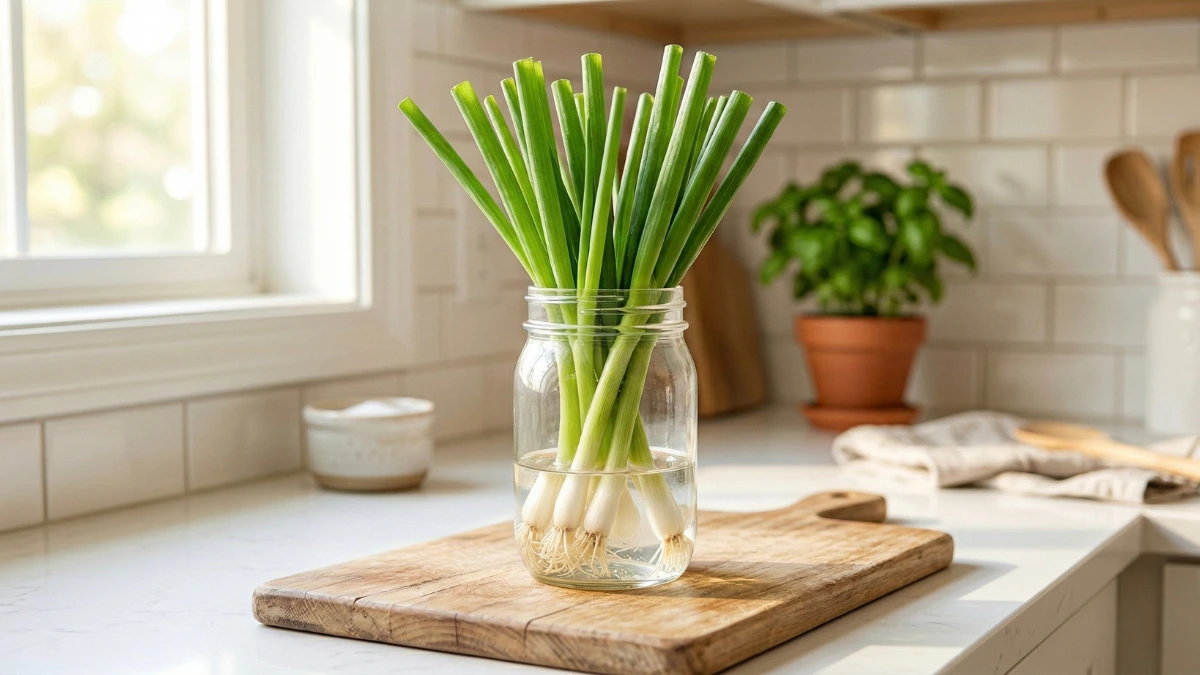
Method 1: The “Refrigerator Bouquet” (The Ultimate Crispness Retainer)
This is the most widely praised variation of the mason jar hack for long-term refrigerator storage. It treats the vegetables exactly like a bouquet of cut flowers, providing them with a constant, reliable water source while protecting the tops from the harsh, dehydrating fridge air.
Step-by-Step Instructions:
- Find the Right Vessel: Select a tall, sturdy glass mason jar. A standard wide-mouth quart jar works perfectly to accommodate a whole grocery-store bunch without crowding them together too tightly.
- Add Water: Fill the bottom of the jar with about one to two inches of cold, fresh tap water. You only need enough to submerge the white root ends; the green stalks should remain completely dry.
- Position the Onions: Place the unwashed spring onions directly into the jar, root-side down. Ensure the delicate roots are resting comfortably in the water pool.
- Form a Humidity Dome: This is the most crucial step for longevity. Take a clean plastic bag (a zip-top bag or even the original produce bag, provided it has no tears) and place it loosely over the top of the green onions and the mouth of the jar.
- Secure the Setup: Use a simple rubber band around the rim of the jar to hold the plastic bag securely in place. It does not need to be an airtight vacuum seal; it just needs to trap enough ambient humidity to prevent wilting.
- Store in the Fridge: Find a safe, low-traffic spot in the refrigerator where the tall jar will not easily tip over when reaching for other items.
Maintenance Tip: To achieve the full month of crispness, it is imperative to change the water every three to four days. Stagnant water will eventually breed bacteria and produce an unpleasant odor, effectively ruining the produce.
Method 2: The “Dry & Chopped” Jar (The Meal-Prep Favorite)
For those who prefer their ingredients prepped and completely ready for immediate cooking, the dry chopped method has gained immense traction recently on video-sharing platforms. This technique relies entirely on complete dryness and a strictly airtight environment.
Step-by-Step Instructions:
- Wash and Dry Thoroughly: Wash the spring onions completely under cold water. The absolute most important part of this entire method is the drying phase. Use a salad spinner, or gently pat them completely dry with a clean kitchen towel. Any residual moisture left on the leaves will ruin the entire batch rapidly.
- Chop to Size: Slice the green onions to your preferred size for garnishing or cooking. Discard any bruised, yellowing, or already wilting pieces during this step.
- Prepare the Jar: Take a completely dry, clean glass mason jar. Fold a piece of standard paper towel and place it at the very bottom. The paper towel acts as a moisture-absorbing sponge, pulling in any excess condensation that the cut onions might naturally release over time.
- Fill and Seal: Gently drop the chopped onions into the jar. Do not pack them too tightly; they need a little breathing room to stay crisp. Place the lid tightly on the jar to form an impenetrable airtight seal.
- Refrigerate: Keep the sealed jar in the fridge. The onions will remain crisp, vibrant, and ready to sprinkle directly onto dishes for up to three full weeks.
The Windowsill Regrowth Method: Real Community Insights
Another fascinating aspect of the mason jar hack is the well-documented ability to regrow spring onions indefinitely right on a sunny kitchen counter. By simply placing the severed root ends in a jar with an inch of water and leaving them in a bright spot, new green shoots will actively begin to emerge within just a few days. However, the online culinary community offers some realistic, grounded nuances about this seemingly endless trick.
According to widespread discussions on dedicated forums like r/Cooking and r/Frugal, treating a water jar like a permanent hydroponic garden has distinct limits. Many experienced home cooks note that while the first regrowth is vibrant and flavorful, subsequent regrowths utilizing only tap water tend to become significantly milder in flavor and somewhat thinner in overall texture.
One active community member from a popular food hack thread shared, “The first regrow isn’t too bad, but after that they start to lose their flavor quite a bit. I still like to use them as garnishes with some dishes where I don’t think the green onion flavor is as important.” Another insightful contributor pointed out the critical importance of daily water maintenance: “You need to change the water every day though or it gets slimy, and after maybe three to four uses they become weak in flavour and should be replaced.”
Transitioning to Soil for an Infinite Supply
To elegantly solve the flavor-loss issue associated with continuous water propagation, seasoned gardeners and home cooks frequently recommend a hybrid approach. Start the freshly cut roots in a mason jar of water on the windowsill until they develop strong, thick, and healthy root systems (which usually takes about a week). Once the roots are visibly established, transplant them directly into a small pot of nutrient-rich potting soil.
By moving them to a soil environment, the plants seamlessly regain access to the essential minerals and nitrogen that standard household tap water simply cannot provide. Keeping a small pot of soil on the kitchen windowsill or an outdoor patio ensures a truly robustly flavorful supply of crisp green garnishes, bypassing the refrigerator storage dilemma entirely.
Food Safety Considerations
When utilizing any water-based storage or regrowth method for fresh produce, it is absolutely critical to observe basic food safety guidelines to maintain both health and ingredient quality. The stagnant water at the bottom of a mason jar is a prime environment for rapid microbial activity if left unchecked. If the water ever becomes cloudy, yellowed, or develops a strong sulfuric odor, it is best to discard the onions entirely and thoroughly sanitize the jar with hot, soapy water before its next use.
Furthermore, if relying on the dry chopped method, inspect the glass jar periodically. If heavy condensation builds up visibly on the inside of the glass, simply open the jar, carefully wipe away the moisture with a clean cloth, and replace the bottom paper towel with a fresh one. Always wash hands thoroughly and use clean utensils when extracting chopped onions from the jar to prevent introducing outside bacteria into the perfectly controlled environment.
The Final Verdict
Saying a permanent goodbye to slimy, wasted produce is surprisingly easy. Whether opting for the classic refrigerator bouquet method to keep entire stalks whole and perfectly hydrated, the dry chopped method for incredibly quick weekday meal prep, or the charming windowsill regrowing technique for a continuous household supply, the humble glass mason jar proves to be a true kitchen champion.
By understanding the simple underlying science of moisture control and diligently following these practical, community-tested steps, anyone can effortlessly enjoy the bright, crisp flavor of fresh spring onions for a full month. It is a wonderfully small adjustment to a standard grocery routine that yields deliciously consistent, waste-free results.