

Why You Should Use a Cheese Grater on Cold Butter for Baking
Have you ever wondered why some pie crusts shatter beautifully into a million delicious flakes, while others turn out dense, heavy, and disappointing? The secret often lies in the exact temperature and texture of the butter. If a recipe demands cold butter, treating it right is the difference between a dense rock and a light, airy masterpiece. Today, the focus is entirely on a simple household tool that transforms baking: the humble cheese grater.
By applying practical, problem-solving methods and relying on real-world baking experiences, this guide will provide actionable knowledge, entirely free from superficial fluff. Let us dive into the science, the step-by-step technique, and the community-tested advice that will elevate any baking endeavor.
The Science of Flaky Pastry: Why Cold Butter Matters
Before grabbing the grater, it is essential to understand why cold butter is the foundational element of excellent baking. When making biscuits, scones, or pie dough, the primary goal is to form a dough where tiny, distinct pieces of solid fat remain suspended within the flour mixture.
When this carefully prepared dough enters a hot oven, a fascinating physical process occurs. The water content trapped inside the cold butter rapidly turns into steam. This steam pushes the layers of flour apart, producing distinct air pockets. These pockets are precisely what give laminated doughs, scones, and pie crusts their highly sought-after flaky texture. If the butter melts into the flour before baking—often caused by the heat of human hands or an excessively warm kitchen—the flour absorbs the fat entirely. The result is a crumbly, shortbread-like texture rather than distinct, airy layers.
Therefore, speed and temperature are critical factors. The traditional methods of incorporating fat—such as snapping it with your fingers or tirelessly working a pastry blender—can be tedious and counterproductive. The longer human hands touch the dough, the warmer the butter gets. This is exactly where the grater method proves its immense value.
Why Traditional Methods Fall Short
Many classic recipes instruct the baker to “cut” the butter into the flour until the mixture resembles coarse crumbs. While a pastry cutter (or pastry blender) is a valid tool, it requires significant elbow grease and time. Pressing the metal blades through a rock-hard block of butter is strenuous, and during the minutes spent mashing the ingredients together, the ambient room temperature is already softening the fat.
Using fingers is even more risky. Human body temperature sits around 37°C (98.6°F), which is more than warm enough to rapidly melt butter. By the time the butter is rubbed into pea-sized pieces, it might already be too soft to form those essential steam pockets in the oven.
Grating the butter eliminates these risks entirely. It produces perfectly uniform, delightfully thin shreds of fat in a fraction of the time. These thin shreds mix into the flour almost instantly with a simple toss of a spatula, keeping the ingredients wonderfully chilled and the hands completely clean.
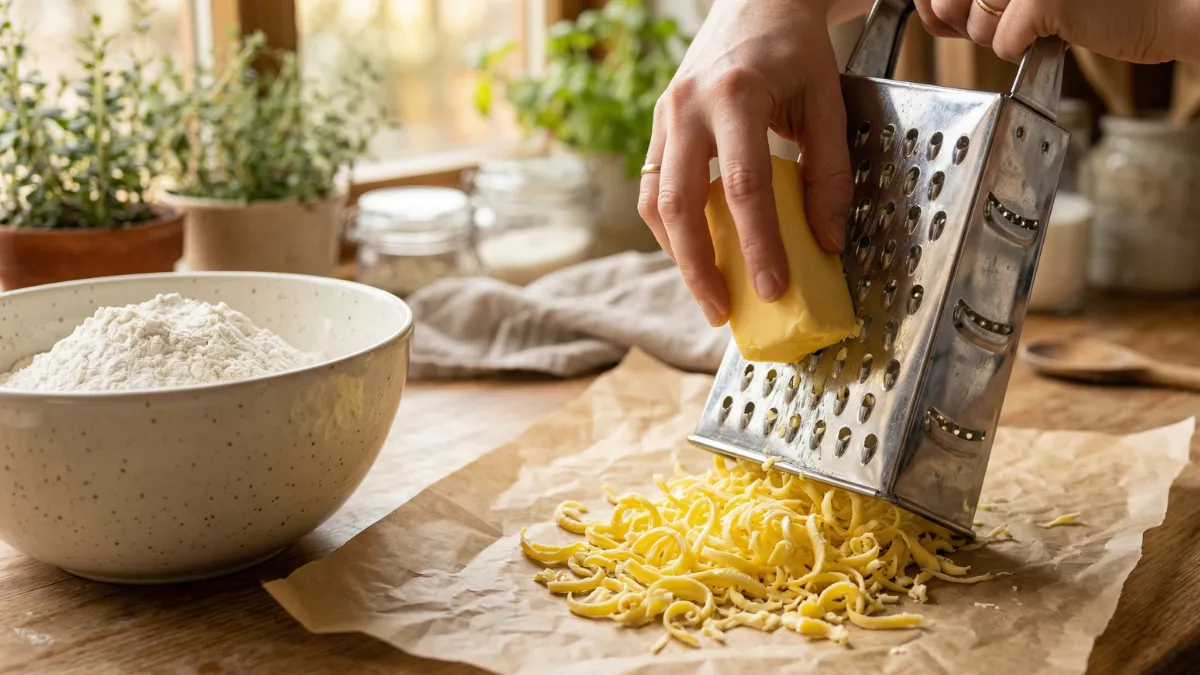
The Cheese Grater Method: A Step-by-Step Guide
Mastering this technique is joyful and straightforward. Follow these steps to achieve pastry perfection:
Step 1: Chill Everything Success begins with temperature control. Place the butter in the freezer for exactly 15 to 30 minutes before starting. It should be exceptionally cold but not frozen completely solid, as rock-hard butter can be dangerous to grate. For an extra layer of insurance, place the mixing bowl and the measured flour into the refrigerator as well.
Step 2: Prepare the Grater Use a standard box grater, specifically the side with the largest holes (the one typically used for cheddar or mozzarella). Recently, culinary experts and television chefs have popularized a brilliant modern hack: rest the grater securely on a piece of silicone-coated parchment paper. This provides a completely non-stick surface, making it incredibly easy to lift the paper and funnel the butter shreds directly into the chilled bowl without losing a single piece.
Step 3: Grate with Care Hold the block of butter by its wrapper to prevent the warmth of your hand from melting the bottom half. Use firm, downward strokes to shred the butter. Work quickly and efficiently.
Step 4: Toss, Do Not Knead Once all the butter is shredded, use a cold metal spoon or a silicone spatula to gently toss the butter ribbons into the dry ingredients. Ensure every single shred is coated in flour. This prevents the pieces from clumping back together into a single mass.
Step 5: Hydrate and Form Add the thoroughly chilled liquid (such as ice water or cold buttermilk) exactly as the recipe directs. Gently fold the dough together until it just barely combines. Avoid the temptation to over-mix!
Real Community Wisdom: Reddit Hacks and Safety Tips
When looking for authentic, field-tested advice, the baking communities on platforms like Reddit are invaluable resources. Over on the r/AskBaking community discussions, real bakers frequently share their trials and triumphs regarding this exact method.
A prominent discussion revolves around the potential pitfalls of the grater technique. For instance, a Reddit user named CatfromLongIsland shared a valuable warning about grating frozen-solid butter directly onto a sharp box grater, which unfortunately led to a painful knuckle injury. To prevent this, they shared an ingenious workaround: grate cold butter straight from the refrigerator onto a plastic tray lined with wax paper. Next, flatten the shreds into a single, even layer, and place that tray in the freezer for 30 minutes. This brilliant method yields the exact same frozen, flaky results without risking any scraped fingers on sharp metal.
Another resourceful baker in the same thread, BeachmontBear, suggests abandoning the box grater altogether. Instead, they use a standard vegetable peeler to shave thin, delicate slices of cold butter directly into the bowl. This alternative makes cleanup significantly easier and keeps fingers far away from sharp grating edges. Integrating these community-tested tips ensures a safer, more efficient baking session.
Baking with Halal Integrity: Mindful Ingredient Swaps
When perfecting pastries and baked goods, maintaining Halal dietary standards is of the utmost importance. Traditional Western baking recipes often rely on ingredients that compromise these strict principles. It is entirely possible to ensure every baked good remains 100% Halal without sacrificing flavor, aroma, or texture.
1. The Vanilla Extract Dilemma Most classic baking recipes, from scones to sweet pie crusts, call for pure vanilla extract. However, in regions like the United States, regulations require pure vanilla extract to contain a minimum of 35% alcohol. For Muslims adhering strictly to Halal guidelines, this renders standard liquid vanilla extract impermissible.
- The Halal Solution: Swap alcohol-based extracts for Halal-certified alternatives. Glycerin-based vanilla extract uses plant-based vegetable glycerin instead of alcohol as the carrier solvent, maintaining a rich, deep flavor profile. Alternatively, use vanilla bean paste or vanilla powder. According to Medical News Today, vanilla powder is highly concentrated and unaffected by high heat, making it perfect for baking. Scraping the seeds directly from a whole vanilla bean pod provides the most robust, authentic flavor without any alcohol involvement whatsoever.
2. Choosing the Right Fat for Flakiness While this guide focuses on grating butter, some traditional pie crust and southern biscuit recipes enthusiastically suggest using lard or unspecified animal shortenings to achieve extra flakiness. Lard is rendered pig fat and is strictly Haram.
- The Halal Solution: Always stick to pure, unsalted Halal-certified butter. If a recipe absolutely requires shortening to stabilize the dough, ensure it is a 100% vegetable-based shortening. High-quality butter not only guarantees Halal compliance but also provides a far superior, rich dairy flavor that processed vegetable oils or animal fats simply cannot replicate.
3. Hidden Additives in Processed Ingredients Be exceptionally mindful of store-bought pie doughs or pre-mixed baking glazes. These convenience items frequently contain emulsifiers (like certain complex E-numbers) derived from non-Halal animal sources. Crafting pastries from scratch using pure flour, water, Halal butter, and natural Halal flavorings is always the safest, most wholesome, and most delicious route.
Best Recipes to Master the Grated Butter Technique
Once this technique becomes a habit, a whole new world of baking opens up. Here are the best culinary applications to test out the newly acquired grater skills:
- Buttermilk Biscuits: The ultimate test of flaky layers. Grated butter ensures those tall, towering biscuits that effortlessly peel apart into distinct, buttery sheets.
- Fruit Scones: Whether crafting a classic English scone or a cranberry-orange variation, shreds of cold butter ensure the interior remains remarkably light and tender, rather than dense and heavy.
- Classic Pie Crust: Achieving a professional-level pie crust at home is entirely possible. Grated butter guarantees a crust that is both structurally sound enough to hold heavy fruit fillings and delicate enough to shatter upon the first bite.
- Streusel and Crumb Toppings: For muffins or Dutch apple pies, tossing grated butter into sugar, cinnamon, and flour produces the most uniform, perfectly textured crumb topping without turning the mixture into a greasy paste.
Troubleshooting Common Grating Issues
Even with the best techniques, minor hiccups can occur in the kitchen. Here is how to solve them swiftly:
- The butter shreds are clumping together: This happens if the butter sits at room temperature for too long after grating. Immediately toss the shreds into the chilled flour mixture to coat them, which acts as a protective barrier against clumping.
- The grater is difficult to clean: Butter is naturally greasy. To easily clean the box grater, run it under very hot water immediately after use to melt the fat away, then scrub with a soapy brush. Do not let the butter dry onto the metal.
- The dough feels excessively dry: Different brands of flour absorb moisture differently. If the dough refuses to come together after cutting in the butter, add ice water exactly one tablespoon at a time until it just barely holds its shape.
Conclusion: Embrace the Chill
Baking is a wonderful science, but it does not have to be an intimidating one. By simply changing the way cold butter is handled, the quality of homemade baked goods will skyrocket. The cheese grater is no longer just for cheddar; it is the ultimate tool for achieving professional bakery results right in a home kitchen. Remember to keep the ingredients icy cold, work efficiently, embrace the helpful tips from the baking community, and always choose wholesome, Halal-certified ingredients. Happy baking, and enjoy the deliciously flaky results!